Outlook issues in the June 2017 security updates

The problems stems from June 2017 security updates. Microsoft is investigating the issues and will update this page when a fix is available. In the meantime, please use the workarounds suggested for each issue. They have categorized it in seven scenarios.

Issue#1: Error when opening an attachment is an email, contact, or task formatted as Rich Text.

This issue affects Outlook 2007 and Outlook 2010.

When you open an attachment in an email, contact, or task formatted as Rich Text you get the following error:outlook-2010-2007-this-program-used-to-create-is-outlook-not-installed

You may also see:

STATUS: WORKAROUND

  • Forward the email to yourself and then open the attachments from the forwarded email.
  • Change the email format to HTML, or Text format.
  • Save the attachments to your computer, using one of the following methods, then open them from the saved location: Drag and drop the attachments to your desktop.
    Go to File > Save Attachments.
    Copy and paste the attachment to your computer.

Issue#2: Opening Mail Attachment warning when opening an attachment that includes consecutive periods

This issue affects Outlook 2007, Outlook 2010, Outlook 2013, and Outlook 2016.

When opening an attachment that includes consecutive periods (…), or an exclamation point (!), the files are blocked and you receive an Opening Mail Attachment warning.
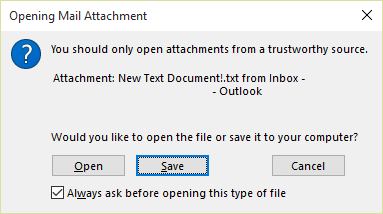
Or if an email message includes an attached email message, and the attached email message’s subject line ends with an unsafe file name extension as listed in the Blocked attachments in Outlook, the email attachment will be blocked for recipients.

STATUS: WORKAROUND

If you get the Opening Mail Attachment warning, and you’re sure the attachment was sent from a trusted source, proceed to Open or Save the attachment.

If the file is blocked because of a potentially unsafe file extension, ask the sender to save the email message to their computer and rename its subject line so that it does not end with an unsafe file name extension. Then, attach it to the email message and resend.

Issue#3: Error when setting ShowLevel1Attach to allow Outlook to display Level 1 attachments

This issue affects Outlook 2013 and Outlook 2016.

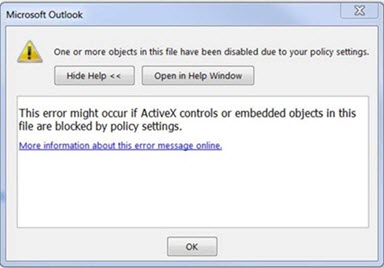
If you set ShowLevel1Attach to allow Outlook to display Level 1 attachments, you may see the error: “One or more objects in this file have been disabled due to your policy settings”.

WARNING: Typically, Level 1 attachments are blocked. If you have enabled this policy, users can see Level 1 attachments in Outlook. If you use any of the workarounds to open the files, please make sure they are safe to open. See: Information for administrators about e-mail security settings in Outlook 2007.
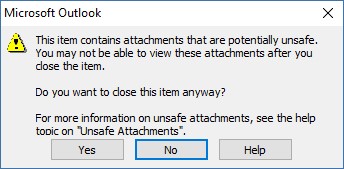
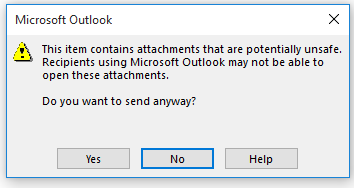
If you set ShowLevel1Attach to allow Outlook to display Level 1 attachments, and you send an email with an attachment you may see this message: “This item contains attachments that are potentially unsafe.  Recipients using Microsoft Outlook may not be able to open these attachments.”
STATUS: WORKAROUND

  • Change the email format to HTML, or Text format.
  • Save the attachments to your computer, using one of the following methods, then open them from the saved location:
    • Drag and drop the attachments to your desktop.
    • Go to File > Save Attachments.
    • Copy and paste the attachment to your computer.

Issue#4: VBScript does not run or you receive malicious code warning when using a custom form for Outlook

This issue affects Outlook 2007, Outlook 2010, Outlook 2013, and Outlook 2016.

When you use a custom form that you have created for Outlook, you see the following two symptoms:

  • VBScript does not run.
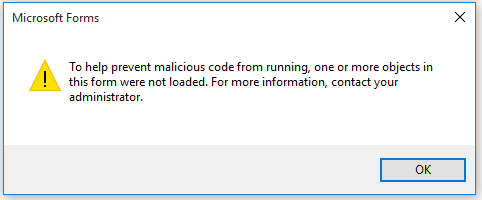
  • You get a malicious code warning: 

STATUS: INVESTIGATING

We’re investigating this issue and will update this page when a fix is available.

Issue#5: “Something went wrong….” or “Search results may be incomplete” error when searching in Outlook

This issue affects all Outlook versions on Windows 7, Windows 8, Windows 10.

When searching in Outlook, you get this error: “Something went wrong and your search couldn’t be completed.”, or “Search results may be incomplete because items are still being indexed“.

And you’ll see this Event Log warning:

STATUS: WORKAROUND

Until the Windows Update fix release on 6/27, you can set a registry key that will cause Outlook to stop using the local Windows Search service. When this registry key is set, Outlook will use its own built-in search engine. The built-in search will display the message below to indicate it is not using the Windows Search service.

Disable Windows Desktop Search Service for Outlook:

NOTE: The following steps show you how to modify the registry. However, serious problems might occur if you modify the registry incorrectly. Please make sure that you follow these steps carefully. For added protection, back up the registry before you modify it. Then, you can restore the registry if a problem occurs. For more information about how to back up and restore the registry, see this article.

  • Open Registry Editor.
  • Go to: Computer\HKEY_LOCAL_MACHINE\SOFTWARE\Policies\Microsoft\Windows\Windows Search
  • PreventIndexingOutlook
  • Set DWORD: 1

Detailed Instructions:

  1. Click Start, click Run, type regedit in the Open box, and then click OK.
  2. Locate and then click the following subkey in the registry:
    HKEY_LOCAL_MACHINE\SOFTWARE\Policies\Microsoft\Windows
  3. On the Edit menu, point to New, and then click New Key and name the key Windows Search.
  4. Click on the new key Windows Search.
  5. On the Edit menu, point to New, and then click DWORD Value.
  6. Type PreventIndexingOutlook for the name of the DWORD, and then press Enter.
  7. Right-click PreventIndexingOutlook, and then click Modify.
  8. In the Value data box, type 1 to enable the registry entry, and then click OK.
  9. Note to disable the PreventIndexingOutlook setting, type 0 (zero), and then click OK.
  10. Exit Registry Editor, and then restart Outlook.

Issue#6: iCloud fails to load properly in Outlook 2007

iCloud fails to load properly in Outlook 2007.

When accessing Calendar, Contacts, or Tasks in Outlook 2007, you get the following error:

The set of folders cannot be opened. MAPI was unable to load the information service C:\PROGRA~2\COMMON~1\Apple\Internet Services\APLZOD.dll. Be sure the service is correctly installed and configured.”

STATUS: WORKAROUND

The loading of unregistered MAPI services has been disabled by default to make Outlook more secure.

WARNING: This workaround may make your computer or your network more vulnerable to attack by malicious users or by malicious software such as viruses. Microsoft does not recommend this workaround but is providing this information so that you can choose to implement this workaround at your own discretion. Use this workaround at your own risk.

If you have trusted applications that depend on being loaded in this manner, you can re-enable those applications by setting the following registry key:

REG_DWORD HKEY_CURRENT_USER\Software\Microsoft\Office\12.0\Outlook\Security\AllowUnregisteredMapiServices

You can use the following registry subkey to apply the registry setting as a domain policy:

HKCU\Software\Policies\Microsoft\Office\12.0\Outlook\Security\AllowUnregisteredMapiServices

Value 0 (default): Block loading of unregistered MAPI services. This is the recommended setting to avoid unexpected execution of unknown code.

Value 1: Enable loading of unregistered MAPI services.

IMPORTANT: The following steps show you how to modify the registry. However, serious problems might occur if you modify the registry incorrectly. Please make sure that you follow these steps carefully. For added protection, back up the registry before you modify it. Then, you can restore the registry if a problem occurs. For more information about how to back up and restore the registry, see this article.

To make these registry changes, follow these steps:

  1. Click Start, click Run, type regedit in the Open box, and then click OK.
  2. Locate and then click the following subkey in the registry:HKCU\Software\Microsoft\Office\12.0\Outlook\Security\
  3. On the Edit menu, point to New, and then click DWORD Value.
  4. Type AllowUnregisteredMapiServices for the name of the DWORD, and then press Enter.
  5. Right-click AllowUnregisteredMapiServices, and then click Modify.
  6. In the Value data box, type 1 to enable the registry entry, and then click OK.

    NOTE: To disable the AllowUnregisteredMapiServices setting, type 0 (zero), and then click OK.

  7. Exit Registry Editor, and then restart the computer.

Vulnerability information (applies to all versions)

MAPI does not validate that a provider’s DLL that it is requested to load is registered correctly in MapiSVC.inf or even that it comes from the local machine. This can be exploited by creating a file together with an OLE object in such a way to cause MAPI to load a DLL from a network share when the OLE object is activated. This can allow arbitrary code execution to occur.

Issue#7: When printing a specific iframe or frame in a web page, the print output may be blank, or text is printed with a 404

This issue affects all Outlook versions on Windows 7, Windows 8, Windows 10.

When you print a specific iframe or frame in a web page, the print output may be blank, or text is printed that resembles the following:

NOTE: A frame is a part of a web page or browser window that displays content independent of its container. A frame can load content independently.

This problem has also been observed in both Internet Explorer 11, and in applications that host the IE Web Browser Control.

STATUS: INVESTIGATING

There is currently no workaround for this issue. However, if you print the entire web page, it will print correctly. We’re investigating this issue and will update this page when a fix is available.

Option: Uninstall Recent Microsoft Update

It is not recommended to uninstall the update as it applies to some other issues but if none of the workarounds help then you have this option until a new fix is releases.

For Outlook 2010:

  1. Go to the Control Panel – Programs and features and select view installed updates on the left.
  2. Search or look for KB3203467 and highlight it and uninstall it.

For Outlook 2007:

  1. Go to the Control Panel – Programs and features and select view installed updates on the left.
  2. Search or look for KB3191898 and highlight it and uninstall it.

Have any questions?

Call us at: 856-745-9990 or visit: https://southjerseytechies.net/

South Jersey Techies, LLC is a full Managed Web and Technology Services Company providing IT Services, Website Design ServicesServer SupportNetwork ConsultingInternet PhonesCloud Solutions Provider and much more. Contact for More Information.

To read this article in its entirety click here.

Seven ways to sort and view Outlook email by accounts

Outlook


Most users manage more than one e-mail account. Outlook 2010 and 2013 automatically create individual folders for each account. If you’re still using Outlook 2007 or earlier, you can simulate this convenience, but you’ll have to set it up yourself. In this article, I’ll show you seven ways to sort or view email messages by their accounts. I’ll include instructions for 2010 and 2013; even if you need to sort by accounts, you might want to use these methods to sort by other criteria.

1. Create account-specific folders

You can simulate the account-specific Inbox configuration in Outlook 2010 and 2013 by creating new download folders for each account. Doing so is easy, and it’s probably the best way to manage multiple accounts in Outlook 2007 and earlier. You’ll create an account-specific folder as follows:

  1. Choose Account Settings from the Tools menu in Outlook 2007. (In Outlook 2010 and 2013, Account Settings are on the File tab.)
  2. Select the POP3 account you want to reconfigure.
  3. Click the Change Folder button. (This button isn’t available for IMAP accounts.)
  4. Use the resulting dialog to identify the folder you want to download your POP3 account mail to (Figure A) or create a new folder if it doesn’t already exist.
    Figure A

    Figure A
  5. Click OK and then Close.

After making this change, Outlook will download that account’s mail into the specified folder. You can create specific folders for every POP3 account you have.

Unlike the 2010/2013 configuration, all of your messages download into the same .pst file. In addition, Outlook will save copies of all sent messages in the default account, not in the account-specific folder.

2. Use a rule

Rules have been around for a long time. They’re commonly used to manipulate mail as it arrives. You can also use a rule to manipulate mail received from a specific account as follows:

  1. Select the Inbox.
  2. In Outlook 2003 and 2007, choose Rules and Alerts from the Tools menu. In Outlook 2010 and 2013, click the File tab and click Manage Rules & Alerts in the Account Information section. (Outlook 2010 and 2013 users won’t need this rule unless they choose to combine all accounts into the same Inbox. Although this is unlikely, I’m including the instructions to be as comprehensive as possible.)
  3. Click New Rule on the E-Mail Rules tab.
  4. In Outlook 2003 and 2007, use Check messages when they arrive. Outlook 2010 and 2013 users, select Apply rule on message I receive.
  5. Click Next.
  6. Check the through the specified account option.
  7. Click the specified link in the bottom pane (Figure B).
    Figure B

    Figure B
  8. Choose the account from the resulting drop-down, click OK, and then click Next.
  9. Check move it to the specified folder.
  10. Click the specified folder link in the bottom pane. Then, identify the folder to which you want to download mail from the specified account (Figure C), and click OK. You can create a folder at this point, if necessary.
    Figure C

    Figure C
  11. Click Next twice (you won’t want to include any exceptions to the rule most likely).
  12. Give the rule a name. I recommend a name that includes the account’s name, such as “Move message for account name.”
  13. Turn the message on if necessary.
  14. Select Run this rule now on messages already in “Inbox” (Figure D) if you want Outlook to move existing messages into the folder. Doing so can save a lot of time.
    Figure D

    Figure D
  15. Click Finish, and then click OK.

This rule works similarly to the account-specific folder tip in #1. If you’re not familiar with rules, take a minute to review the many conditions and actions; you can do a lot with rules.

3. Use the Account view option

You can use a view property to sort message by their accounts. In Outlook 2003 and 2007, choose Arrange By from the View menu and then select E-mail Account. The change is immediate, but its helpfulness in a busy Inbox is limited. You’ll probably find it more useful to combine this setting with other sorting methods, such as search folders and filters. After creating the main sort, apply this setting to further define the results by account. In addition, you can quickly apply this setting to all folders by modifying the default Messages view and then copying it. (For more complete instructions on applying this setting to all folders, read “Pro tip: Use standard and custom views to personalize an Outlook folder.”)

In Outlook 2010 and 2013, you can combine individual .pst files into one and download all mail into the same Inbox. You’ll find this setting in the Arrangement gallery on the View tab. (Click the More button to see all of the settings.)

4. Sort by the E-mail Account column

Similar to changing a view’s configuration, you can sort multi-account folders by accounts. You might find this alternative easier or preferable to creating or modifying a view. To add this column, do the following:

  1. Right-click the title bar (in the Mail window).
  2. Select Field Chooser from the resulting dialog.
  3. Choose All Mail Fields from the drop-down.
  4. Drag E-mail Account to the title bar (Figure E) and release it. If it’s not where you want it, drag it accordingly.
    Figure E

After adding the E-mail Account column, you can click it to sort all mail in the folder by their accounts.

5. Use a view

Both the Account view and adding the E-mail Account column will sort messages by accounts, but you’ll still see mail for all of your accounts. If you want to view mail from a single account, create a view. Then you can apply views to filter messages accordingly. To view messages from a single account using a filtered view, do the following:

  1. In Outlook 2003, choose Arrange By from the View menu. In Outlook 2007, choose Current View from the View menu. In Outlook 2010 and 2013, click the View tab and choose Manage Views from the Change View drop-down in the Current View group.
  2. Click New.
  3. Give the view a name. I recommend naming the view for the account.
  4. Select Table and All Mail and Post Folders (the default).
  5. Click OK.
  6. Click Filter.
  7. Click the Advanced tab in the resulting dialog.
  8. Choose All Mail fields from the Field drop-down, and then choose E-mail Account (Figure F).
    Figure F

  9. Choose is (exactly) from the Condition drop-down.
  10. Set the Value using the account’s name (Figure G).
    Figure G

  11. Click Add to List.
  12. Press OK twice.
  13. Click OK to close the Manage All Views dialog and return to the Mail window.

Repeat the above steps to create a custom view for each account. To view all the messages for only one account, choose the appropriate view from the Change View drop-down (in the Current View group).

6. Sort into search folders       billionphotos-1647683

Similar to filtering with a view, you can display account-specific mail in a search folder. The difference, of course, is the difference between a view and a folder. The view merely filters mail to determine what you see, but all of the messages are still there. A search folder contains links to only those messages that meet the folder’s search criteria. To create a search folder for this purpose, do the following:

  1. In Outlook 2003 and Outlook 2007, choose New from the File menu, and then select Search folder. In Outlook 2010 and 2013, click the Folder tab and then click New Search Folder in the New group.
  2. In the resulting dialog, choose Create a custom Search Folder (in the Custom section at the bottom of the list).
  3. Click Choose, and then name the new folder. I recommend that you name the folder for the account.
  4. Click Browse, exclude folders and subfolders you don’t want to search, and click OK. Doing so will speed up your search.
  5. Click Criteria, and then click the Advanced tab.
  6. Choose All Mail Fields from the Field drop-down and then choose E-mail Account.
  7. Choose is (exactly) from the Condition drop-down.
  8. Set the Value using the account’s name.
  9. Click Add to List.
  10. Click OK four times.

Create a folder for each of your accounts. To read the mail for an account, open that account’s search folder.

7. Format by account

Sometimes, a visual clue is all you need. When this is the case, apply a format to distinguish accounts as follows:

  1. In Outlook 2003 and 2007, choose Arrange By from the View menu. Choose Custom, and then select Automatic Formatting. In Outlook 2010 and Outlook 2013, click the View tab. Then, click View Settings in the Current View group. In the resulting dialog, click Conditional Formatting.
  2. Click Add and name the new View. I recommend that you name the view after the account.
  3. Click Condition.
  4. Click the Advanced tab.
  5. Choose All Mail Fields from the Field drop-down and then choose E-mail Account.
  6. Choose is (exactly) from the Condition drop-down.
  7. Set the Value using the account’s name.
  8. Click Add to List, and then click OK.
  9. In the Conditional Formatting dialog, click Font and change the formats accordingly. Changing the font’s color is a common choice.
  10. Click OK three times to return to the Mail window.

Outlook will update the folder immediately by applying the formats for the specified account.

About the .pst files

It might never matter to you, but should .pst management become an issue, keep the following in mind:

  • Outlook 2010 and 2013 download POP3 mail into separate (dedicated) .pst files. For each account, you’ll have a dedicated Inbox.
  • Outlook 2007 and earlier download all mail into the same .pst file, regardless of the changes you make for viewing the mail via the interface.

sjt


Have questions?

Our small business team is here to help.
Call us at: 856-745-9990

South Jersey Techies, LL C is a full Managed Web and Technology Services Company providing IT Services, Website Design ServicesServer SupportNetwork ConsultingInternet PhonesCloud Solutions Provider and much more. Contact for More Information.

 To read this article in its entirety click here.

10 Missing Features from Outlook 2013

Takeaway:  Ten popular features that are missing from Outlook 2013.
outlook

Right-click Lookup

Outlook 2013 does not include ‘Lookup’ when right-clicking a word.  This feature is still available:

            1. Open a new e-mail message.
            2. Click inside the message body.
            3. Select the Review tab.
            4. Select ‘Research’ in the Proofing section.
            5. Press [ALT] and select the word or phrase that you would like to look up.  Also, you can type the word or phrase in the ‘Search For:’ box.

Right-click AutoCorrect

Outlook 2013 does not include ‘AutoCorrect’ when right-clicking a word. This feature is still available but will have to be entered manually.  (Right-click Add to Dictionary is still available using a right-click.)

Import/Export Formats

Outlook 2013 only allows .pst (Outlook’s data file format) and comma-delimited data as import formats.  Previous versions allowed many file formats to be imported and exported.

Meeting Workspace

Outlook 2013 does not include Meeting Workplace.  Also, this feature cannot be added to the Quick Acces Toolbar.  Meeting Workplace was a website that supplied Attendees, Date, Time and Location for meetings.

Outlook Mobile Service

Outlook 2013 does not support Outlook Mobile Service (OMS).  OMS let you create and send text/multimedia messages to a mobile device from Outlook, similar to e-mail(s).

Windows Search

Windows 8 does not support using Windows Search to search Outlook e-mail. Previously, you could using Windows Search without opening Outlook to search for e-mail(s).

Calendar Publishing

Outlook 2013 does not support Calendar Publishing; the replacement is Office.com.  Microsoft cut service for previous versions on April 5, 2014.

Drag-and-Drop

Office 2013 does not support “dragging-and-dropping” e-mail(s) in the To-Do bar to create a calendar entry.  You can “drag-and-drop” an e-mail to a shortcut to create a calendar or task entry.

Notes and Journal

Office 2013 supports ‘Notes’ but ‘Journal’ is no longer available.

Suggested Contacts

Office 2013 does not support Suggested Contacts.  Suggested contacts gathers contacts that are not in your list and suggests them.