Archives December 2012

Are Your Emails Too Long?


Your Emails Are Too Long: Here’s How to Fix Them

Long Emails Don’t Get Read

You may take email for granted. However, effective email communication is as much a skill as anything else. When used effectively, email can be a powerful tool. However, one of the top email inefficiencies is message length. One of the top reasons your email isn’t getting read is because it is too long. Writing long emails doesn’t mean you are getting more work done. As people are fighting to get their inbox to empty, the last thing they want to do is read a multi-page rambling email.

Keep Those Emails Short

Resist the urge to write long and drawn out messages. If you find yourself writing long responses, you probably should be having a conversation, not an email writing contest. The shorter and tighter your email messages, the better chance that they will be read, understood and acted upon.

Here are 10 Reasons That Your Emails Are Too Long

  1. You don’t know what you are trying to say. It’s like when someone calls you and says, “What’s up?” Um, I don’t know… you called me. Hold that email until you have something specific to say or ask.
  2. You don’t know what you are talking about. This is similar to when people endlessly talk in meetings to cover up their lack of information. Writing more isn’t going to cover up the fact that you are lacking knowledge. This practice occurs in many companies when individuals send emails to “appear” busy.
  3. Your signature is unnecessary. Your half-page signature doesn’t need to be on all of your emails. Do you send emails with a 1 word response and then half of a page of signature? As well, please lose the attached graphic and cute quote.
  4. You are writing a book. Emails are not books. If there is additional information, attach supporting documents. If you are putting a large table in your email, you should stop and consider whether it should be in an attachment.
  5. You are spamming. This happens often in larger corporations. Employees feel the need to send each other lengthy updates of what they have been doing. And it’s not just the remote employees.
  6. You are rambling. Don’t write a 2-page email to ask a 1-line question. Be direct. Thanks.
  7. You are forwarding a mess. Instead of taking the time explain, you just forward your email stream. Ever get one of those, “See below..!” messages. Um, I don’t want to read the 45 page back-and-forth that you participated in.
  8. It shouldn’t be an email. Don’t send an email when it should be a meeting or a phone call. Sometimes email isn’t the right medium for your message. If it is taking more than a few lines to explain, then go talk to the person you need to communicate with.
  9. It should be multiple emails. Here is a good one. One boss combines all of the team items into one email. You may think this is an attempt at efficiency, however combining multiple emails into one doesn’t work for everyone involved. And it creates great aftermath when people “Reply All.”
  10. You don’t edit your emails. After you write an email, you should edit it before sending. Besides the obvious spelling and grammatical errors, you should be editing for content, meaning, and conciseness. Another good thumb-rule: the number of times you should re-read an email before sending is equal to the number of people you are sending it to. (And yes, this rule scales.)

Make Sure Your Email Gets to the Point

In today’s high-speed communication, no one wants to read overly long email messages. If your emails are brief and to the point, your recipients will be more likely to get the point. Remember that short and sweet will beat the 3-page email every time.

Customize Outlook’s To-Do Bar

Three tips for making Outlook’s To-Do bar work for you

Takeaway: If you’re tempted to hide Outlook’s new To-Do bar, stop! Customize it and put it to work for you.
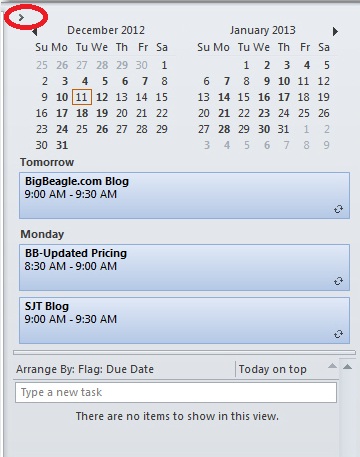
Outlook 2007 introduced the To-Do bar -a means of tracking appointments and tasks with a quick glance. The To-Do bar shows a Date Navigator with upcoming appointments and a list of tasks, but some users don’t take full advantage of it.

Most users spend most of their time in their Mail window and having quick access to other features, via the To-Do bar, without leaving their Inbox is not only convenient, it’s efficient. For instance, the Date Navigator displays upcoming appointments without opening your Calendar. If you decide to open your Calendar, simply click a date. You can also add new tasks, accept or decline meetings, and so on. These three tips will help you learn your way around so that you can customize the feature to suit your work habits.

1: Don’t dismiss it

Outlook displays the full bar, but you can free up space by collapsing it – don’t delete it! To minimize the bar, click the arrow in the top-left corner. You can then expand and collapse the bar, to suit your needs.

2: Customize the settings
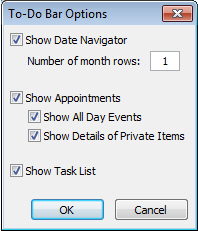
To change the default arrangement of the Date Navigator, appointments, and tasks, right-click the To-Do bar’s header. At this point, you can also turn off the display for all three To-Do bar components, but don’t to so right now. Instead, choose Options. In the resulting dialog box, you can determine the display options that work best for you. For example, you can display more than one month, hide private items, and so on.


3: Customize the Task list

Most of us will use the Task list more than the other two components, so getting this part right will really make you happy. To customize the Task list component, right-click the column header area (Arrange By) and choose View Settings (Custom in Outlook 2007). In the resulting dialog box, you can customize the task features you see. For instance, you might click Columns to add icons to the display. Or, you might want to remove the Follow Up flags.

To display more information about each task, change the single line display. Right-click the column header as before and choose View Settings (or Custom). Click Column and change this setting using the Maximum Number Of Lines dropdown.

You can temporarily filter the tasks you see by clicking the Filter button and entering specific words or choosing existing text from the dropdown. Doing so will display only those tasks that meet your criteria.

I’ve mentioned just a few of the more popular ways to customize the To-Do bar. The key to getting the most out of this feature is to explore its settings and put them to work for you!

Use AutoText to Save Multiple Return Addresses

Takeaway: If you work with multiple return addresses, you don’t have to enter those addresses manually as you use them; use Word’s AutoText feature instead.

Word uses the Mailing Address entered via the options as the return address on envelopes generated by the Envelope wizard. It’s convenient and efficient. You enter the address once, but the wizard uses it for all your envelopes, until you change or delete the address This is a great setup, unless you have more than one return address. In that case, you can delete the default address and enter the second address, when you need to, but there’s an easier way – save the second address as AutoText.

First, let’s review how to store a return address for the wizard:

  1. Click the File tab and choose Options (under Help). In Office 2007, click the Office button and then click Word Options. In Word 2003, choose Options from the Tools menu.
  2. Click Advanced in the left pane. In Word 2003, click the User Information tab.
  3. In the General section, enter the return address in the Mailing Address control.
  4. Click OK.

Now you’re ready to execute the wizard by clicking the Mailings tab and then clicking Envelopes in the Create group. In Word 2003, choose Letters and Mailings from the Tools menu, and then select Envelopes and Labels. In the resulting dialog, the wizard uses the address you just entered as the return address.


If you have to replace the default return address occasionally with another, it’s no big deal. If you use another address frequently, create an AutoText entry for it, as follows:

  1. Enter and format the address.
  2. Then, select the address.
  3. Click the Insert tab, and choose Save Selection To The AutoText Gallery from the Quick Parts dropdown in the Text group. In Word 2003, choose AutoText from the Insert menu and then choose AutoText from the resulting submenu.
  4. Change the name to something simple, such as RT.
  5. If the Save In setting is the Normal.dotx, change it to Building Blocks.dotx.
  6. Click OK.


Now you can use the AutoText entry RT to quickly change the default return address in the envelope wizard, as follows:

  1. Click the mailings tab and choose Envelopes in the Create group. In Word 2003, choose Letters and Mailings from the Tools menu, and then select Envelopes and Labels.
  2. Highlight the default address and type RT.
  3. Immediately press [F3] and Word will replace RT with the AutoText entry of the same name—the second return address.
Replacing the default address with an AutoText entry is temporary. The next time you run the wizard, it will display the default address – not the one you stored as an AutoText entry. Using this simple trick, you can store several addresses as AutoText and use them in multiple spots, not just with the envelope wizard.