Organize your intranet with SharePoint hub sites

New SharePoint hub sites make organizing and connecting your intranet easy. 

As business goals and team structures evolve, so too must your sites and the content that lives within them. Ideas must flourish and grow, not become rigid or stale. SharePoint hub sites bring flexible, dynamic building blocks to your company intranet – connecting collaboration and communication. Associating sites together in a hub site enhances discovery and engagement with content, while creating a complete and consistent representation of your project, department or region.

Microsoft first disclosed SharePoint hub sites during Ignite 2017. And recently they announced that they are now rolling out to Targeted Release customers in Office 365. Microsoft encouraged by early adopter feedback, can’t wait for every customer to use and adopt them.

SharePoint hub sites bring the following new capabilities to you and your intranet:

  • Cross-site navigation – increase visibility of and navigation among associated sites
  • Content rollup – read aggregated news and discover related site activities
  • Consistent look-and-feel – establish a common theme to improve visitor awareness of connected sites
  • Scoped search – focus on finding content that resides within the hub site’s associated sites

Hub sites support good governance, giving admins a growth framework to maintain relationships between sites over time. They are easy for admins to establish and bring efficiencies for people who work inside and across the sites on a day-to-day basis. And when managing change within the business, it is easy to move a site from one hub site to another.


Getting started with SharePoint hub sites in Office 365

You can convert an existing communication site or modern team time into a hub site, or you can start with a brand-new modern site. We recommend selecting a communication site as the hub site. You can associate multiple team sites and communication sites to model and promote an intranet that reflects the way your people organize. It is easy for admins to create one or more hub sites. After a hub site is created, approved site owners can associate existing team sites and communication sites with the hub site.


Use the SharePoint Online Management Shell to establish your hub sites

Admins, you are the enablers. And the SharePoint Online Management Shell (aka, PowerShell for SharePoint in Office 365) is your enabling tool of choice.

The PowerShell cmdlet you’ll want to get most familiar with is: Register-SPOHubSite https://contoso.sharepoint.com/sites/HR (where HR URL is the full-path address of the existing site that you want to convert into a hub site). You then will assign a unique security group to designate approved site owners that can associate sites to this new hub. You simply create a mail-enabled security group and add the users. You then run an additional PowerShell command to give that group permissions to associate their sites to the hub site.

Note: You must be a SharePoint administrator or above in Office 365 to create SharePoint hub sites. Site owners, however, can associate a SharePoint site with a hub site that already exists.

Learn more how admins create and manage hub sites.


Associating a site under a hub site

Once a hub site is established, it’s then a two-click process to associate to the hub site.

As the site owner, go to the site you want to have associated to the hub site. Click Settings (gear icon) > Site information > hub site association and select the desired hub.  You’ll only see the hubs you have permission to associate to. And then click Save. You will see the hub navigation appear above. The site itself will inherit the hub theme, and news and activities will begin to flow up to the hub site home page – along with a search crawl of content for any site associated to the hub site. And at any time, per a reorg or change in business direction, you can easily move sites between hub sites. This is the power of a dynamic intranet, one that can change and adapt with the ebb and flow of your ever-changing business landscape. Note: individual sites can only be associated to one hub site at a time.

Note: Sites associated with a SharePoint hub site don’t inherit the permissions of the hub site or any other sites associated with it. Each site, including the hub site, will retain their current permission settings. And as easy as it is to associate a site to a hub site, you, too, can dissaciate from one.

Learn more how to associate and dissociate your sites to and from hub sites.


Design your layout and choose you theme

Once the hub site has been established, you’ll then want to further set it up and refine it for that organization — so the hub site carries the right name and logo, the preferred navigation elements, a preferred theme, and the desired layout for news, sites and highlighted content. And all will re-flow and present beautifully within the SharePoint mobile apps.

The SharePoint mobile apps will display hub sites, and their pages, news, and content, with smooth navigation between associated sites and the scoped search experience. Find what you need on the go and get going! Install or update the SharePoint mobile app today: aka.ms/getSPmobile.

Microsoft announces the new Teams & Skype for Business Admin Center

To enable IT admins to better manage the various aspects of Microsoft Teams and Skype for Business services, Microsoft is announcing the new Microsoft Teams & Skype for Business Admin Center.

Now, there’s an admin center just for calling and messaging.

This new portal will offer a unified experience to manage both Teams and Skype for Business and will also include Call Analytics and the Call Quality Dashboard. Admins can also get end-to-end insights and the ability to manage Teams settings on a user level in this new portal.

Following features are available in this release:

Microsoft Teams messaging policy: Create custom policies for messaging scenarios for your users.

User management: Assign policies and configure your users.

Microsoft Teams guest messaging settings: Control the messaging capabilities for guest accounts in Microsoft Teams.

Federation settings: Manage federation between tenants for Microsoft Teams and Skype for Business. (Please note that federation for Microsoft Teams and Skype for Business will roll out in stages and this setting might not be visible for you during the initial rollout.)

Audio conferencing: Configure dial-in numbers and settings for Microsoft Teams and Skype for Business.

Office 365 to get enhanced Anti-spoofing capabilities

Enhanced anti-spoofing safeguards are rolling out for Office 365.

Microsoft services like OneDrive for Business, SharePoint Online, and Microsoft Teams are closely guarded by ATP (Advanced Threat Protection). Besides, there are numerous feature updates available in Office 365 threat protection service to address the evolution and advances in the threat landscape. The addition of enhanced Anti-Spoofing capability in Office ATP for protecting against spoofed emails from external domains further strengthens this security framework.

Anti-spoofing in Office 365 Advanced Threat Protection

The newest anti-spoof features help protect organizations from external domain spoof.  Office 365 recognizes emails from external domains having proper SPF, DMARC, and DKIM authentication settings as legitimate/authentic and therefore allow them to pass authentication, uninterrupted.

This normal process is however challenged when external domains do not have these settings properly configured. Without enforcement of these settings, domains show a high likelihood of being manipulated and maliciously spoofed, leaving customers vulnerable to phishing or spam attacks. The new external domain anti-spoofing capabilities help detect and block emails from external domains that do not have the following features,

  1. Correct authentication configuration
  2. An email infrastructure source with an unknown history

How does it work?

A newly enhanced filter in ATP first checks if the email from external domains, passes SPF, DKIM, and DMARC test.  If not, the filter thoroughly checks for historical sending patterns of that domain and associated infrastructure. If any suspicious behavior is noted, ATP assumes the sender does not bear a good reputation and as such, proceeds to junk the message.

Also, a feature worth noticing about Anti-spoofing – The filter constantly evolves and enhances itself based on mail flow patterns it observes.  ATP subscribers can access the spoof intelligence report in their Antispam Policy and take necessary actions if required.

New Website Design – Jay’s Landscaping, LLC

The Website Design team of South Jersey Techies has been constantly working on developing great looking websites using the latest web technologies. The most recent website developed by our team is for Jay’s Landscaping, LLC in South Jersey

Jay’s Landscaping is a full-service landscape design and installation company. Our services include lawn maintenance, installation of retaining walls, brick walkways and patios, pruning, mulching, drainage, irrigation, and chemical fertilization.

To view the Website 

Have questions?

Our Web Design team is here to help
Call us at: 856-745-9990 or visit: https://southjerseytechies.net

South Jersey Techies, LLC is a full Managed Web and IT Services Company located in Marlton, NJ providing IT ServicesManaged IT Services, Website Design ServicesServer SupportIT ConsultingVoIP PhonesCloud Solutions Provider and much more. Contact Us Today.

Exclusive offer from BigBeagle.com

Exclusive offer from: BigBeagle.com  |  24/7 Support: (888) 505-1532

Don’t forget to visit our coupon page at http://bigbeagle.com/coupons for the latest and greatest promotions.

Save 5% on all new purchases of $20 or more. Great products just for you. Hurry before the offer expires.

Use promo code rs218a6 in your cart when you order.

*Some limitations apply. Applicable to new purchases only. Enter promo code into shopping cart to see full details. Offer expires Friday, July 13, 2018 at midnight (Mountain Time).

Copyright © 2018 BigBeagle.com. All rights reserved.

What Terms You Need to Know to Get Your Business GDPR-Ready


What Is EU GDPR? 

The EU GDPR is a law designed to protect and empower residents of the EU by guiding business usage of personal data. In essence, it is reshaping the way corporations handle personal data by controlling its collection, use, and storage. It will replace the regulations and frameworks of the existing 20-year-old directive (95/46/EC).


Who Is the GDPR Protecting and Empowering? 

The data subject: This is any individual that can be directly or indirectly identified or uniquely singled out in a group of individuals, from any stored data.


What Is the GDPR Protecting? 

Personal data: This is any information relating to an individual, whether in reference to their private, professional, or public life. It includes things like names, photos, email addresses, location data, online identifiers, a person’s bank details, posts on social networking websites, medical information, work performance details, subscriptions, purchases, tax numbers, education or competencies, locations, usernames and passwords, hobbies, habits, lifestyles, or a person’s computer’s IP address.


Who Is the GDPR Regulating? 

The data controller: This is the person who, alone or jointly with others, determines the purposes for, and means of, processing personal data. A data controller is not responsible for the act of processing (this falls to the data processor); they can be defined as the entity that determines motivation, condition, and means of processing.

Generally, the role of the controller is derived from the organization’s functional relation with the individual. That is, a business is the controller for the customer data it processes in relation to its sales, and an employer is the controller for the employee data they process in connection with the employment relationship.


Who Else Is the GDPR Regulating? 

Data processors: This is the person who processes personal data on behalf of the controller. Typical processors are IT service providers (including hosting providers) and payroll administrators. The processor is required to process the personal data in accordance with the controller’s instructions and take adequate measures to protect the personal data. The GDPR does not allow data processors to use the personal data for other purposes beyond providing the services requested by the controller.


What Does the GDPR Consider “Processing?” 

Processing refers to any operation or set of operations performed upon personal data, whether or not by automatic means—such as collection, recording, organization, storage, adaptation or alteration, retrieval, consultation, use, disclosure by transmission, dissemination or otherwise making available, alignment or combination, blocking, erasure, or destruction. Processing must be fair and lawful, although transparency is significantly strengthened. The processor may not use the personal data for their own purposes.


What Rights Do the Data Subjects Have? 

Under the GDPR, data subjects can request the following:

  • To be informed about the data processing
  • To consent to the processing of their personal data (opt in) or object to the processing of their personal data (opt out)
  • To obtain their personal data in a structured and commonly used format in order to transfer that data, in certain circumstances, to another controller (data portability)
  • To not be subject to fully automated data processing or profiling
  • To know what data is processed (right of access)
  • To correct where any data is incorrect
  • To have data erased under certain circumstances, for example, where the retention period has lapsed or where consent for the processing has been withdrawn (referred to commonly as the “right to be forgotten”) and to register a complaint with the supervisory authority


Other Key Elements to Consider in Preparing for GDPR

We’re not done yet. There are four more important elements to consider with GDPR as you become ready.


1) Data Breach Notification

For controllers, GDPR requires that breach notice must be provided, where feasible, within 72 hours of becoming aware of a breach; processors need to provide notice to controllers without undue delay. Any data breaches must be documented.

2) Data Minimization

This requires the level and type of data being processed to be limited to the minimum amount of data necessary. This requires you to ensure that the purpose in which the data is agreed and the purpose in which the data was collected are materially similar. The processors should ensure that individuals’ privacy is considered at the outset of each new processing, product, service, or application, and only minimum amounts of data are processed for the specific purposes collected and processed.

3) Data Pseudonymization

The GDPR defines pseudonymization as “the processing of personal data in such a way that the data can no longer be attributed to a specific data subject without the use of additional information.” To pseudonymize data, the “additional information” must be “kept separately and subject to technical and organizational measures to ensure non-attribution to an identified or identifiable person.” In other words, it is a strategy designed to enhance protection and privacy for applicable identifying data.

Although similar, anonymization and pseudonymization are two distinct techniques that permit data controllers and processors to use de-identified data. The difference between the two techniques rests on whether the data can be re-identified.

4) Fair Processing of Personal Data

This requires the processing of personal data to be fair and lawful. Generally, only the level and type of data collected should be limited to the minimum amount of data necessary (see data minimization above). There are a number of methods in which the data may be processed, including: express consent (which may be withdrawn at any time), legitimate interest basis (the subject of which legitimacy may be challenged by the data subject), honoring obligations under the agreement with the data subject, or any other legal basis that may apply.


What We Can Do to Help

We know this information can be overwhelming, but taking the proper steps now will save you headaches later. SolarWinds provides products that can help you with getting ready. Our Risk Intelligence software is one of them, providing you with hard data on:

  • A business’ quantified financial risk
  • Personally identifiable information (PII)
  • Protected health information
  • Payment information located in storage
  • Access permissions for sensitive data

Search your ‘data at rest’ for risk areas and start the data mapping you need to get ready for GDPR.

Office 365: New capabilities for iPad and iPhone

New features make Office and OneDrive the best place to work on iPad and iPhone

More and more, people around the world are working on the go, changing locations and devices as they create and collaborate with others throughout their day. As they work across their PCs, Macs and mobile devices, they expect an uncompromising experience that is familiar yet optimized for the device they are using.

Microsoft is committed to providing best in class experiences on all devices, and today, we are proud to share with you a set of new Office capabilities across Word, Excel, PowerPoint, and OneDrive on iOS that will delight and make iPad and iPhone users more productive than ever before.

Real-time co-authoring in Word, Excel, and PowerPoint on iOS – We live in a world where we’re often collaborating with multiple people in different locations and Office 365 provides the broadest and deepest toolkit for collaboration between individuals, teams, and entire organizations. Using real-time co-authoring, colleagues, friends, and family can contribute to and edit documents simultaneously in the Word, Excel and PowerPoint iOS apps. This allows you to know who else is working with you in a document, see where they’re working, and view changes automatically within seconds. The co-authoring experiences are also available in Office Online and the latest versions of Word, Excel and PowerPoint on the PC and Mac, all made possible by storing your documents in OneDrive or SharePoint.

Drag and drop files anywhere with OneDrive – Sometimes your files can get scattered between different folders or even services and applications. Now it’s easier than ever to organize and rearrange your files. You can drag files in between folders in OneDrive and, if your teammates use SharePoint to work together, you can even drag OneDrive files to a SharePoint site giving them immediate access. On iPad, you can also drag files from other apps, such as iMessage, into your OneDrive and drag files out of your OneDrive to other apps.

Drag and drop content between Word, Excel, PowerPoint, and OneDrive on iPad – One of the most common and powerful tasks when creating content is pulling in text, photos, graphs, and other objects from different sources. Now you can pull in content with ease on your iPad with drag and drop support in Office and OneDrive. Easily drag and drop objects from OneDrive or from one Office app to another.

OneDrive Files app support – Today we’re also announcing native support for the Files app in iOS 11. OneDrive integration with the Files app allows you to access, upload, edit, and save your content to OneDrive or SharePoint from apps that support Files app integration. You can also tag and favorite your OneDrive and SharePoint files from within the Files app.

OneDrive redesigned to find the files that matter – The OneDrive iOS app has been redesigned from the ground up with a new layout that uses your screen space more efficiently allowing you to find your files faster. It’s easier to scan across file names, see the information that matters to you, and sort files how you want. New metadata is visible in the list view, so you can easily identify new files and files that have been shared.

Universal link support for shared files – Being able to seamlessly share and securely access files is essential for teamwork. Previously when you received a link to a shared file, you would be directed to a browser and prompted to re-authenticate. Today, we are announcing universal link support, which will open the document directly in the Word, Excel, or PowerPoint iOS apps. Further, if you don’t have a supporting application for the file, you’ll be directed to the OneDrive app to preview the file.

Preview 130+ file types in your OneDrive app – You and the people you work with use a variety of different file formats, but when you’re on your mobile device you might not have access to the native applications for those files. Now, the OneDrive iOS app creates crisp thumbnails and supports large previews of over 130 file types, including Adobe Photoshop and Illustrator, RAW, 3D objects, and high-precision DICOM images. OneDrive lets you open, view, and share all of your files without leaving the app.

New accessibility features for Word, Excel and PowerPoint on iOS 11
The VoiceOver rotor in iOS improves navigation and the accessibility of content. For example, you can use the built-in rotor on iOS to navigate line-by-line or word-by-word and change the speed at which VoiceOver speaks. The new Office-specific rotors also let people with vision impairments navigate more efficiently in Word across tables and links, slides in PowerPoint, and sheets in Excel.

Users can also leverage larger text options in accessibility settings to modify the text size in the core Office apps. Visit the support pages for Excel, Word, and PowerPoint to learn more.

You can use take advantage of these new capabilities in the coming days by updating the Word, Excel, PowerPoint, and OneDrive apps in the Apple App Store.

Microsoft announced Attack Simulator for Office 365 Threat Intelligence


Admins can send simulated phishing and attack emails to find security and training weaknesses.

A few weeks ago, Microsoft released a public preview for Attack Simulator for Office 365 Threat Intelligence. On April 17th Microsoft announced that Attack Simulator is now generally available. Attack Simulator for Office 365 Threat Intelligence is available to all Office 365 E5 or Office 365 Threat Intelligence customers.

With Attack Simulator, customers can launch simulated attacks on their end users, determine how end users behave in the event of an attack, and update policies and ensure that appropriate security tools are in place to protect the organization from threats.  The GA of Attack Simulator adds a new HTML editor so realistic looking HTML emails can be sent in simulations of spear-phishing.  Also, two spear-phishing templates are available for immediate use in the spear phishing simulation.

Attack Simulator includes the three attack scenarios from our public preview.

Display Name Spear Phishing Attack: Phishing is the generic term for socially engineered attacks designed to harvest credentials or personally identifiable information (PII). Spear phishing is a subset of this phishing and is more targeted, often aimed at a specific group, individual, or organization.  These attacks are customized and tend to leverage a sender name that generates trust with the recipient.

Password Spray Attack: To prevent bad actors from constantly guessing the passwords of user accounts, often there are account lockout policies.  For example, an account will lockout after a certain number of bad passwords are guessed for a user.  However, if you were to take a single password and try it against every single account in an organization, it would not trigger any lockouts.  The password spray attack leverages commonly used passwords and targets many accounts in an organization with the hope that one of the account holder uses a common password that allows a hacker to enter the account and take control of it.  From this compromised account, a hacker can launch more attacks by assuming the identity of account holder.

Brute Force Password Attack: This type of attack consists of a hacker trying many passwords or passphrases with the hope of eventually guessing correctly. The attacker systematically checks all possible passwords and passphrases until the correct one is found.


This video demonstrates how Attack Simulator can help organizations educate users to become more secure from cyber threats.  With Attack Simulator, admins can train all their end users, and especially those who are attacked most often.  This proactive training is a powerful way to ensure that your organization can prevent the impact from advanced threats.  Over the coming months, more threat simulations will be added to Attack Simulator so organizations can simulate the most prevalent threat types from the modern threat landscape.

Experience the benefits of Attack Simulator for Office 365 Threat Intelligence by beginning an Office 365 E5 trial today.  Also, learn more about how Microsoft leverages threat intelligence and the value of threat intelligence.

Windows 10 quick tips: 10 ways to speed up your PC

Want Windows 10 to run faster? Take a few minutes to try out these tips, and your machine will be zippier and less prone to performance and system issues.


1. Change your power settings

If you’re using Windows 10’s Power saver plan, you’re slowing down your PC. That plan reduces your PC’s performance in order to save energy. (Even desktop PCs typically have a Power saver plan.) Changing your power plan from Power saver to High performance or Balanced will give you an instant performance boost.

To do it, launch Control Panel, then select Hardware and Sound > Power Options. You’ll typically see two options: Balanced (recommended) and Power saver. (Depending on your make and model, you might see other plans here as well, including some branded by the manufacturer.) To see the High performance setting, click the down arrow by Show additional plans.

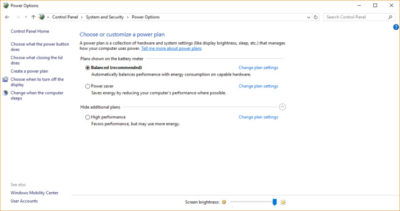
To change your power setting, simply choose the one you want, then exit Control Panel. High performance gives you the most oomph, but uses the most power; Balanced finds a median between power use and better performance; and Power saver does everything it can to give you as much battery life as possible. Desktop users have no reason to choose Power saver, and even laptop users should consider the Balanced option when unplugged and High performance when connected to a power source.


2. Disable programs that run on startup

One reason your Windows 10 PC may feel sluggish is you’ve got too many programs running in the background programs that you may never use, or only rarely use. Stop them from running, and your PC will run more smoothly.

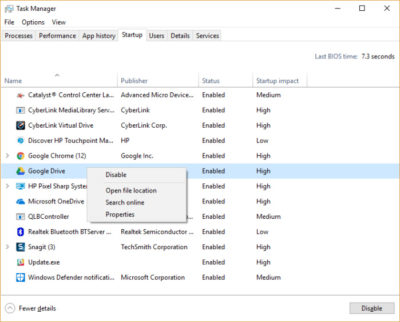
Start by launching the Task Manager: Press Ctrl-Shift-Esc or right-click the lower-right corner of your screen and select Task Manager. If the Task Manager launches as a compact app with no tabs, click “More details” at the bottom of your screen. The Task Manager will then appear in all of its full-tabbed glory. There’s plenty you can do with it, but we’re going to focus only on killing unnecessary programs that run at startup.

Click the Startup tab. You’ll see a list of the programs and services that launch when you start Windows. Included on the list is each program’s name as well as its publisher, whether it’s enabled to run on startup, and its “Startup impact,” which is how much it slows down Windows 10 when the system starts up.

To stop a program or service from launching at startup, right-click it and select “Disable.” This doesn’t disable the program entirely; it only prevents it from launching at startup — you can always run the application after launch. Also, if you later decide you want it to launch at startup, you can just return to this area of the Task Manager, right-click the application and select “Enable.”

Many of the programs and services that run on startup may be familiar to you, like OneDrive or Evernote Clipper. But you may not recognize many of them. (Anyone who immediately knows what “bzbui.exe” is, please raise your hand. No fair Googling it first.)

The Task Manager helps you get information about unfamiliar programs. Right-click an item and select Properties for more information about it, including its location on your hard disk, whether it has a digital signature, and other information such as the version number, the file size and the last time it was modified.

You can also right-click the item and select “Open file location.” That opens File Explorer and takes it to the folder where the file is located, which may give you another clue about the program’s purpose.

Finally, and most helpfully, you can select “Search online” after you right-click. Bing will then launch with links to sites with information about the program or service.

If you’re really nervous about one of the listed applications, you can go to a site run by Reason Software called Should I Block It? and search for the file name. You’ll usually find very solid information about the program or service.

Now that you’ve selected all the programs that you want to disable at startup, the next time you restart your computer, the system will be a lot less concerned with unnecessary program.


3. Turn off search indexing

Windows 10 indexes your hard disk in the background, allowing you – in theory – to search your PC more quickly than if no indexing were being done. But slower PCs that use indexing can see a performance hit, and you can give them a speed boost by turning off indexing. Even if you have an SSD disk, turning off indexing can improve your speed as well, because the constant writing to disk that indexing does can eventually slow down SSDs.

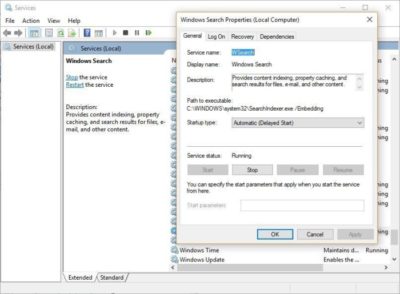
To get the maximum benefit in Windows 10, you need to turn indexing off completely. To do so, first type services.msc in the Start Menu search box, and click the Services result that come up. The Services app then appears. Scroll down to either Indexing Service or Windows Search in the list of services. Double-click it, and from the screen that appears, click Stop. Then reboot. Your searches may be slightly slower, although you may not notice the difference. But you should get an overall performance boost.

If you’d like, you can turn off indexing for only files in certain locations. To do this, first type index in the Start Menu search box, and click the Indexing Options result that appears. The Indexing Options page of Control Panel appears. Click the Modify button and you’ll see a list of locations that are being indexed, such as Microsoft Outlook, your personal files, and so on. Uncheck the boxes next to any location, and it will no longer be indexed.


4. Clean out your hard disk

If you’ve got a bloated hard disk filled with files you don’t need, you could be slowing down your PC. Cleaning it out can give you a speed boost. Windows 10 has a surprisingly useful built-in tool for doing this called Storage Sense. Go to Settings > System > Storage and at the top of the screen – in the Storage Sense section – move the toggle from Off to On. When you do this, Windows constantly monitors your PC, and deletes old junk files you no longer need; temporary files; files in the Downloads folder that haven’t been changed in a month; and old Recycle Bin files.

You can customize how Storage Sense works and also use it to free up even more space than it normally would. Underneath Storage Sense, click “Change how we free up space automatically.” From the screen that appears, you can change how often Storage Sense deletes files (every day, every week, every month or when Windows decides). You can also tell Storage Sense to delete files in your Download folder, depending on how long they’ve been there. And you can also set how long to wait to delete files in the Recycle Bin automatically.

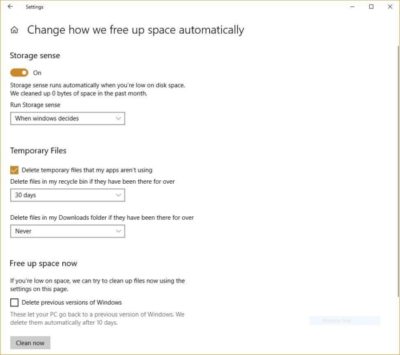
You can also delete old versions of Windows that might be hogging space. At the bottom of the screen, check the box next to “Delete previous versions of Windows.” Storage Sense will then delete old versions of Windows ten days after you’ve installed an upgrade. Note that if you do this, you won’t be able to revert to the older version of Windows.


5. Clean out your Registry

Under the Windows hood, the Registry tracks and controls just about everything about the way Windows works and looks. That includes information about where your programs are stored, which DLLs they use and share, what file types should be opened by which program or just about everything else.

But the Registry is a very messy thing. When you uninstall a program, for example, that program’s settings don’t always get cleaned up in the Registry. So over time, it can get filled with countless outdated settings of all types. And that can lead to system slowdowns.

Don’t even think of trying to clean any of this out yourself. It’s impossible. To do it, you need a Registry Cleaner. There are plenty available, some free and some paid. But there’s really no need to outright buy  one, because the free Auslogics Registry Cleaner does a solid job.

Before using Auslogics or any other Registry Cleaner, you should back up your Registry so you can restore it if anything goes wrong. (Auslogics Registry Cleaner does this for you as well, but it can’t hurt to have it backed up twice.) To do your own Registry backup, type regedit.ext in the search box, then press Enter. That runs the Registry editor.  From the File menu, select Export. From the screen that appears, make sure to choose the “All” option in the Export range section at the bottom of the screen. Then choose a file location and file name and click Save. To restore the Registry, open the Registry editor, select Import from the File menu, then open the file you saved.

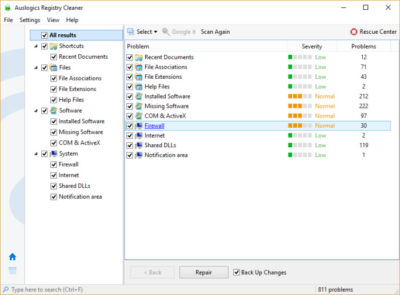
Now download, install and run Auslogics Registry Cleaner. On the left-hand side of the screen you can select the kinds of Registry issues you want to clean up – for example, File Associations, Internet or Fonts. I generally select them all.

Next tell it to scan the Registry for problems. To do that, click “Scan Now” and from a drop-down menu that appears select Scan. That lets you first examine the Registry problems it finds. If you instead choose “Scan and Repair,” it makes the fixes without you checking them.

It now scans your Registry for errors, then shows you what it found. It ranks the errors according to their severity, to help you decide which to fix. Click Repair when you’ve made your decision, and make sure that “Back up Changes” is checked, so you can restore the Registry easily if something goes wrong.


6. Disable shadows, animations and visual effects

Windows 10 has some nice eye candy — shadows, animations and visual effects. On fast, newer PCs, these don’t usually affect system performance. But on slower and older PCs, they can exact a performance hit.

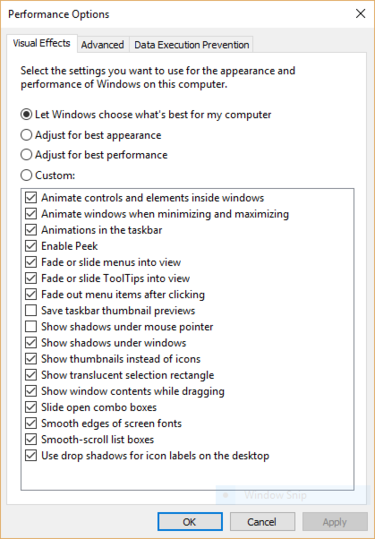
It’s easy to turn them off. In the Windows 10 search box type sysdm.cpl and press Enter. That launches the System Properties dialog box. Click the Advanced tab and click “Settings” in the Performance section. That brings you to the Performance Options dialog box. You’ll see a varied list of animations and special effects.

If you have time on your hands and love to tweak, you can turn individual ones on and off. These are the animations and special effects you’ll probably want to turn off, because they have the greatest effect on system performance:

  • Animate controls and elements inside windows
  • Animate windows when minimizing and maximizing
  • Animations in the taskbar
  • Fade or slide menus into view
  • Fade or slide ToolTips into view
  • Fade out menu items after clicking
  • Show shadows under windows

However, it’s probably a lot easier to just select “Adjust for best performance” at the top of the screen and then click OK. Windows 10 will then turn off the effects that slow down your system.


7. Launch the Windows troubleshooter

Windows 10 has a very useful, little-known tool that can sniff out performance problems and solve them. To launch it, run Control Panel and select System and Security > Security and Maintenance > Troubleshooting > Run maintenance tasks. A screen titled “Troubleshoot and help prevent computer problems” will appear. Click Next.

The troubleshooter will find files and shortcuts you don’t use, identify any performance and other issues on your PC, report them to you and then fix them. Note that you may get a message that says, “Try troubleshooting as an administrator.” If you have administrative rights to the PC, click it and the troubleshooter will launch and do its work.


8. Get help from the Performance Monitor

There’s a great tool in Windows 10 called the Performance Monitor that can, among other things, create a detailed performance report about your PC, detail any system and performance issues, and suggest fixes.

To get the report, type perfmon /report into your search box and press Enter. (Make sure there’s a space between “perfmon” and the slash mark.) The Resource and Performance Monitor launches and gathers information about your system. It will say that it will take 60 seconds, but I’ve found that it takes several minutes. When the Monitor finishes, it will launch an interactive report.

You’ll find a lot of extremely detailed information in the report, and it can take a lot of time to go through. Your best bet is to first look at the Warnings section, which details the biggest issues (if any) it found on your PC, such as problems with Windows, with drivers and so on. It also tells you how to fix each problem — for example, how to turn on a device that has been disabled.

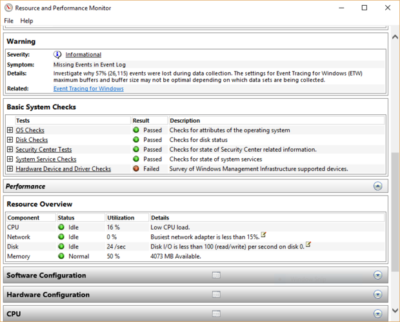
It is also worthwhile to scroll down to the Resource Overview section, where you’ll find an analysis of how well your CPU, network, disk and memory are performing. Each result is color-coded, with green meaning no problems, yellow meaning potential issues, and red showing a problem.

Beyond that, the Resource Overview also reports performance metrics and explanatory details. For example, for the CPU, it might show green and a utilization of 21%, with the details, “Normal CPU load.” Or for Memory, it might show yellow, with 62% utilization and the details, “1520 MB is available.” Based on what you get, you might want to do something about your hardware — for example, add more memory.


9. Kill bloatware

Sometimes the biggest factor slowing down your PC isn’t Windows 10 itself, but bloatware or adware that takes up CPU and system resources. Adware and bloatware are particularly insidious because they may have been installed by your computer’s manufacturer. You’d be amazed at how much more quickly your Windows 10 PC can run if you get rid of it.

First, run a system scan to find adware and malware. If you’ve already installed a security suite such as Norton Security or McAfee LiveSafe, you can use that. You can also use Windows 10’s built in anti-malware app — just type Windows Defender in the search box, press Enter, and then click Scan Now. Windows Defender will look for malware and remove any it finds.

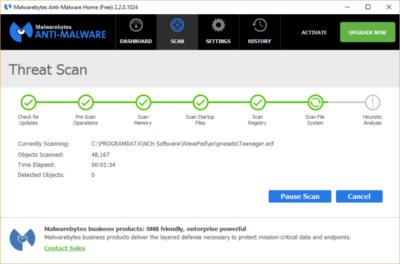
It’s a good idea to get a second opinion, though, so consider a free tool like Malwarebytes Anti-Malware. The free version scans for malware and removes what it finds; the paid version offers always-on protection to stop infections in the first place.

Now you can check for bloatware and get rid of it. Several free programs will do this for you; your best bet is to run several of them, because no single one will find all the bloatware on your PC. Good choices are the PC Decrapifier, Should I Remove It? and SlimComputer.


10. Shut down and restart Windows

Here’s one of IT’s not-quite-secret weapons for troubleshooting and speeding up a PC: Shut it down and restart it. Doing that clears out any excess use of RAM that otherwise can’t be cleared. It also kills processes that you might have set in motion and are no longer needed, but that continue running and slow your system. If your Windows 10 PC has turned sluggish over time for no apparent reason, you may be surprised at how much more quickly it will run when you do this.

Try just some of these tricks, and you’ll find that you’ve got a faster Windows 10 PC — and one that is less likely to have any reliability problems.

How to access Compliance Manager by Office 365

Compliance Manager is now available

Compliance Manager is a cross-Microsoft-cloud services feature designed to help organizations meet complex compliance obligations, including GDPR, ISO 27001, ISO 27018, NIST 800-53, and HIPAA. Compliance Manger is rolling out and has been moved from Public Preview to General Availability.

How to access Compliance Manager?

Users can access Compliance Manager by signing into their Office 365, Dynamics 365, or Azure user account via the Service Trust Portal. This new compliance solution is designed to help organizations meet their data protection and regulatory requirements while using Microsoft cloud services. Compliance Manager enables users to perform on-going risk assessments, gain actionable insights to improve data protection capabilities, and simplifies compliance processes through its built-in control management and audit-ready reporting tools.

Compliance Manager is now generally available for Azure, Dynamics 365, and Office 365 Business and Enterprise subscribers in public clouds. Note that Office 365 GCC customers can access Compliance Manager, however, you should evaluate whether to use the document upload feature of compliance manager, as the storage for document upload is currently compliant with Office 365 Tier C only.

What do I need to do to prepare for this change?

By default, everyone in your organization with an Office 365, Dynamics 365 or Azure user account has access to Compliance Manager and can perform any action in Compliance Manager. To change the default permissions, at least one user must be added to each Compliance Manager role (see the instructions on our support page linked from Additional Information below). After a user is added to a role, the default permissions are removed and only users that have been added to a role will be able to access Compliance Manager and perform the actions allowed by that role.

Once you log into Compliance Manager you will see a number of assessments and what Microsoft has completed for the various assessments.  You will also see what controls your organization are responsible for.  You can export the assessment to excel if you need to provide it for an auditor or wish to save it for retention purposes.

Once in an assessment, you can update what your organization is doing to meet the requirements for the various supported standards.  This gives you the ability to track your compliance activities.  Some organization may already have GRC tracking software but they will find this tool useful if for no other reason to see the results of Microsoft Managed controls.

If Microsoft allowed you to have an assessment for your on-premises systems.  Like a blank questionnaire, clients could use it might be able to replace a GRC app for some companies.

When updating the Customer Managed Controls you have the ability to upload documents, lookup the related controls, assign an assessor, a test date and document the test results.

Microsoft provides you with detailed guidance for customer actions and allows you to document your control implementation details along with a test plan and any response to the assessment.

There is a Compliance Score that, “is a new intelligent scoring feature that is calculated based on an analysis of industry standard control components. Compliance Manager analyzes controls for their the impact to the confidentiality, availability, and integrity of protected data, as well as external drivers in order to weigh controls based on their impact.”

We think this is a great tool especially for small to medium businesses and local governments.  Most often these smaller organizations don’t have formal governance practices or necessary skills in-house.  This tool could help them develop those processes. We also see this as a great tool or internal auditors to use. It gives businesses a place to document the testing methods and results.