Tips for Outlook Calendar

Takeaway:  Tips to change defaults for Outlook Calendar.

outlook-logo-vector2

Work Week View:

Default “Work Week” is Monday through Friday, 8AM to 5PM.

  1. Select File tab.
  2. Click Options button.
  3. On the left side of the window, click Calendar button (3rd down).WorkWeekView
  4. Under Work Time Section, enter your Start and End time.
  5. Check the days of your Work Week.
  6. Select the First Day of week.
  7. Select the First week of year.
  8. Click OK.

WorkWeekView2

Reminder Alerts:

ReminderAlertsAfter creating or accepting an appointment, a “Default Reminder” is automatically set to 15 minutes.  

  1. Select File tab.
  2. Click Options button.
  3. On the left side of the window, click Calendar button (3rd down).
  4.  Under Calendar Options Section, select your reminder times.
  5. Click OK.

Calendar Time Slots:

CalendarTimeSlotsTime slots for Calendar Appointments are defaulted to 30 minutes.

  1. Select Calendar View.
  2. Right-Click on Timeline.
  3. Select the interval you prefer.
  4. Outlook will automatically update.
    • 5 minutes:  Most space for details.
    • 60 minutes:  Least space for details


Microsoft Word Formatting Tips

Takeaway:  Save time formatting documents in Microsoft Word by using quick tools and tips.

Copy & Paste Methods:

When copying to Microsoft Word, the original formatting is automatically inserted with text and pictures.

1. Copy the content to the Clipboard: [CTRL]+[C] or Highlight content, right click on highlighted content, and select “Copy”.
2. Paste the content into a Word document: [CTRL]+[V] or Home Tab, Paste and then select from the three options (see picture below)

–  Keep Source Formatting (K) – Original Formatting
–  Merge Formatting (M) – New content changed to format already in use
–  Keep Text Only (T) – Generic Format and will only Paste text, no pictures
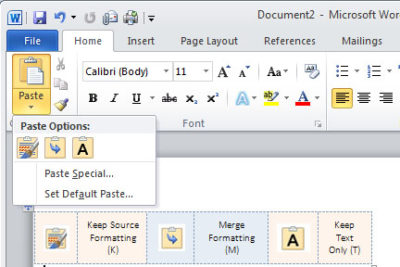
Paste_Blog041013

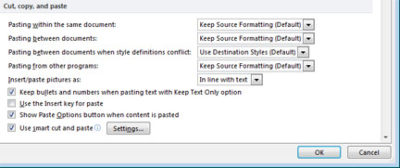
Changing the default, as follows might be more efficient:

  1. Click the File tab, Help button, Options button and select the Advanced button.
  2. In the Cut, Copy, and Paste section, choose the appropriate option. (Example, you might want to keep formatting when copying from other Word documents but not from any other source)
  3. Click OK.

CCP_Blog041013

In Word 2003, select Tool menu, Options button and Edit Tab, uncheck the “Smart Cut And Paste” option or click the Settings button to customize your settings.

Section Breaks:

Separating a document with Section Breaks allows you to format each “section” differently.  Also, you can copy a previous Section Break

–  Next Page – Insert a section break and start the new section on the next page
–  Continuous – Insert a section break and start the new section on the same page.
–  Even Page – Insert a section break and start the new section on the next even-numbered page.
–  Odd Page – Insert a section break and start the new section on the next odd-numbered page.

SB_Blog041013

 In Word 2003, you can insert a Section Break from the Insert Menu.

Keeping Words Together:

Whether the word is hyphenated or simply two words you do not want to split up , a proper noun or a date, you can keep them together!

–  Hyphenated Words:  When typing the hyphen between use [CTRL]+[SHIFT]+[-]
–  Non-hyphenated Words:  When typing the space between use [CTRL]+[SHIFT]+[SPACEBAR]

Editing Number/Bullet Styles:

When formatting a list (bullets or numbers) you can simply edit the format of one or multiple bullets or numbers.

1. Select the Home tab, click Show/Hide in the Paragraph section.
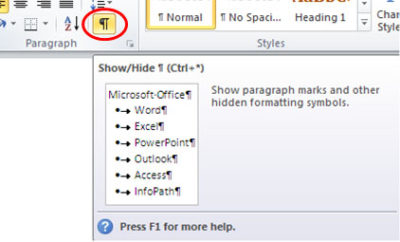
SH_Blog041013

2. Highlight the Paragraph mark(s) at the end of each line you would like to re-format.  For more than one number or bullet, hold [CTRL] while highlighting.
3. Apply format using Style section.

Removing Formats:

You can highlight the entire document or only sections to remove formatting.  If you are trying to remove formatting from a few different sections, hold [CTRL] while selecting the sections.

–  Remove all formatting:  [CTRL]+[SPACEBAR]
–  Remove Paragraph formatting:  [CTRL]+[Q]

Automatically Updating Styles:

When adding a format to text, Word will let you update a style, this can be difficult.

1.  Select the Home tab.
2.  Open the Styles Dialog.
3.  Find the Style from the drop-down list.
4.  Select Modify button.
5.  Uncheck Automatically Update.

Default Line Spacing:
LS_Blog041013

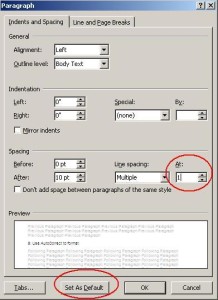
The default line spacing in Word 2007 and 2010 is set for 1.15, commonly used for Web publishing.  You can set your default to 0 or 1 using a few steps.

1.  Select the Home tab.

2.  Right-click Normal in Styles section and select Modify.

3.  Choose Paragraph from the Format list.

4.  In the Spacing section, change the At: setting from 1.15 to 1, Click OK.

5.  You now have the option to set this as your default template for all new documents by selecting “Set As Default” button.

6.  Click OK.


Paragraph Spacing:
PS_Blog041013


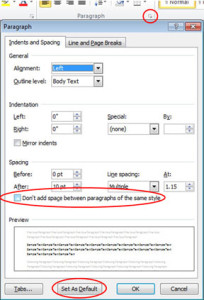
Newest versions of Microsoft Word have increased the spacing between paragraphs.  If you do not want extra space between paragraphs, you can modify it using a few steps.

1.  Select the Home tab.

2.  Open Paragraph Dialog.

3.  Check “Don’t Add Space Between Paragraphs Of the Same Style Option”.

4.  You now have the option to set this as your default template for all new documents by selecting “Set As Default” button

5.  Click OK.


Save Formatted text as AutoCorrect:
AC_Blog041013

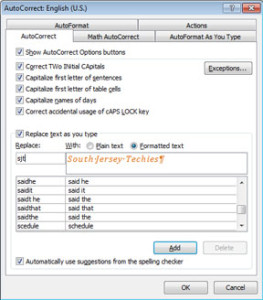
Using AutoCorrect saves time and prevents mistakes.  It can also save the text previously formatted.

1.  Highlight the content you would like to save in AutoCorrect that is pre-formatted.
2.  Open the File tab.
3.  Choose Options and then select Proofing button.
4.  Click AutoCorrect Options button.
5.  Uncheck Automatically Update.
6.  Select the option you would like to use:
–  Plain text (not formatted)
–  Formatted text (keep the format you have already applied)
7.  Enter short key in the Replace control.  (Example:  We use sjt for South Jersey Techies)
8.  Click Add button.
9.  Click OK, twice.


Find and Replace to Edit Format:

Microsoft Word’s Find and Replace tools can be used for more than replacing characters or multiple words, you can also change the format of text.

1.  Copy the text or word you would like to format.
2.  Press [CTRL]+[H] to open tool.
3.  Select More button.
3.  Paste the text or word you previously copied into Find What control.
4.  If the text you paste into Find What is formatted, select the Format button and adjust accordingly.
5.  Paste the same text into Replace With control.
6.  Select the Format button and change to the new format or remove the current Format by leaving the Format Option blank.
7.  You can either, Replace (first instance of the text or word you selected) or you can Replace All (replaces all text or words that are identical).

“Sticky Borders”:

A Sticky Border is when you type three hyphens and press enter directly below text.  This border attaches the the paragraph format or to the bottom of a page.  To easily remove this border follow these steps:

1.  Select the Home tab.
2.  Click inside the paragraph.
3.  In the Paragraph section, choose “No Border” (usually seen with editing tables).


10 tools that simplify collaboration

Takeaway: The key to collaborating effectively is to find tools that make working with others easy and efficient. Jack Wallen shares a list of tools that have greatly improved the collaborative process for his projects.

You might notice that not all tools listed were actually designed specifically for the task of collaboration. Some are communication tools, whereas others serve a much broader purpose. No matter their original purpose, each one makes collaboration much easier. In the end, all that matters is that you can work with your collaborators without having to leave town, host a face-to-face meeting, or run up your phone bill.

1: Google Docs
That’s right. The mighty Google has finally added a level of collaboration to its documents. Google documents now have a discussion feature, which allows the creator of a document to invite participants to collaborate (discuss) on it. What’s nice about this feature is that it is in real time and can be saved for later reference. Google docs are gaining ground, people!

2: Track Changes
In both Microsoft Office and LibreOffice, anyone who is collaborating on a document can take advantage of track changes. If you’re collaborating on a document in either of these office suites and you aren’t using track changes, you have no idea what you are missing. The ability to show what has been changed (and by whom), as well as to easily accept or reject those changes, goes a long way toward streamlining the collaboration process. The only downfall to track changes is that it is not in real time. But not many tools allow you to collaborate in real time on documents.

3: Comments
Another collaboration feature in both Microsoft Office and LibreOffice is the ability to insert comments into text. This is often used in conjunction with track changes to explain a change or ask a question. Anyone who plans on collaborating must have this feature in their toolbox. If you don’t use comments, you wind up sticking notes inline — which often ends badly when the comments are not removed before publication.

4: Gobby/Kobby
Gobby and Kobby offer the same function — real-time collaboration on text documents in Linux. These tools serve as a sort of chat client with a built-in text editor. The primary audience for both Gobby and Kobby is the developer, but that doesn’t mean they can’t be used for ordinary document collaboration. The downfall? Neither one supports the most popular word processor formats (such as .doc, .rtf, .and odt).

5: Instant messaging
I know, I know. IM isn’t technically a collaboration tool. But if you really think about it, how is it not? You can fire up your document, log on to your instant messaging client, and start chatting with your collaborators in real time about the work. No, you do not see changes as they are made, and any updates to the document are not made for all to see. But the truth of the matter is, the primary function of collaboration is communication, and using an instant messaging tool is a fantastic way to communicate.

6: Zoho
Zoho is an incredible Web-based collaboration tool. With Zoho, you can collaborate via chats, discussions, email, meetings, projects, wikis, and more. There are so many ways that Zoho helps you to collaborate, it would be serious feat to actually use them all for a single project. Although Zoho has a free plan for its service, you get only 1 GB of space for files. But its premium service is only $5 per month, so if you are a frequent collaborator and you’re looking for a great Web-based tool to facilitate collaboration, Zoho might be the perfect fit.

7: Campfire
Campfire is another Web-based collaboration tool, but it’s aimed at the corporate or enterprise-level crowds. With plans that reach all the way to 100 chatters and 25 GB of storage (a plan that costs $99 per month), Campfire can enable collaboration in larger settings or even classrooms. Campfire also packs in other enterprise-friendly features, such as searchability and an iPhone app for mobile collaboration. An extra benefit of the pricier plans is that they incorporated SSL for higher security.

8: MindMeister
MindMeister is a Web-based mind-mapping tool. Not all collaborators are familiar with (or comfortable with) mind-mapping tools. But for those who are, there is no better way to brainstorm an idea than a mind-mapping tool. Having a tool for mind-mapping available online is a brilliant way to get those ideas out of your head and into reality. MindMeister has three plans: Free (three maps), Premium — $59 per year (unlimited maps, enhanced security, upload files), and Business — $9 per month (unlimited maps, edit maps offline, branded subdomain, auto backups). MindMeister also has an app for iPhone and iPad.

9: TextFlow
TextFlow is an online document comparison tool. It allows you to generate change reports from Word and PDF documents. You can compare up to seven documents at once, see the changes in context, view the changes in a summary report, and even view the change history. Although the layout of the changes can take a bit of acclimation, the benefits of using such a tool far outweigh the somewhat awkward layout.

10: Kablink
Kablink is a set of open source, online collaboration tools. The set consists of Teaming, iFolder, and Conferencing. Teaming includes document management, workflow, expertise location, federated search, and a custom Web form generator. ifolder is a secure storage solution similar to that of Dropbox, but it also allows you to invite other iFolder users to share your folders. Conferencing is a real-time meeting solution that allows application sharing, whiteboards, presentations, and more. All three of the Kablink tools are cross platform.

Other tools?
If you try out the tools on this list, you should be able to find a collaboration solution that meets your needs. Although you may have to use a combination of tools, you should be able to find everything you need to get your collaboration up and running with very little effort.

Have you worked successfully with some of these tools? What other solutions would you add to the list?

To view the original article in it’s entirety Click Here

10 free anti-malware tools worth checking out

Over the last few years, anti-malware software has become increasingly costly. But believe it or not, there are still ways to protect your computer for free. In this article, I will list 10 free utilities you can use to either prevent malware infections or to help clean up the mess once a PC becomes infected.

1: AVG Anti-Virus Free Edition 2011
I have been using AVG’s free antivirus product for a few years now, and although it isn’t perfect, it seems to be at least as good as most of the commercial anti-malware products. AVG’s free edition provides basic protection against viruses and spyware, but the company also offers a more comprehensive security suite called AVG Internet Security 2011. This suite offers the same anti-malware protection as the free edition, but it also provides real-time protection against Internet search and social networking sites.

2: Comodo Antivirus
Comodo Antivirus takes a different approach to virus protection than most other antivirus products do. Comodo is based on the idea that it is foolish to allow code to run without first proving itself to be benign. So Comodo implements a default denial until an executable proves itself trustworthy. To keep the software from being too chatty, Comodo executes unknown code in an isolated sandbox where its behavior can be monitored without running the risk of the executable harming the system.

3: PC Tools AntiVirus Free 2011
PC Tools AntiVirus Free 2011 is a basic antivirus / anti-spyware program that is designed to protect Windows desktops against various forms of malware. Besides its basic detection capabilities, PC Tools includes a feature called Search Defender that is designed to warn you about unsafe Web sites (or phishing sites) before you click on them. The software also includes a File Guard component that monitors the file system and blocks attempted malware infections in real time.

4: Avast Free Antivirus
Like AVG, Avast sells comprehensive security suites, but makes its basic antivirus / anti-spyware product available for free to home users. Although I have never used Avast Free Antivirus, I’ve recently noticed posts in various message boards from people who claim that Avast provides better protection than some of the commercial products.

5: Ad-Aware Free Internet Security
Although it was originally designed as a product for detecting adware, Lavasoft’s Ad-Aware has evolved into a complete anti-malware product. Ad-Aware Free Internet Security provides real-time protection against spyware, rootkits, and more. It also includes a utility called The Neutralizer, which you can use to clean a PC that has already been infected.

6: HijackThis
HijackThis is one of my favorite anti-malware utilities, but it’s not for the faint of heart. HijackThis is designed to compile a report of critical file and registry settings that are often prone to viral infections. The thing that makes HijackThis difficult to use is that it makes no distinction between malicious and legitimate entries. As a result, you can end up doing even more damage to a PC unless you know what you are doing. Even so, I consider HijackThis to be a must-have utility.

7: Microsoft Security Essentials
Microsoft provides free antivirus protection for home users through a relatively new application called Microsoft Security Essentials. Microsoft Security Essentials is based on the same ForeFront technology as Microsoft’s enterprise class anti-malware software. The difference is that Microsoft Security Essentials is available solely to home users and businesses with fewer than 10 Windows desktops.

8: Windows Defender
Microsoft’s Windows Defender is a free anti-spyware utility for Windows. It’s not comprehensive, but it does a surprisingly good job of protecting Windows as long as you install it before an infection occurs.
Windows Defender is included with Windows Vista and Windows 7, but you can also download a version for Windows XP. If you are using Windows 7 or Windows Vista, Windows Defender is disabled by default. You can enable Windows Defender by typing the word Defender into the Windows search box and then double-clicking on the Windows Defender option. When you do, Windows will tell you that Windows Defender is turned off and will give you the opportunity to enable it.

9: Malicious Software Removal Tool
Although not a comprehensive antivirus tool by any stretch of the imagination, Microsoft’s Malicious Software Removal Tool does a good job of detecting and removing the most common viruses. The Malicious Software Removal Tool works with Windows 7, Vista, XP, and Server 2003. Microsoft releases updates to this tool on the second Tuesday of each month.

10: McAfee virus removal tools
McAfee makes commercial antivirus products, but it also offers some free tools for removing viruses. Specifically, it offers tools for removing Sasser, Bagle, Zafi, Mydoom, Lovsan / Balster, Klez, and Bugbear. You can download all of these tools here

To view the original article in it’s entirety Click Here