Takeaway: Save time formatting documents in Microsoft Word by using quick tools and tips.
Copy & Paste Methods:
When copying to Microsoft Word, the original formatting is automatically inserted with text and pictures.
1. Copy the content to the Clipboard: [CTRL]+[C] or Highlight content, right click on highlighted content, and select “Copy”.
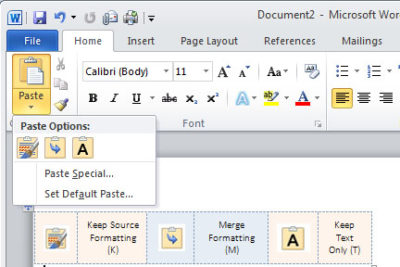
2. Paste the content into a Word document: [CTRL]+[V] or Home Tab, Paste and then select from the three options (see picture below)
– Keep Source Formatting (K) – Original Formatting
– Merge Formatting (M) – New content changed to format already in use
– Keep Text Only (T) – Generic Format and will only Paste text, no pictures
Changing the default, as follows might be more efficient:
- Click the File tab, Help button, Options button and select the Advanced button.
- In the Cut, Copy, and Paste section, choose the appropriate option. (Example, you might want to keep formatting when copying from other Word documents but not from any other source)
- Click OK.

In Word 2003, select Tool menu, Options button and Edit Tab, uncheck the “Smart Cut And Paste” option or click the Settings button to customize your settings.
Section Breaks:
Separating a document with Section Breaks allows you to format each “section” differently. Also, you can copy a previous Section Break
– Next Page – Insert a section break and start the new section on the next page
– Continuous – Insert a section break and start the new section on the same page.
– Even Page – Insert a section break and start the new section on the next even-numbered page.
– Odd Page – Insert a section break and start the new section on the next odd-numbered page.

In Word 2003, you can insert a Section Break from the Insert Menu.
Keeping Words Together:
Whether the word is hyphenated or simply two words you do not want to split up , a proper noun or a date, you can keep them together!
– Hyphenated Words: When typing the hyphen between use [CTRL]+[SHIFT]+[-]
– Non-hyphenated Words: When typing the space between use [CTRL]+[SHIFT]+[SPACEBAR]
Editing Number/Bullet Styles:
When formatting a list (bullets or numbers) you can simply edit the format of one or multiple bullets or numbers.
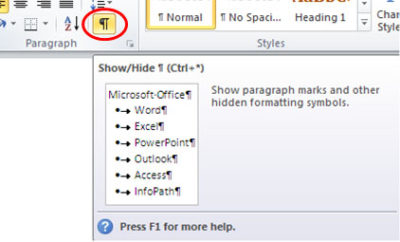
1. Select the Home tab, click Show/Hide in the Paragraph section.
2. Highlight the Paragraph mark(s) at the end of each line you would like to re-format. For more than one number or bullet, hold [CTRL] while highlighting.
3. Apply format using Style section.
Removing Formats:
You can highlight the entire document or only sections to remove formatting. If you are trying to remove formatting from a few different sections, hold [CTRL] while selecting the sections.
– Remove all formatting: [CTRL]+[SPACEBAR]
– Remove Paragraph formatting: [CTRL]+[Q]
Automatically Updating Styles:
When adding a format to text, Word will let you update a style, this can be difficult.
1. Select the Home tab.
2. Open the Styles Dialog.
3. Find the Style from the drop-down list.
4. Select Modify button.
5. Uncheck Automatically Update.
Default Line Spacing:
The default line spacing in Word 2007 and 2010 is set for 1.15, commonly used for Web publishing. You can set your default to 0 or 1 using a few steps.
1. Select the Home tab.
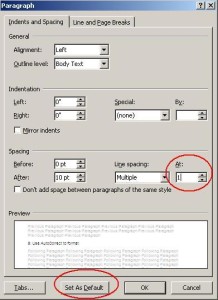
2. Right-click Normal in Styles section and select Modify.
3. Choose Paragraph from the Format list.
4. In the Spacing section, change the At: setting from 1.15 to 1, Click OK.
5. You now have the option to set this as your default template for all new documents by selecting “Set As Default” button.
6. Click OK.
Paragraph Spacing:
Newest versions of Microsoft Word have increased the spacing between paragraphs. If you do not want extra space between paragraphs, you can modify it using a few steps.
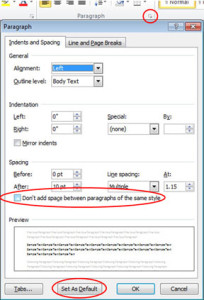
1. Select the Home tab.
2. Open Paragraph Dialog.
3. Check “Don’t Add Space Between Paragraphs Of the Same Style Option”.
4. You now have the option to set this as your default template for all new documents by selecting “Set As Default” button
5. Click OK.
Save Formatted text as AutoCorrect:
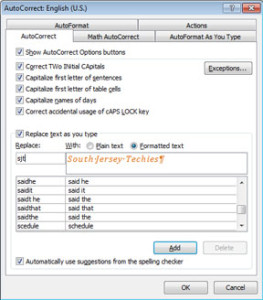
Using AutoCorrect saves time and prevents mistakes. It can also save the text previously formatted.
1. Highlight the content you would like to save in AutoCorrect that is pre-formatted.
2. Open the File tab.
3. Choose Options and then select Proofing button.
4. Click AutoCorrect Options button.
5. Uncheck Automatically Update.
6. Select the option you would like to use:
– Plain text (not formatted)
– Formatted text (keep the format you have already applied)
7. Enter short key in the Replace control. (Example: We use sjt for South Jersey Techies)
8. Click Add button.
9. Click OK, twice.
Find and Replace to Edit Format:
Microsoft Word’s Find and Replace tools can be used for more than replacing characters or multiple words, you can also change the format of text.
1. Copy the text or word you would like to format.
2. Press [CTRL]+[H] to open tool.
3. Select More button.
3. Paste the text or word you previously copied into Find What control.
4. If the text you paste into Find What is formatted, select the Format button and adjust accordingly.
5. Paste the same text into Replace With control.
6. Select the Format button and change to the new format or remove the current Format by leaving the Format Option blank.
7. You can either, Replace (first instance of the text or word you selected) or you can Replace All (replaces all text or words that are identical).
“Sticky Borders”:
A Sticky Border is when you type three hyphens and press enter directly below text. This border attaches the the paragraph format or to the bottom of a page. To easily remove this border follow these steps:
1. Select the Home tab.
2. Click inside the paragraph.
3. In the Paragraph section, choose “No Border” (usually seen with editing tables).