Microsoft is phasing out the traditional Control Panel with the Windows 10 Creators Update, but with a few tweaks you can still access it. Mark Kaelin explains how.
Microsoft has been slowly and methodically rolling out the Windows 10 Creators Update to customers throughout 2017. If you are one of the lucky ones to receive the update already, you have likely noticed more than a few changes to how Windows 10 looks and works. Some of the changes are good, some are a little annoying.
One of the changes Microsoft implemented in the Windows 10 Creators Update that I don’t like is the removal of the traditional Control Panel from the Win+X menu—that’s the menu you see displayed when you right-click the Start button from the Desktop interface (Figure A). Microsoft is migrating the interface for configuring the operating system to the new Settings screen, but some of us, especially IT pros who have been doing this for a long time, prefer the old Control Panel interface.
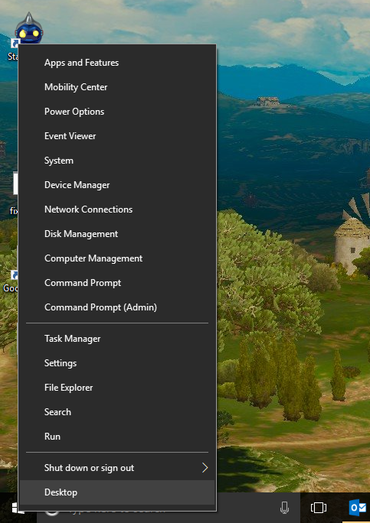
Figure A
Fortunately, the old Control Panel is still available; it is just lurking in the background. We can bring it back to the forefront with a few clicks, tweaks, and tricks, and this tutorial will show you how they work.
First, what you can’t do
The commands for the Win+X menu are located in this file folder, as shown in Figure B:
C:\Users\USERNAME\AppData\Local|Microsoft\Windows\WinX
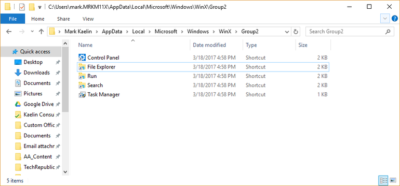
Figure B
But you can’t just add a shortcut to the Control Panel executable to one of those Group folders and expect to see it show up in the Win+X menu. The special links within the Win+X menu system are protected with a special hash calculation, which greatly complicates any attempt to edit its contents.
To add the Control Panel back to the Win+X menu you will have to use a link with the hash already included. In general, that means acquiring a link from a version of Windows that is not the Creators Update. It is possible with the help of a third-party app, but it is complicated, convoluted, and not really necessary.
If you want to go through the process, you can check out this website for the details. But before you do, I have some simple solutions that might work better for you.
Now, what you can and should do
For those of us who want to keep things simple, here are a couple of ways to access the traditional Control Panel in Microsoft Windows 10 Creators Update.
1. Search for it
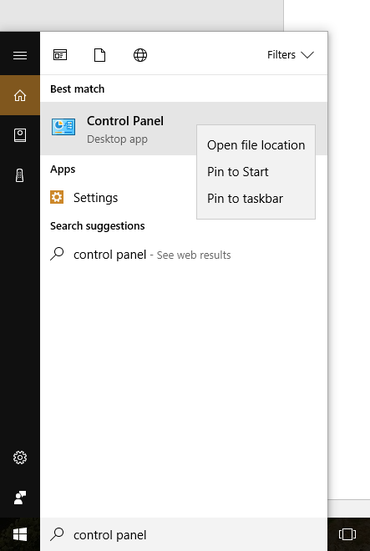
Figure C
If you just want to access the control panel occasionally and not add more icons to your desktop, the simplest way to access the Control Panel is by typing control panel in the Cortana search box. Control Panel should be the first entry in the search results (Figure C). You can left-click the link to start the app or right-click it and add the link to the Start Menu or to your Taskbar for easy future access.
Adding the Control Panel to the Start Menu is handy if you are using a touch screen interface. Adding it to the Taskbar works well if you find yourself accessing configuration settings on a regular basis.
2. Add to Desktop
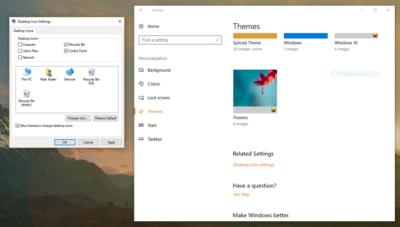
Figure D
There are two ways to add the Control Panel to your Desktop. The first way is fairly obvious: Right-click an empty area on your Desktop and create a new shortcut that points to the Control Panel executable located here:
C:\Windows\System32
But you can also add the Control Panel icon to your Desktop through the Personalization screen. Right-click the Start button to open the Win+X menu and click the Settings menu item. Click the Personalization icon to open the next screen and drill down to the Themes screen. Scroll down until you see the Desktop Icon Settings item under the Related Settings area and click it. A dialog box will pop open and you can check the Control Panel radio button to add that link to your Desktop (Figure D). Click OK and the icon will be added as a primary system link on your Desktop.
Have questions?
Get answers from Microsofts Cloud Solutions Partner!
Call us at: 856-745-9990 or visit: https://southjerseytechies.net/
South Jersey Techies, LL C is a full Managed Web and Technology Services Company providing IT Services, Website Design Services, Server Support, Network Consulting, Internet Phones, Cloud Solutions Provider and much more. Contact for More Information.
To read this article in its entirety click here.