End of Support for Microsoft Windows Server 2003

end windows server 2003


A large number of businesses still run Microsoft MSFT -1.71% Windows Server 2003 and it’s unlikely they all will upgrade before Microsoft Corp. ends support on July 14, 2015, say analysts. Companies that don’t upgrade increase their cyber security risks because the company will no longer issue security updates and these systems will be more vulnerable to hackers.

Businesses worldwide run an estimated 23.8 million physical and virtual instances of Windows Server 2003, according to data released by Microsoft in July 2014. Analysts say the technology is more prevalent in industries such as health care, utilities and government. Yet it’s also still used in about 7% of retail point of sale systems, according to a report Thursday by Trend Micro Inc.4704.TO -1.11%

“Microsoft does not plan to extend support for Windows Server 2003 and encourages customers who currently run Windows Server 2003 and have not yet begun migration planning to do so immediately,” said Vivecka Budden, a Microsoft spokesperson, in an email.

South Jersey Techies offers various migration options to include Windows Server 2012 R2, Microsoft Azure, hosting partners and Office 365.

“It is going to be difficult to get this done in time,” said David Mayer, practice director of Microsoft Solutions at Insight Enterprises Inc.NSIT -1.12%, a provider of IT hardware, software and services.

Many of these same industries were impacted by the end of service for the Windows XP operating system on April 8.  Microsoft broadcasts these sorts of moves years in advance, so it shouldn’t come as a surprise to anyone. But, the product was stable and for many companies there simply wasn’t incentive to update.

“In general, everyone has been slow to migrate, especially those with servers that are running applications,” said Rob Helm, vice president of research at Directions on Microsoft consulting firm.

The problem in industries such as health care and utilities is that companies run legacy apps written by vendors who still require Windows Server 2003. For example, there are smaller vendors in health care that have not kept up with development and application modernization, said a health-care CIO who asked not to be identified. A hospital may have an inventory of 100 to 500 different applications and many applications will still require Windows Server 2003, he added.

Electric utilities, for example, widely use Windows Server 2003. There hasn’t been much movement to upgrade those systems, said Patrick C. Miller, founder of the nonprofit Energy Sector Security Consortium and a managing partner at The Anfield Group, a security consulting firm. Instead, utilities are working to better secure and isolate those systems.

“I’m concerned about directory services such as application authentication and user permissions,” said Mr. Miller. “If you compromise an Active Directory server, you get access to everything.”

For now, analysts are recommending that companies work out their risk of exposure and make plans to first migrate those applications that will be most difficult. Companies should make plans to harden servers that can’t be updated. That might entail putting those systems on an isolated network, where they’d be less prone to outside attack, said Mr. Helm.

To protect and upgrade your home or business

 please contact us 856-745-9990 or click here.


New Security Threat: CryptoWall


crypt

In October of last year news broke about a new form of malware called Cryptolocker. This malware posed a particularly large threat to many business users and led to many quick and important security updates. Now, almost a year later, it appears that the second version of this – CryptoWall – has been released and is beginning to infect users.

What is Crypto malware?

Crypto malware is a type of trojan horse that when installed onto computers or devices, holds the data and system hostage. This is done by locking valuable or important files with a strong encryption. You then see a pop-up open informing you that you have a set amount of time to pay for a key which will unlock the encryption. If you don’t pay before the deadline, your files are deleted.

When this malware surfaced last year, many users were understandably more than a little worried and took strong precautions to ensure they did not get infected. Despite these efforts, it really didn’t go away until earlier this year, when security experts introduced a number of online portals that can un-encrypt files affected by Cryptolocker, essentially neutralizing the threat, until now that is. A recently updated version is threatening users once again.

Cryptolocker 2.0, aka. CryptoWall

Possibly because of efforts by security firms to neutralize the Cryptolocker threat, the various developers of the malware have come back with an improved version, CryptoWall and it is a threat that all businesses should be aware of.

With CryptoWall, the transmission and infection methods remain the same as they did with the first version: It is most commonly found in zipped folders and PDF files sent over email. Most emails with the malware are disguised as invoices, bills, complaints, and other business messages that we are likely to open.

The developers did however make some “improvements” to the malware that make it more difficult to deal with for most users. These changes include:

  • Unique IDs are used for payment: These are addresses used to verify that the payment is unique and from one person only. If the address is used by another user, payment will now be rejected. This is different from the first version where one person who paid could share the unlock code with other infected users.
  • CryptoWall can securely delete files: In the older version of this threat, files were deleted if the ransom wasn’t paid, but they could be recovered easily. In the new version the encryption has increased security which ensures the file is deleted. This leaves you with either the option of paying the ransom or retrieving the file from a backup.
  • Payment servers can’t be blocked: With CryptoLocker, when authorities and security experts found the addresses of the servers that accepted payments they were able to add these to blacklists, thus ensuring no traffic would come from, or go to, these servers again. Essentially, this made it impossible for the malware to actually work. Now, it has been found that the developers are using their own servers and gateways which essentially makes them much, much more difficult to find and ban.

How do I prevent my systems and devices from being infected?

Unlike other viruses and malware, CryptoWall doesn’t go after passwords or account names, so the usual changing of your passwords won’t really help. The best ways to prevent this from getting onto your systems is:

  • Don’t open any suspicious attachments – Look at each and every email attachment that comes into your inbox. If you spot anything that looks odd, such as say a spelling mistake in the name, or a long string of characters together, then it is best to avoid opening it.
  • Don’t open emails from unknown sources – Be extra careful about emails from unknown sources, especially ones that say they provide business oriented information e.g., bank statements from banks you don’t have an account with or bills from a utilities company you don’t use. Chances are high that they contain some form of malware.

Microsoft IIS: Disabling the SSL v3 Protocol


Depending on how your Windows servers are configured, you may need to disable SSL v3.

Note that older versions of Internet Explorer may not have the TLS protocol enabled by default. If you disable SSL versions 2.0 and 3.0, the older versions of Internet Explorer will need to enable the TLS protocol before they can connect to your site.

For a Simpler Way to Disable the SSL v3 Protocol:

DigiCert is not responsible for any complications or problems if you decide to use this .zip file to disable the SSL v3 protocol on your server.

  1. Log into your server as a user with Administrator privileges.
  2. Download DisableSSL3.zip, extract the .zip file contents, and then double-click DisableSSL3.reg.
  3. In the Registry Editor caution window, click Yes.
  4. Restart server.

If you prefer to do it yourself, follow the steps in the instruction below.

Microsoft IIS: How to Disable the SSL v3 Protocol

  1. Open the Registry Editor and run it as administrator.For example, in Windows 2012:
    1. On the Start screen type regedit.exe.
    2. Right-click on regedit.exe and click Run as administrator.
  2. In the Registry Editor window, go to:HKEY_LOCAL_MACHINE\SYSTEM\CurrentControlSet\Control\SecurityProviders\Schannel\Protocols\
  3. In the navigation tree, right-click on Protocols, and in the pop-up menu, click New > Key.
  4. Name the key, SSL 3.0.
  5. In the navigation tree, right-click on the new SSL 3.0 key that you just created, and in the pop-up menu, click New > Key.
  6. Name the key, Client.
  7. In the navigation tree, right-click on the new SSL 3.0 key again, and in the pop-up menu, click New > Key.
  8. Name the key, Server.
  9. In the navigation tree, under SSL 3.0, right-click on Client, and in the pop-up menu, click New > DWORD (32-bit) Value.
  10. Name the value DisabledByDefault.
  11. In the navigation tree, under SSL 3.0, select Client and then, in the right pane, double-click the DisabledByDefault DWORD value.
  12. In the Edit DWORD (32-bit) Value window, in the Value Data box change the value to 1 and then, click OK.
  13. In the navigation tree, under SSL 3.0, right-click on Server, and in the pop-up menu, click New > DWORD (32-bit) Value.
  14. Name the value Enabled.
  15. In the navigation tree, under SSL 3.0, select Server and then, in the right pane, double-click the Enabled DWORD value.
  16. In the Edit DWORD (32-bit) Value window, in the Value Data box leave the value at 0 and then, click OK.
  17. Restart your Windows server.You have successfully disabled the SSL v3 protocol.

For instructions about disabling browser support for the SSL v3 protocol, see Disabling Browser Support for the SSL 3.0.


10 places to recycle your cell phone

EcoAtm

Here are 10 places to take your phones so they can be refurbished, reused, or recycled and diverted from the landfill.

1. EcoATM

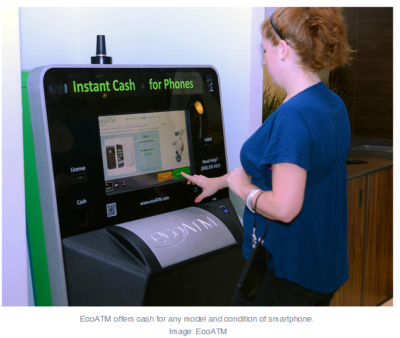
EcoATM is an automated kiosk that collects your unwanted cell phones and tablets and gives you cash for them. It’s made by the same people that make CoinStar, so you’ll find them by the checkout lines at various grocery store chains. It accepts devices from any era or in any condition, and offers anywhere between a few bucks to a few hundred dollars in return. EcoATM partners with R2 certified e-waste reclamation facilities to ensure they are recycled, or gives the phones a second life.

2. Eco-Cell

Eco-Cell is a Louisville, Kentucky-based e-waste recycling company. It partners with nonprofits and organizations such as the Jane Goodall Institute. Bins are located in coffee shops and other businesses around the country, where the collected phones are shipped to Eco-Cell in Louisville. If the phones are reusable, they resell them and pass some of the money back to the owner. If they are not reusable, the phones are recycled and the owner is paid the money for the value of the recycled materials.

3. Best Buy

Best Buy has recycling kiosks in their stores in the US, as well as recycling in-store for no charge to you. They typically limit it to three items per family, per day. From there, they work with recycling companies to make sure the phones and other electronics don’t end up in landfills.

4. Hope Phones

The Hope Phones campaign was started in 2009 by Medic Mobile, which works to advance health care in 16 countries by using mobile technology. Individuals, nonprofits, groups, or businesses can host a Hope Phones campaign to donate old phones. They are recycled and valued so the nonprofit can get new technology for the field. Most old models are valued at $5, but newer smartphones are regularly valued at $80, according to the website.

5. Cell Phones for Soldiers

Cell Phones for Soldiers is a nonprofit that works to provide cost-free communication services to active-duty military and veterans. New or gently used mobile phones are accepted and each device valued at $5 turns into 2.5 hours of free talk time for the soldiers.

6. Gazelle

Gazelle is one of the most popular trade-in options for old cell phones. The company is headquartered in Boston, with locations in Louisville, Kentucky and in Texas. Pick your brand, model, carrier, and plug in what kind of shape it’s in, then get an offer. Ship it for free, and receive a check or gift card to Amazon.com or PayPal after they check it out and make sure it’s worth what you say it is.

7. Call2Recycle

Call2Recyle  is a no-cost recycling program for batteries and cell phones in the US and Canada. It has collection boxes that can be placed anywhere, which have shipping permits so mailing them is easy. They also have bulk shipping if there is a large amount of recyclables.

8. Your carrier

AT&T has a trade-in program for unwanted phones and accessories regardless of manufacturer or carrier. The owner gets a “promotion card” which can then be used to take money off a new phone or other purchase. Make sure you erase all your information before you turn them in, though.

Verizon also offers a trade-in program where the owner can receive an electronic gift card once they send in the phone and have it appraised.

9. Local places

Your city undoubtedly has places to recycle old phones. Most local government websites, like New York’s, have directions of where to go to recycle phones. A lot of cities usually have nonprofits that donate old phones as well. The EPA also has an option to find out what electronics you can recycle with mail-in options.

10. Recycling for Charities

This nonprofit features one charity at a time, for which they donate money from recycling old phones. All makes and models are welcome at Recycling for Charities, and the phone condition is not an issue. They make an attempt to refurbish it first, then find recycling centers to ensure the materials won’t go into landfills if the phones cannot be reused.

These 10 services are well-researched and well-known options, but make sure to research on your own where your phone is going to make sure it is going to a certified e-waste recycler, so it doesn’t end up in a landfill despite your efforts.


Important: Internet Explorer Vulnerability

IEIMPORTANT INFORMATION: US-CERT and UK security agencies warn users to stop using Internet Explorer because of the severity in this security hole that has been used in “limited, targeted attacks”.

United States Computer Emergency Readiness Team released an alert on April 28, 2014 regarding vulnerabilities in Microsoft’s Internet Explorer.  Internet Explorer versions 6 through 11 are susceptible to be victims of attacks to exploit the Remote Code Execution Vulnerability.

US-CERT Vulnerability Note VU#22292

Microsoft Security Advisory 2963983

Workarounds:

Basic protection includes the installation of Anti-malware software, enabling a Firewall and applying all Windows/Microsoft updates.  In addition to basic protection, we recommend taking extra preventative steps listed below.  It is not necessary to apply all of the following workarounds, apply one to help protect your system and data.

Enable Enhanced Protection Mode

    1. Open IE 10 or IE 11.
    2. Click the Tools menu and select Internet Options.
    3. In the Internet Options window, click the Advanced tab.
    4. Scroll down the list of options until you see the Security section, click the checkbox to Enable Enhanced Protected Mode.  For IE 11 in a 64-bit version of Windows, you also need to click the checkbox to “Enable 64-bit processes for Enhanced Protected Mode”.
    5. Restart IE to force the new settings.

Change Access Control List and unregister VGX.DLL:

32-Bit Systems:

      1. Open elevated Command Prompt (Run as Administrator)
      2. Run the following command:
        “%SystemRoot%\System32\regsvr32.exe” -u “%CommonProgramFiles%\Microsoft Shared\VGX\vgx.dll”
      3. Click OK to close Dialog Box confirming un-registration has succeeded.

64-Bit Systems:

      1. Open elevated Command Prompt (Run as Administrator)
      2. Run the following command(s) separately:
        “%SystemRoot%\System32\regsvr32.exe” -u “%CommonProgramFiles%\Microsoft Shared\VGX\vgx.dll” “%SystemRoot%\System32\regsvr32.exe” -u “%CommonProgramFiles(x86)%\Microsoft Shared\VGX\vgx.dll”
      3. Click OK to close Dialog Box confirming un-registration has succeeded.

Windows XP and all other users.

For all user(s) that cannot follow recommendations from Microsoft are urged to use a different web browser.  For secure download(s) of Google Chrome or Mozilla Firefox, please follow the links provided.

For assistance with Changing IE Settings or Install a new Browser

 please contact us 856-745-9990 or click here.


National Cyber Security Awareness Month Tips

360px-US_Department_of_Homeland_Security_Seal.svg

October is National Cyber Security Awareness Month by Department of Homeland Security.

National Cyber Security Awareness Month encourages vigilance and protection by sharing tips and best practices in regard to how to stay safe.

Small businesses are a large target for criminals because they have limited resources dedicated to information system security.  Cyber criminals look for access to sensitive data.

Create a cyber security plan

The Federal Communications Commission offers a Cyber Planner for small businesses.  The planner guide allows specific sections to be added to your guide, including Privacy and Data Security, Scams/Fraud, Network Security, Website Security, Email, Mobile Devices, Employees, Facility Security, Operational Security, Payment Cards, Incident Response/Reporting and Policy Development/Management.

Generate a personalized Small Biz Cyber Planner Guide.

Establish Rules and Educate Employees

Create rules and guidelines for protecting information.  Educate employees on how to post online in a way that does not share intellectual property.  Clearly explain the penalties for violating security policies.

Network Protection

Deploy and update protection software, such a antivirus and antispyware software, on each computer within your network.  Create a regularly scheduled full computer scan.

Manage and assess risk

Cyber criminals often use small businesses that are less-protected to get to larger businesses.  Being a victim of a cyber-attack can have a huge impact on any business including financial issues, loss of possible business partner(s) and many more issues.

Download and install software updates

Installing software updates from vendors can protect your network for unwanted viruses and malware.  Vendors frequently release patches/updates for their software to improve performance and fine-tune software security.  (Example:  Adobe Reader, Adobe Flash and Java updates are critical for protection.)

Backup important business data and information

Create a backup plan for all data including documents, databases, files, HR records and accounting files.  A regularly scheduled backup can be a full, differential or incremental.

  • Full Backup:  Backup of all data.
  • Differential Backup:  Backup of all data that has changed since the last full backup.
  • Incremental Backup:  Backup of all data that has changed since the last full or incremental backup.

Control physical access

Protecting physical property is a very important role in protecting intellectual data.  Create a physical security plan to prevent unauthorized access to business computers and components. 

Secure Wi-Fi

Securing your Wi-Fi network consists of a few configurations.  Configure a device administrator password for your wireless access point (WAP) or router, require a password for Wi-Fi access and do not allow the WAP or router to broadcast the Service Set Identifier (SSID), also known, as network name.


Tips to Troubleshoot Outlook

microsoft-outlook

Microsoft Outlook can connectivity issue with Microsoft Exchange.  Troubleshooting and fixing these issues can range from a simple reboot to creating a new mail profile.

Restart Outlook and/or Computer

Many connectivity problems with Outlook can be resolved by simply restarting Outlook and/or the Computer.

  1. Restart Outlook.
  2. After restarting Outlook, verify connectivity.
  3. If there are still connectivity problems, restart Computer.
  4. Once computer is up and running, verify connectivity in Outlook.

Outlook3

Offline Mode

 Outlook 2010 and newer:

  1. Click the Send/Receive tab.
  2. Locate the Work Offline button.
  3. Click the Offline button. 

Outlook 2007 and older:

  1. Click File Menu.
  2. Uncheck the Offline box.

At the bottom of your Outlook Window there will be a “Trying to Connect” prompt.  If  Outlook is “Connected” the problem is solved.

Rebuild PST or OST File

OST File

  1. Close Outlook.
  2. Open the Control Panel.
  3. Select Mail icon.
  4. In the next window, click Data Files.
  5. Locate your data file, select and click Open File Location.
  6. Locate the data file using Windows Explorer.
  7. Rename the file extension from .OST to .OLD
  8. Close these windows and open Outlook

PST File

  1. Search for scanpst.exe using Windows Explorer.
  2. Double click scanpst.exe to run the application.
  3. In the next window, click Browse.
  4. Locate your .pst file.
  5. Click Start.
  6. Scanpst will scan the data file eight times.  
  7. If the scan finds errors, there will be a prompt to repair. For backup purposes, check the Make Backup Of Scanned File Before Repairing box.
  8. Click Repair.
  9. Close these windows and open Outlook

outlook2

Repair Software Install

  1. Open Control Panel.
  2. Click Programs and Features.
  3. Scroll down and highlight the Microsoft Office installation.
  4. Click Change.
  5. Select Repair.
  6. Click Continue.
  7. Allow the repair to complete.
  8. Reboot your computer. 

outlook

Recreate Mail Profile

  1. Open Control Panel.
  2. Click Mail.
  3. Select Show Profiles.
  4. Click Add.
  5. Name the new profile.
  6. Follow the steps for the Outlook Account Setup Wizard.
  7. Verify the new profile and set as the default or delete old profile. 


Tips for Supporting iOS 7

ios7

September 18, 2013 was the official release of iOS 7.  Complementary to iOS 7 are several support questions for corporate-owned iOS devices, including Bring Your Own Device (BYOD) and Corporate Owned Personally Enabled (COPE) devices.

COPE devices are corporately compliant prior to distribution to employees; this allows consistency and higher security for all enterprise devices.

There may be a few problems when upgrading to iOS 7 such as older iPhone/iPad devices may not support iOS 7 and not all features are available on all devices or in all countries. 

Here are some tips for supporting iOS 7 in the enterprise. 

Implement VPP

Apple now offers a Volume Purchase Program (VPP) for business.  VPP can retain volume licenses for Apps and Books.  Download Apple’s VPP Guide.

Third-Party iOS Apps

Configuring third-party apps can be completed in iOS 7,  Mobile Device Management (MDM) distributes the third-party configuration and the developer needs to enables it.

Test and Troubleshoot

The most important step before deploying in-house developed enterprise app(s) is to test and troubleshoot.  Testing and troubleshooting will save time and resources after deployment.

Per App VPN

Per app VPN ensures that only managed app data travels through VPN.  iOS 7 apps can automatically be connected to VPN when launched.  Also, for security purposes this tool will separate corporate data and personal data.


American Red Cross – Mobile Apps

Untitled

September is National Preparedness Month sponsored by the Federal Emergency Management Agency in the US Department of Homeland Security.  American Red Cross now offers Mobile Apps that include a Volunteer App, First Aid App, Shelter Finder App and multiple natural disaster Apps.  Prepare your company and family for emergency situations using ‘Make a Plan’ feature in each App.

vaVolunteer App

Team Red Cross wants you! Join Team Red Cross to help provide care and comfort to your local community when the unthinkable occurs. Team Red Cross is looking for people with various backgrounds, talents, and skill levels. Make a difference, support your community and join Team Red Cross!

taTornado App

Get your family and home ready for a tornado with the official Tornado App from the American Red Cross. The Tornado app puts everything you need to know prepare for a tornado – and all that comes with it – in the palm of your hand.

haHurricane App 

Monitor conditions in your area or throughout the storm track, prepare your family and home, find help and let others know you are safe even if the power is out – a must have for anyone who lives in an area where a hurricane may strike or has loved ones who do. 

sfaShelter Finder App 

The Red Cross Shelter Finder is available in the iTunes store and works on iOS devices. The Shelter Finder displays open Red Cross shelters and their current population on an easy to use map interface.

faaFirst Aid App

The official American Red Cross First Aid app puts expert advice for everyday emergencies in your hand. The official American Red Cross First Aid app offers videos, interactive quizzes and simple step-by-step advice it’s never been easier to know first aid. 

eaEarthquake App 

Be ready for an earthquake with Earthquake by American Red Cross. Get notified when an earthquake occurs, prepare your family and home, find help and let others know you are safe even if the power is out – a must have for anyone who lives in an earthquake-prone area or has loved ones who do.

wfaWildfire App 

Be ready for wildfires with the official Red Cross wildfire app. Blaze Warnings, Blaze Alerts” and Blaze Path Tracker are tools included with the Wildfire App. You can also let loved ones know that you are safe even if the power is out and learn what steps you should take to prepare your family, home and pets – all from the palm of your hand.

Download these Apps:  Android and Apple

Windows 8 – Access Windows XP Apps

Client Hyper-V is a virtualization tool that comes with Windows 8 Professional and Windows 8 Enterprise.  Using Client Hyper-V can run Windows XP applications on a Windows 8 machine.  This tool requires that your system has a minimum of 4GB of RAM, 64-bit CPU that supports Second Level Address Translation (SLAT).  Also, the key virtualization feature must be enabled prior to setup.

6388488-620-290

Step 1 – Getting Started with Windows 8 Client Hyper-V

Step 2 – Installing Client Hyper-V

Step 3 – Create a Virtual Switch

Step 4 – Create a Virtual XP Machine

Step 5 – Setup USB Access

Step 6 – Install RemoteApp Tool

Step 1 – Getting Started

Launch and verify System Information:

  • To access the Apps Search page:  [Windows] + Q keystroke.
  • In the text box type msinfo32 and click msinfo32.exe.
  • Scroll to the bottom of the right panel and the following values are set to Yes:  (If the Second Level Address Translation Extensions or the Data Execution Protection values are set to No, then you will not be able to use Windows 8’s Client Hyper-V.)
      1. Hyper-V – VM Monitor Mode Extensions
      2. Hyper-V – Second Level Address Translation Extensions
      3. Hyper-V – Virtualization Enables in Firmware
      4. Hyper-V – Data Execution Protection.

Enabling Virtualization through Setup Utility

    • Before the operating system loads, boot into your Setup Utility.
    • Select Computer Setup (If applicable)
    • Scroll to Security drop-down menu and select System Security.

  • Enable Virtualization Technology.
  • Save Changes and Exit.

Go to Step 2 – Installing Client Hyper-V.

Step 2 – Install Client Hyper-V

    • To access the Programs and Features tool:  [Windows] + X keystroke.
    • Select Turn Windows Features on or off (located in the left panel).
    • Select the Hyper-V box.

  • Click OK.  After Installation there will be a prompt to Restart the system.

Go to Step 3 – Create a Virtual Switch.

Step 3 – Create a Virtual Switch

For a VM to connect to your network or Internet, the VM must be connected to a Virtual Switch.

  • Open Hyper-V Manager (Start Screen)
  • In the Actions Pane, select Virtual Switch Manager.
  • Choose the type of Virtual Switch you would like to create:  External*, Internal and Private
    1. External:  Connection with entire network and Internet.
    2. Internal:  Connection with “Host” machine network connection only.
    3. Private:  Connection with other virtual machines only.
  • After selecting the type, another window will open where you can Name the switch and add the Description.
  • Click OK.  Then click Yes to “Apply Networking Changes”.

In a typical Client Hyper-V Configuration, you will not use the following settings:

    • “Enable virtual LAN identification for management operating system in the VLAN ID” check box.
    • Extensions (Located under the Virtual Switch on the left panel).

  • MAC Address Range (Global Network Settings on the left panel).

Go to Step 4 – Create a Virtual XP Machine.

Step 4 – Create a Virtual XP Machine

  • Open Hyper-V Manager (Start Screen)
  • In the Actions Pane, select New and then Virtual Machine…
  • Before You Begin window, click Next.
  • Specify Name and Location window, you can name your VM and where you would like to save it, then click Next.
  • Assign Memory window, type the amount of memory you would like to allocate for the VM (8MB – 1804MB), then click Next.
  • Configure Networking window, click Next.
  • Connect Virtual Hard Disk window, you can Create a virtual hard disk, Use an existing virtual hard disk or Attach a virtual hard disk later, then click Next.
  • Installation Options window, you can Install the OS laterInstall an OS from a boot CD/DVD or ISOInstall OS from boot floppy disk or Install OS from a netowrk-based installation server.
  • Then click Next to view the Summary or click Finish to complete the setup.

Setting up the Networking settings for an XP machine requires additional steps.

  • Open Hyper-V Manager (Start Screen)
  • In the Actions Pane, select Settings…
  • Select Legacy Network Adapter in the “Add Hardware” section, then click Add.
  • In the “Legacy Network Adapter” section, select the Virtual Switch you created in the last step.
  • Click Apply and then OK.

Installation:

    • Insert the Windows XP CD into the computer.
    • Open Hyper-V Manager (Start Screen)
    • Select your VM and then in the Actions Pane, select Connect.
    • Click the Green Power Button.

  • Once Windows XP Installation appears, follow all of the installation steps.

Go to Step 5 – Setup USB Access.

Step 5 – Setup USB Access

Client Hyper-V does not support USB access.  Setting up a Remote Desktop Connection allows the XP Virtual Machine to access USB devices while also providing a full screen display and better performance.  For Remote Desktop Connection to work the Host and Client machines must be setup on the same Workgroup.

Host Machine Setup:

      • To access the System window:  [Windows] + [Break] keystroke.
      • From this window, you can change your Computer Name and the Workgroup name.
      • Restart machine.

Client Machine Setup:

      • Open Hyper-V Manager (Start Screen)
      • Select your VM and then in the Actions Pane, select Connect.
      • Click the Green Power Button.
      • To access the System window:  [Windows] + [Break] keystroke.
      • Select the Remote tab, check the box to “Allow users to connect remotely to this computer“.
      • Click Apply and OK.
      • Select Computer Name tab, you can change your Computer Name and the Workgroup name.
      • Restart machine.

Setting up initial remote connection:

    • Acccess the App Search Page on the Host Machine:  [Windows] + Q keystroke.
    • In the text box type Remote and click Remote Desktop Connection.
    • Remote Desktop Connection window, click the Show Options button.
    • Type:  Windows XP System name and Windows XP User name, then click Save As and assign a Connection name.
    • Select the Local Resources tab, in the Local devices and resources section, click More.
    • Select all the devices you would like access to, and then click OK.
    • Return to the General Tab and click Save.

  • Select Connect.
  • After logging in you can install XP drivers, install a printer and access Host machine files.

Go to Step 6 – Install RemoteApp Tool.

Step 6 – RemoteApp Tool

RemoteApp tool can directly access Windows XP applications from Windows 8.

Install RemoteApp Update

  • Open Hyper-V Manager (Start Screen)
  • Select your VM and then in the Actions Pane, select Connect.
  • Open IE, go to Microsoft Download Center, and search for Enable Remote App.
  • Select “Update for Windows XP SP3 to enable RemoteApp” and click Download.
  • Follow instructions to install RemoteApp, select Finish.  After Installation there will be a prompt to Restart the system.

Modify the Registry

  • Open Run [Windows] + R keystroke.
  • In the text box type Regedit to open Registry Editor.
  • Go to:  HKEY_LOCAL_MACHINE\SOFTWARE\Microsoft\Windows NT\CurrentVersion\Terminal Server\TSAppAllowList
  • In TSAppAllowList, select fDisabledAllowList, change the value from 0 to 1.
  • Click OK.

File Path to EXE for Programs (For each Application)

  • Locate the application shortcut.
  • Right click on it.
  • Select the Properties.
  • In the Properties dialog box, select the Find Target button.
  • Copy the path and executable file name.
  • Log off but keep the Virtual Machine running.

Customize RDP File (Saved in Step 5)

  • Navigate to your RDP file and copy/paste a copy of the file.
  • Rename the copy to an *Application*.rdp.  (Example:  Outlook.RDP)
  • Open the file using Notepad and make the following changes:
    • Locate:
      • remoteapplicationmode:i:0
      • alternate shell:s:
    • Change to:
      • remoteapplicationmode:i:1
      • alternate shell:s:rdpinit.exe
    •   Add:
      • disableremoteappcapscheck:i:1
      • remoteapplicationname:s:{Application Name}
      • remoteapplicationprogram:s:{Path to executable file}
  • Select File and Save.

Return to Step 1 – Getting Started with Windows 8 Client Hyper-V.