Use multiple monitors with Windows 7’s Remote Desktop Connection

In Windows 7 you can connect to a remote computer and take full advantage of your local system’s multiple monitors. Here’s how.

If you’re using multiple monitors on your system setup and you regularly connect to other systems via Remote Desktop, you know how frustrating it is to go from a multiple-monitor display to a single-monitor display for your remote connection. If so, you’ll definitely want to learn how you can take advantage of multiple monitors in Microsoft Windows 7’s Remote Desktop Connection.

However, before going any further it is important to understand right off the bat that multiple-monitors support in Windows 7’s Remote Desktop is available only on Windows 7 Ultimate and Windows 7 Enterprise. (It is also available in Windows Server 2008 R2.) Furthermore, both the local and remote systems must be running one of the supported versions. For example, Windows 7 Ultimate is running on the local and Windows 7 Enterprise is running on the remote.

As long as you have the proper configuration, Windows 7 provides you with real multiple-monitor support as opposed to the monitor-spanning feature that was introduced in the previous version of Remote Desktop Connection. This means that in Windows 7 you can use this feature to connect to a remote computer and take full advantage of your local system’s multiple monitors on your remote system.

In this edition of the Windows Desktop Report, we’ll describe Windows 7’s Remote Desktop support for multiple monitors and show you how to configure it for connecting to other Windows 7 systems. we’ll also show you how to use Remote Desktop’s monitor-spanning feature when connecting to, and from, Windows versions that do not support the multiple-monitors feature.

What’s the difference?

Before we get started, let’s take a moment to discuss the different types of Remote Desktop monitor configurations you can have when using a system with multiple monitors. In the standard type of connection, Remote Desktop displays the remote system in a window on one monitor. In a connection configured with the monitor-spanning feature, Remote Desktop displays the remote system in a window on one monitor but allows you to drag or span that window across multiple monitors. In a connection configured with the multiple-monitors feature, Remote Desktop makes the remote system behave as if it were physically connected to multiple monitors. Each of these configurations is illustrated in Figure A.

Figure A

There are three types of configurations you can use when using Remote Desktop on a system with multiple monitors.

Configuring a multiple-monitors connection

If you have the proper setup, configuring Windows 7’s Remote Desktop multiple-monitor feature is easy. To begin, Launch Remote Desktop Connection and select the system you want to connect to with multiple-monitor support from the Computer drop-down list. Then, click the Options button to expand the Remote Desktop Connection window so that you can see all the tabs. Next, choose the Display tab and select the Use All My Monitors for the Remote Session check box, as shown in Figure B. To complete the procedure, return to the General tab and click the Save button.

Figure B

Selecting the Use All My Monitors for the Remote Session check box is all that is needed to enable the multiple-monitor feature.

When you connect to the remote system, the remote system’s monitor will instantly fill your multiple monitors, just as if it were physically connected to the monitors.

Configuring a monitor-spanning connection

As mentioned, in a connection configured with the monitor-spanning feature, Remote Desktop allows you to drag or span the window across multiple monitors. However, there are a couple of caveats. First your multiple monitors must have the same screen resolution. Second, the monitors must be aligned, or positioned, side-by-side. Third, the combined screen resolution of your multiple monitors must be under 4096 x 2048.

To launch Remote Desktop Connection with monitor-spanning support, just click the Start button and type the following command in the Start Search box. (Alternatively, you can open a Command Prompt window and type the same command.)

Mstsc /span

When you do, you’ll see the standard Remote Desktop Connection dialog box, and you can launch the connection as you normally would. As soon as you make a connection, you’ll immediately see the desktop of the remote system spread across your multiple monitors. If you need to have access to both the local and remote desktops, you can reduce the size of the remote system’s desktop to only one monitor by clicking the Restore Down button on the Remote Desktop window. As a shortcut, you can also use the keystroke: [Ctrl][Alt][Break].

Once the window is on one monitor, you use click and drag to resize the window to completely cover a single monitor. Keep in mind that when you reduce the size of a spanned remote widow, it will display both horizontal and vertical scroll bars, as shown in Figure C, that you’ll have to use to see the entire screen. However, you can instantly span the window by clicking the Maximize button.

Figure C

When you resize the remote desktop’s spanned window, you’ll have to use scroll bars to view the entire screen.

Creating a shortcut

Of course, using a command line to launch your Remote Desktop connection isn’t the most convenient way to use the monitor-spanning feature. Chances are that you already have a Remote Desktop Connection RDP file saved on your desktop. If so, you can create a standard Windows shortcut that will incorporate both the special command line and your RDP file.

To begin, right-click anywhere on the desktop and then select New | Shortcut from the context menu. When you see the Create Shortcut wizard, just type mstsc /span and the path to the RDP file in the text box, as shown in Figure D. Be sure that you enclose the path to the RDP file in double quotes if the path has spaces in it. To continue, click Next and give the shortcut an appropriate name, such as Saturn – Remote Spanning, and then click Finish.

Figure D

You can create a standard Windows shortcut that will incorporate both the special command line and your RDP file.

You can now use this shortcut to launch your remote desktop connection and span the Remote Desktop window across all the available space on your multiple monitors. Of course, the spanned desktop won’t exactly behave like a multiple-monitor setup when you open multiple windows. As such you’ll have to use a little creative click-and-drag resizing to reposition the windows on the spanned desktop.

Have questions?

Get answers from Microsofts Cloud Solutions Partner!
Call us at: 856-745-9990 or visit: https://southjerseytechies.net/

South Jersey Techies, LL C is a full Managed Web and Technology Services Company providing IT Services, Website Design ServicesServer SupportNetwork ConsultingInternet PhonesCloud Solutions Provider and much more. Contact for More Information.

To read this article in its entirety click here.http://www.techrepublic.com/blog/windows-and-office/use-multiple-monitors-with-windows-7s-remote-desktop-connection/

Use Windows 7 Event Viewer to track down issues that cause slower boot times

Here’s how to use some of the new features in Windows 7’s Event Viewer to investigate a slow boot time.
Overview

Windows 7’s Event Viewer includes a new category of event logs called Applications and Services Logs, which includes a whole host of subcategories that track key elements of the operating system. The majority of these subcategories contain an event log type called Operational that is designed to track events that can be used for analyzing and diagnosing problems. (Other event log types that can be found in these subcategories are Admin, Analytic, and Debug; however, describing them is beyond the scope of this article.)

Now, within the operating system section is a subcategory titled Diagnostic-Performance with an Operational log that contains a set of a Task Category called Boot Performance Monitoring. The Event IDs in this category are 100 through 110. By investigating all the Event ID 100 events, you will be able to find out exactly how long it took to boot up your system every time since the day you installed Windows 7. By investigating all the Event ID 101 thru 110 events, you will be able to identify all instances where boot time slowed down.

Getting started

You can find and launch Event Viewer by opening the Control Panel, accessing the System and Security category, selecting the Administrative Tools item, and double-clicking the Event Viewer icon. However, you can also simply click the Start button, type Event in the Start Search box, and press Enter once Event Viewer appears and the top of the results display.

Creating a Custom View

Once you have Event Viewer up and running, you can, of course, drill down through the Applications and Services Logs and locate the Diagnostic-Performance Operational log and begin manually looking through the events recorded in the log. However, you can save yourself time and energy by taking advantage of the new Custom View feature, which is essentially a filter that you can create and save.

To do so, pull down the Action menu and select the Create Custom View command. When you see the Create Custom View dialog box, leave the Logged option set at the default value of Any Time and select all the Event level check boxes. Next, select the By Log option button, if it is not already selected, and click the dropdown arrow. Then, drill down through the tree following the path: Applications and Services Logs | Microsoft | Windows | Diagnostics-Performance. When you open the Diagnostics-Performance branch, select the Operational check box, as shown in Figure A.

Figure A
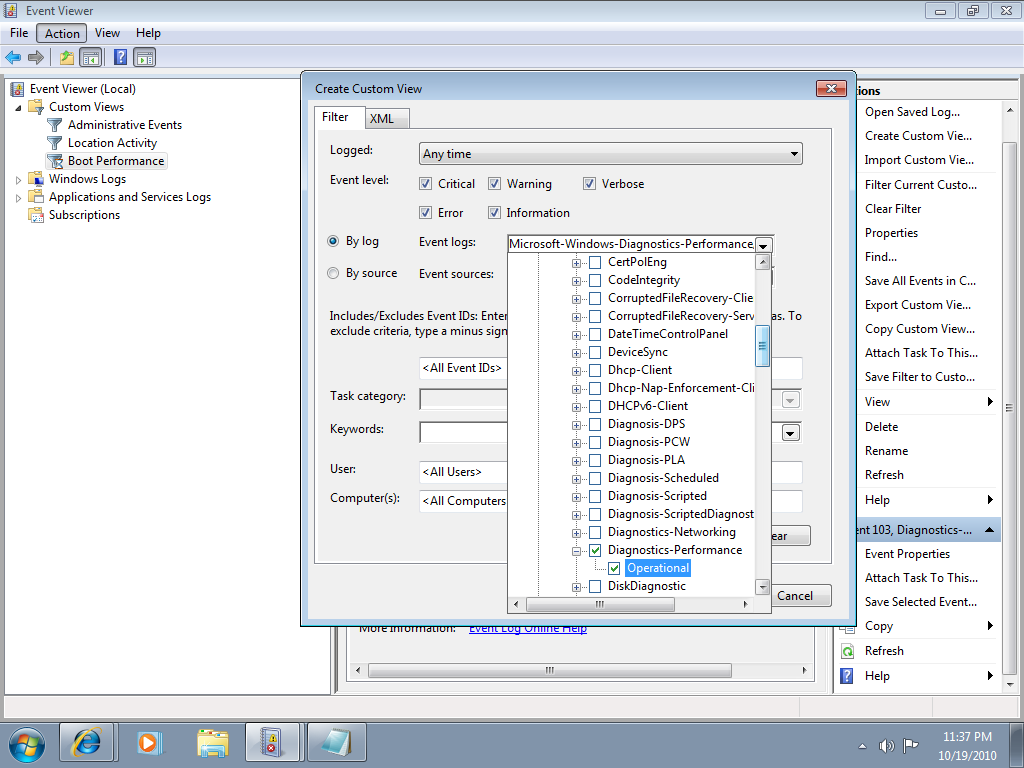
When you get to the Diagnostics-Performance branch, select the Operational check box.

To continue, type 100 in the Includes/Excludes Event IDs box, as shown in Figure B, and then click OK.

Figure B
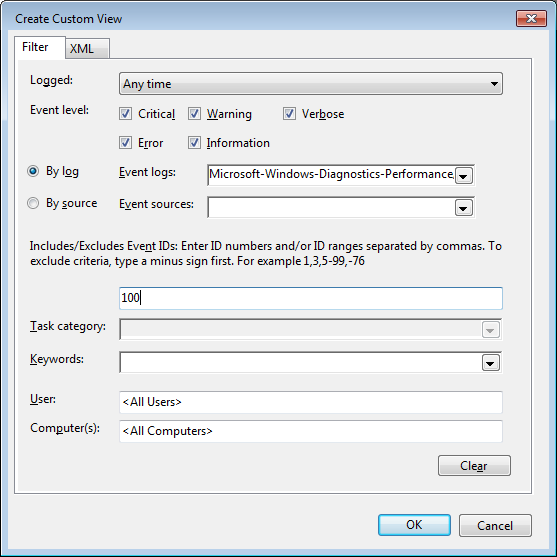
Event ID 100 records how long it takes to boot up your system.

When you see the Save Filter to Custom View dialog box, enter a name, as shown in Figure C, and click OK.

Figure C
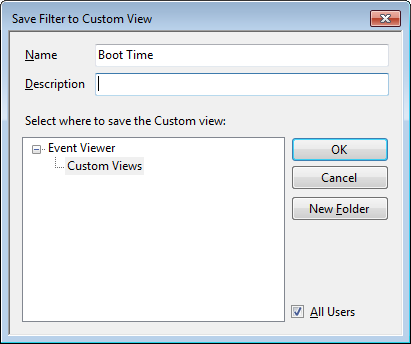
To save the filter as a Custom View, simply provide an appropriate name, such as Boot Time.

You’ll now repeat these steps and create another Custom View, and this time, you’ll type 101-110 in the Includes/Excludes Event IDs box and name it Boot Degradation.

Investigating Boot Time

To investigate your Windows 7 system’s boot time, select Boot Time in the Custom Views tree and then sort the Date and Time column in ascending order. When you do, you’ll see a complete history of every time you have booted your system since the day you installed Windows 7. In Figure D, you can see that we have hidden the Console Tree and the Action Pane to focus on the events.

Figure D
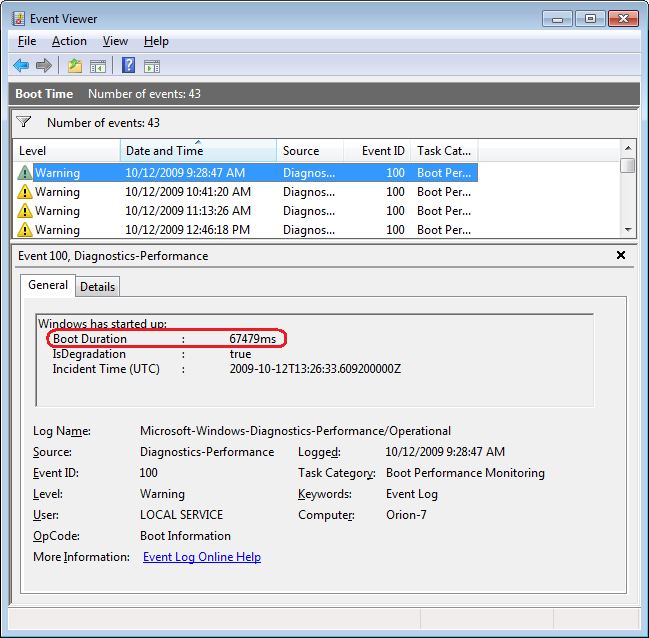
By sorting the Date and Time column in ascending order, you’ll see a complete history of every time you have booted your system since the day you installed Windows 7.

As you can see, the first recorded Boot Time on my sample system was 67479 milliseconds in October 2009. Dividing by 1,000 tells me that it took around 67 seconds to boot up. Of course, this was the first time, and a lot was going on right after installation. For example, drivers were being installed, startup programs were being initialized, and the SuperFetch cache was being built. By December 2009 the average boot time was around 37 seconds.

In any case, by using the Boot Time Custom View, you can scroll through every boot time recorded on your system. Of course, keep in mind that there will be normal occurrences that may lengthen the boot time, such as when updates, drivers, and software is installed.

Now, if you click the Details tab, you’ll see the entire boot process broken down in an incredible amount of detail, as shown in Figure E. (You can find more information about the boot process in the “Windows On/Off Transition Performance Analysis” white paper.) However, for the purposes of tracking the boot time, we can focus on just three of the values listed on the Details tab.

Figure E
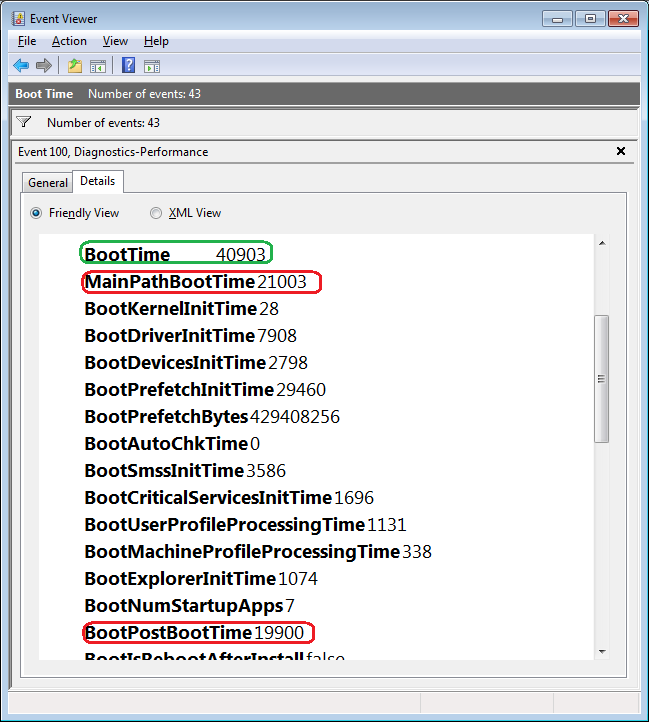
The Details tab contains an incredible amount of detail on the boot time.

MainPathBootTime

MainPathBootTime represents the amount of time that elapses between the time the animated Windows logo first appears on the screen and the time that the desktop appears. Keep in mind that even though the system is usable at this point, Windows is still working in the background loading low-priority tasks.

BootPostBootTime

BootPostBootTime represents the amount of time that elapses between the time that the desktop appears and the time that you can actually begin using the system.

BootTime

Of course, BootTime is the same value that on the General tab is called Boot Duration. This number is the sum of MainPathBootTime and BootPostBootTime. Something that we didn’t tell you before is that Microsoft indicates that your actual boot time is about 10 seconds less that the recorded BootTime. The reason is that it usually takes about 10 seconds for the system to reach an 80-percent idle measurement at which time the BootPostBootTime measurement is recorded.

Investigating Boot Degradation

To investigate instances that cause Windows 7 system’s boot time to slow down, select Boot Degradation in the Custom Views tree and then sort Event ID column in ascending order. Each Event ID, 101 through 110, represents a different type of situation that causes degradation of the boot time.

While there are ten different Event IDs here, not all of them occur on all systems and under all circumstances. As such, I’ll focus on the most common ones that we have encountered and explain some possible solutions.

Event ID 101

Event ID 101 indicates that an application took longer than usual to start up. This is typically the result of an update of some sort. As you can see in Figure F, the AVG Resident Shield Service took longer than usual to start up right after an update to the virus database. If you look at the details, you can see that it took about 15 seconds for the application to load (Total Time), and that is about 9 seconds longer than it normally takes (Degradation Time).

Figure F
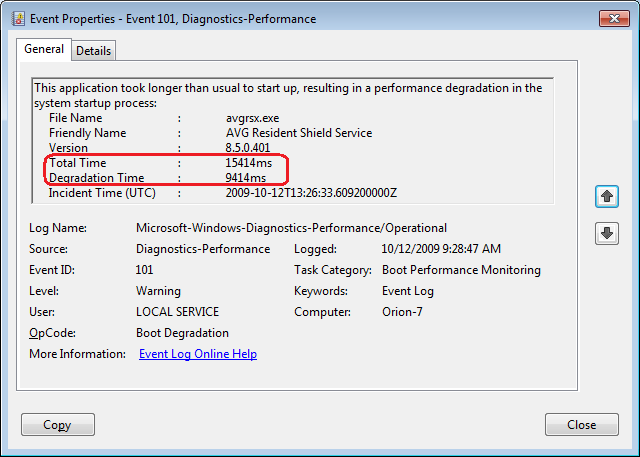
Event ID 101 indicates that an application took longer than usual to start up.

An occasional degradation is pretty normal; however, if you find that a particular application is being reported on a regular basis or has a large degradation time, chances are that there is a problem of some sort. As such, you may want to look for an updated version, uninstall and reinstall the application, uninstall and stop using the application, or maybe find an alternative.

(In the case of my friend’s Windows 7 system, there were several applications that were identified by Event ID 101 as the cause of his system slowdown. Uninstalling them was the solution, and he is currently seeking alternatives.)

Event ID 102

Event ID 102 indicates that a driver took longer to initialize. Again, this could be the result of an update. However, if it occurs regularly for a certain driver or has a large degradation time, you should definitely look in to a newer version of the driver. If a new version is not available, you should uninstall and reinstall the driver.

Event ID 103

Event ID 103 indicates that a service took longer than expected to start up, as shown in Figure G.

Figure G
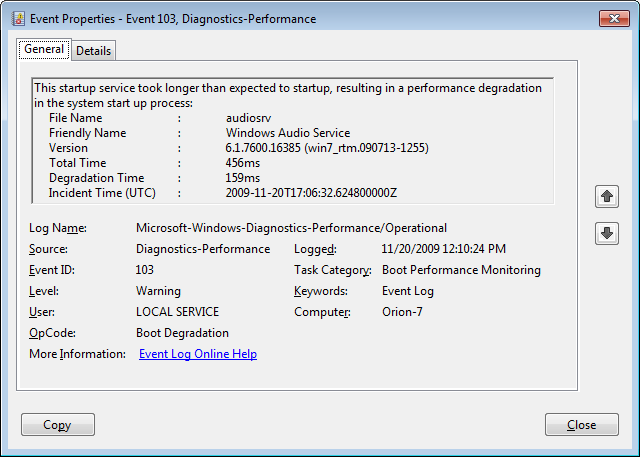
Event ID 103 indicates that a service took longer than expected to start up.

Services can occasionally take longer to start up, but they shouldn’t do so on a regular basis. If you encounter a service that is regularly having problems, you can go to the Services tool and experiment with changing the Startup type to Automatic (Delayed Start) or Manual.

Event ID 106

Event ID 106 indicates that a background optimization operation took longer to complete. On all the Windows 7 systems that we investigated, this event identified the BackgroundPrefetchTime as the culprit, as shown in Figure H. Since the Prefetch cache is a work in progress, this should not really represent a problem.

Figure H
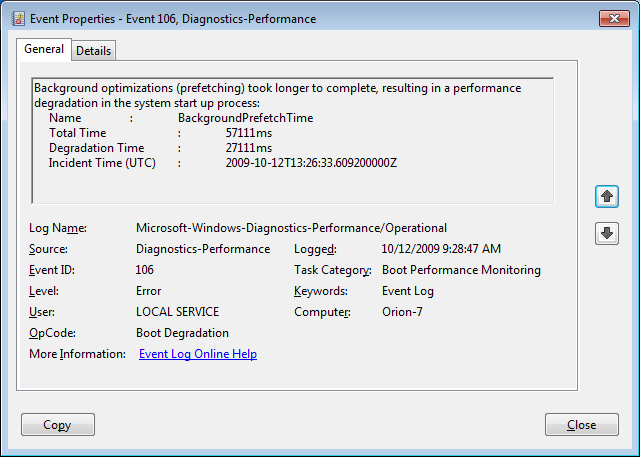
Event ID 106 indicates that a background optimization operation took longer to complete.

If you encounter regular or long degradation times related to Prefetch, you may want to investigate clearing this cache and allowing the operating system to rebuild it from scratch. However bear in mind that doing so can be tricky and instructions on doing so are beyond the scope of this article.

Event ID 109

Event ID 109 indicates that a device took longer to initialize. Again, if this is happening occasionally, there shouldn’t be anything to worry about. But if it is occurring regularly, you should make sure that you regularly back up your hard disk and begin investigating replacing the device in question.

Have questions?

Get answers from Microsofts Cloud Solutions Partner!
Call us at: 856-745-9990 or visit: https://southjerseytechies.net/

South Jersey Techies, LL C is a full Managed Web and Technology Services Company providing IT Services, Website Design ServicesServer SupportNetwork ConsultingInternet PhonesCloud Solutions Provider and much more. Contact for More Information.

To read this article in its entirety click here.

Change and customize Windows 7’s Logon screen wallpaper

In this edition of the Windows Vista and Windows 7 Report, we show you how to change Windows 7’s Logon screen wallpaper.

While experimenting with several Microsoft Windows 7 systems recently, we spent a lot of time staring at the Logon screen. During that time, we began to think about changing the Logon screen wallpaper. Now, we have changed the Logon screen wallpaper in just about every version of Windows we’ve used, so we know that there had to be a way to do so.

When we began to investigate the procedure in Windows 7, we discovered that changing the Logon screen wallpaper in the newest version of the Windows operating system is easy, once you know the steps — and you don’t even need any third-party software to do it.

In order to make it easy for OEMs to customize Windows 7, Microsoft built the ability to change the Logon screen wallpaper right in to the operating system. In this edition of the Windows Vista and Windows 7 Report, we’ll show you how to change Windows 7’s Logon screen wallpaper.

A Registry tweak

The process begins with a very minor Registry tweak. Even for those who would not normally feel comfortable editing the Registry, this one’s a piece of cake. To begin, click the Start button and type Regedit in the Search box. Then, select the appropriate result and press [Enter]. When you do, you’ll see the User Account Control, shown in Figure A, and will need to click the Yes button.Note: Editing the Windows Registry file is not without its risks, so be sure you have a verified backup before making any changes.

Figure A

You will encounter a UAC when you launch the Registry Editor.

Once the Registry Editor launches, locate and right-click on HKEY_LOCAL_MACHINE key and select the Find command. When you see the Find dialog box, type OEMBackground in the text box and make sure that only the Values check box is selected, as shown in Figure B.

Figure B

Type OEMBackground in the Find dialog box.

When the HKEY_LOCAL_MACHINE\SOFTWARE\Microsoft\Windows\CurrentVersion\Authentication\LogonUI\Background key opens, locate and double-click the OEMBackground value. When you see the Edit DWORD dialog box, change the value data from 0 to 1, as shown in Figure C. (If the OEMBackground value doesn’t exist in the Background key, you’ll need to pull down the Edit menu from that key and select New | DWORD (32-bit) Value).

Figure C

Change the value data from 0 to 1.

To complete this part of the operation, click OK to close the Edit DWORD dialog box and then close the Registry Editor.

Creating folders

In the second part of the operation, you’ll need to create a couple of folders. To begin, launch Windows Explorer. Then navigate to the C:\Windows\System32\Oobe folder. Once you access the Oobe folder, click the New Folder button in the Windows Explorer toolbar. You’ll see a confirmation dialog box, like the one shown in Figure D. When you click Continue, the new folder will be created and you can name it info.

Figure D

When you click the New Folder button, you’ll encounter a confirmation dialog box.

Then, open the info folder, click the New Folder button again, work through the confirmation dialog box, and then name the second new folder backgrounds.

Configuring the wallpaper

You can use any image that you want for your new Logon screen wallpaper. However, the image has to be in JPG format and you need to name it backgroundDefault.jpg. When you copy your file to the Windows\System32\Oobe\info\backgrounds folder, you’ll encounter and will need to work through a confirmation dialog box similar to the one shown in Figure D.

Two other things to keep in mind: First, the actual file size of backgroundDefault.jpg cannot exceed 256 KB. Second, you’ll want to use an image whose dimensions match the screen resolution that you are using. If you use a file whose dimensions are smaller, the image will be stretched and may appear distorted.

Altering shadows

As you know, the button and the text used to identify your user account on the Logon screen have shadows behind them to give them a 3D-like look, and these shadows work well with the default Logon screen wallpaper. Depending on what image you use for your new Logon screen wallpaper, these shadows might not work so well.

In addition to making it easy to change the Logon screen wallpaper, Microsoft also made it easy to adjust or disable the text and button shadows to accommodate your particular image.

To alter the shadows, launch the Registry Editor again as described above and access the

HKEY_LOCAL_MACHINE\SOFTWARE\Microsoft\Windows\CurrentVersion\Authentication\LogonUI folder

Once you open the LogonUI folder, you’ll create a new DWORD value called ButtonSet, as shown in Figure E. You can then configure the shadow by setting the value data to one of the following numbers:

  • 0 — Light shadow
  • 1 — Dark shadow
  • 2 — No shadow

Figure E

The ButtonSet value allows you to adjust or disable the text and button shadows.

Have questions?

Get answers from Microsofts Cloud Solutions Partner!
Call us at: 856-745-9990 or visit: https://southjerseytechies.net/

South Jersey Techies, LL C is a full Managed Web and Technology Services Company providing IT Services, Website Design ServicesServer SupportNetwork ConsultingInternet PhonesCloud Solutions Provider and much more. Contact for More Information.

To read this article in its entirety click here.

Modifying the Windows 7 boot loader with the Boot Configuration Data Editor tool

In Windows Vista and later versions of Windows, the bootloader was moved from boot.ini to a utility called BCDEdit. Here’s how to modify the boot config data with the new tool.

Sometimes dual-booting a system is a handy way to test new software, a new operating system, or an application that needs to be run in a specific version of Windows. Other reasons to dual-boot might include replication of a client environment.

Windows handles dual-booting by using boot.ini to display a menu of bootable choices or partitions found on the current system. In Windows Vista and later versions of Windows, the bootloader was moved from boot.ini to a utility called BCDEdit.

Recently, we decided we could make better use of some disk space that we had set aside to create a bootable VHD for Windows Server 2008 R2. There was no data other than the OS installation contained within the file because we had used it only to prepare a blog post about booting from Virtual Hard Disks. To free up the space, we deleted the VHD.

Note: Always make sure to back up any data that you want to keep before deleting or modifying partitions on VHDs. Your changes could make the partition unbootable.

Once we had the VHD removed, we thought Windows would be smart enough to clean up the boot loader, but we were not so lucky. We had Windows 7 set as the primary OS, so we were not without a system.

We started looking around for boot.ini and was directed toward the Boot Configuration Data Editor (BCDEdit) as the utility to use when editing boot loader information in Windows 7 (and in Vista too).

To begin, open the Start menu, select All Programs, and then choose Accessories. Right-click on Command Prompt and select Run As Administrator. Once in the command window, type bcdedit. This will return the current running configuration of your boot loader, showing any and all items that can boot on this system.

In this example, we decided to remove the entry for my Windows 2008 R2 installation, as we wouldn’t need it for the time being. To remove an entry, you will need to know the Boot Loader Identifier (found in curly braces in Figure A).

Figure A

we copied the whole list into Notepad and then selected and copied just the ID, braces included.

Removing an entry from the Boot Loader

One simple command got the Windows Server 2008 R2 entry out of the boot loader. At the command prompt, enter the following:

Bcdedit /delete {boot loader identifier}

Press Enter, and the Boot Configuration Data Editor (BCDEdit) will remove the entry for the ID you specified and display a message when finished. When Windows starts, the only choice available in the boot menu should be the current Windows installation.

Warning: Be careful when editing the boot configuration data. If you mistakenly remove the current instance of Windows, you may render your computer unbootable.

Have questions?

Get answers from Microsofts Cloud Solutions Partner!
Call us at: 856-745-9990 or visit: https://southjerseytechies.net/

South Jersey Techies, LL C is a full Managed Web and Technology Services Company providing IT Services, Website Design ServicesServer SupportNetwork ConsultingInternet PhonesCloud Solutions Provider and much more. Contact for More Information.

To read this article in its entirety click here.

Microsoft’s new Surface Laptops unveiled

Microsoft’s most direct shot at the MacBook yet

The one Surface product that fans have been clamoring over for years, a straight up Surface Laptop, is finally here. But, in taking design cues from both the Surface Pro and Surface Book lines, Microsoft has set lofty expectations for its first dedicated laptop device.

Priced at $999 (about £770, AU$1,330), the Surface Laptop clearly aims to chip at the MacBook and MacBook Air models that dominate college campuses practically worldwide. In fact, Microsoft claims that its cheaper (and larger) Surface Laptop can last far longer on a charge than Apple’s 12-inch MacBook: 14.5 hours.

However, every Surface Laptop shipped will come with Windows 10 S installed, Microsoft’s new version of Windows 10 that only accepts app installs downloaded from the Windows Store.

With the ability to switch from Windows 10 S to the 100% open Windows 10 Pro for $49 if you miss the chance in 2017 for free, should you need an app outside of the Windows Store that badly (spoiler: you probably will).

Regardless, at that price, can Microsoft garner enough interest from college students (or more likely their parents), who are often already strapped from the cost of an education?

The Surface Laptop in traditional ‘Platinum’

Design

Clearly, part of Microsoft’s plan is to lure those folks in with an incredibly gorgeous, and potentially trendsetting, design. The 13.5-inch Surface Laptop may very well be Microsoft’s most attractive computing product yet.

And, with four colors to choose from – Burgundy, Platinum, Cobalt Blue and Graphite Gold – there’s bound to be one that appeals to you.

A full aluminum lid and base wrap the laptop in much the same way it does a Surface Book, but ditches the aluminum in the keyboard deck for a Alcantara fabric that surrounds every plastic key and meets with the aluminum base in a seemingly airtight seal.

The fabric, according to Microsoft, is imported from Italy and laser cut to fit every Surface Laptop. Now, while many of the design elements are the same, the 13.5-inch (2,256 x 1,504) PixelSense touch display, the smooth glass-coated Precision touchpad, the chrome logo centered on the aluminum lid, we’re told that very few parts from previous parts are found within the Surface Laptop.

That much is obvious in the nature of the felt used for this keyboard deck compared against that which the Type Covers from Microsoft utilize. It’s smoother and more plush than those Type Covers, and we’re told it’s spill resistant.

The Surface Laptop’s keyboard deck is awfully comfortable

Plus, the additional height afforded by this traditional laptop design allowed Microsoft to equip the keyboard with 1.5mm of travel, and the difference in typing between that and the Surface Pro 4 is night and day. Finally, Microsoft devised a speaker system beneath the keyboard that radiates sound through the spaces between the keys and the keyboard deck.

The result isn’t much better audio than you’d find in a MacBook Air, perhaps a bit fuller, but at least it’s consistently in an uninterrupted position. Naturally, the audio gets a bit muffled when typing, but since the sound radiates throughout the laptop base, there isn’t a major loss in audio detail.

That leaves the side of the laptop base to house Microsoft’s proprietary power and docking port found on other Surface devices, as well as a USB 3.0 and Mini DisplayPort, not to mention an audio jack. If you’re already asking, “where’s the USB-C,” we’ve already been there.

Microsoft tells us that it intends for its own port to handle concerns of connectivity expansion via the Surface Connect port and its Surface Dock, while refraining from alienating customers that have yet to completely update to USB-C.

A fine explanation, but that doesn’t tell us why USB 3.0 and not USB 3.1 at least, as you’re missing out on some major data transfer speed improvements there.

Those strange strips of plastic on the base? They’re Wi-Fi antennae

Performance and battery life

Microsoft can pack the Surface Laptop with the latest Intel Core i5 or Core i7 processors (Kaby Lake), up to 512GB of PCIe solid-state storage (SSD) and as much as 16GB of RAM.

That’s a mighty powerful laptop on paper, likely stronger than either the MacBook Air or 12-inch MacBook, while rising above even the latest 13-inch MacBook Pro that still utilizes Skylake processors.

(The $999 model comes packing a 128GB SSD and 4GB of RAM with the Intel Core i5.)

As for how Microsoft fit that kind of power a laptop just 0.57 inches (14.48mm) thin, a brand new, proprietary vapor chamber cooling system helps a whole lot. The system changes the physical state of the heat as it’s taken in through the center of a fan vent in the rear of the laptop base and spits it out of the sides of that same vent.

While we obviously weren’t able to stress-test the Surface Laptop, we were able to test out how it feels to use. For starters, at just 2.76 pounds (1.25kg), this thing is super light, which is all the more impressive considering it’s a 13.5-inch, Gorilla Glass 3 touchscreen you’re looking at.

Note the Surface Connect dock port – Microsoft’s answer to USB-C

Microsoft chalks this up to, in part, the thinnest LCD touch module ever used in a laptop design. This, in turn, helps the lid to lift with just one finger. However, perhaps the hinge design needs refinement.

While you can open the display with just a finger, that slightness in the hinge is felt when the screen bounces with every tap of the touchscreen. It’s the very reason we question the inclusion of touchscreens in traditional laptops to begin with. Unfortunately, it seems Microsoft hasn’t found a better solution here.

That said, typing on the keyboard is the best time we’ve had doing such on a Surface product yet, and the portability of the whole thing is right there with Apple’s best.

As for battery life, Microsoft is, again, claiming 14.5 hours on a single charge. Microsoft later clarified for us that this number was achieved via local video playback with all radios but Wi-Fi disabled.

That testing environment sounds very similar to how TechRadar tests for battery life, so we might see battery life results in a full review fall much closer to this claim. If so, then Surface Laptop will be very tough to beat in longevity and be a potentially major driver for sales.

This is the Surface Laptop in Cobalt Blue

Early verdict

The fact that the Surface Laptop ships with a limited – sorry, “streamlined” – operating system and costs more than some previous Surface systems that come with full fat Windows 10 cannot go unnoticed – regardless of the free upgrade through this year. Unless Microsoft changes its tune come 2018, folks buying one of these with holiday gift money at the turn of the year would be wise to tack 50 bucks on top of whichever configuration they choose to get Windows 10 Pro.

While this switch will be free for any Surface Laptops bought in the education sector, that won’t help the Surface Laptop’s target audience come 2018: late high school and college students.

That said, the Surface Laptop’s incredible, potentially trendsetting design cannot go unnoticed either. Frankly, this is a laptop that appears to outclass the MacBook Air and 12-inch MacBook – and possibly even the 13-inch MacBook Pro – for hundreds less.

Save for a questionable platform versus pricing decision, the Surface Laptop has all the makings of yet another winning piece of hardware from Microsoft.

Have questions?

Get answers from Microsofts Cloud Solutions Partner!
Call us at: 856-745-9990 or visit: https://southjerseytechies.net/

South Jersey Techies, LL C is a full Managed Web and Technology Services Company providing IT Services, Website Design ServicesServer SupportNetwork ConsultingInternet PhonesCloud Solutions Provider and much more. Contact for More Information.

To read this article in its entirety click here.

Old Windows PCs can stop WannaCry ransomware with new Microsoft patch

In a rare step, Microsoft published a patch for Windows XP, Windows Server 2003 and Windows 8

Users of old Windows systems can now download a patch to protect them from this week’s massive ransomware attack.

In a rare step, Microsoft published a patch for Windows XP, Windows Server 2003 and Windows 8 — all of them operating systems for which it no longer provides mainstream support.

Users can download and find more information about the patches in Microsoft’s blog post about Friday’s attack from the WannaCry ransomware.

The ransomware, which has spread globally, has been infecting computers by exploiting a Windows vulnerability involving the Server Message Block protocol, a file-sharing feature.

Computers infected with WannaCry will have their data encrypted, and display a ransom note demanding $300 or $600 in bitcoin to free the files.

Fortunately, Windows 10 customers were not targeted in Friday’s attack. In March, Microsoft patched the vulnerability that the ransomware exploits — but only for newer Windows systems. That’s left older Windows machines, or those users who failed to patch newer machines, vulnerable to Friday’s attack.

Researchers originally believed the ransomware was spread through attachments in email phishing campaigns. That no longer appears to be the case.

Infection attempts from the WannaCry ransomware.

Once a vulnerable PC becomes infected, the computer will attempt to spread to other machines over the local network as well as over the internet. The ransomware will specifically scan for unpatched machines that have the Server Message Block vulnerability exposed.

Businesses can prevent this by disabling the Server Message Block protocol in vulnerable PCs. They can also use a firewall to block unrecognized internet traffic from accessing the networking ports the Server Message Block uses.

Fortunately, Friday’s ransomware attack may have been contained. A security researcher who goes by the name MalwareTech has activated a sort of kill-switch in WannaCry that stops it from spreading.

As a result, over 100,000 new infections were prevented, according to U.K.’s National Cyber Security Centre. But experts also warn that WannaCry’s developers may be working on other versions that won’t be easy to disable.

“It’s very important everyone understands that all they (the hackers) need to do is change some code and start again. Patch your systems now!” MalwareTech tweeted.

Unfortunately, the kill-switch’s activation will provide no relief to existing victims. The ransomware will persist on systems already infected.

Friday’s ransomware attack appears to have spread mainly in Europe and Asia, with Russia among those nations hardest hit, according to security researchers.

Security experts are advising victims to wait before paying the ransom. It’s possible that researchers will develop a free solution that can remove the infection.

Have questions?

Get answers from Microsofts Cloud Solutions Partner!
Call us at: 856-745-9990 or visit: https://southjerseytechies.net/

South Jersey Techies, LL C is a full Managed Web and Technology Services Company providing IT Services, Website Design ServicesServer SupportNetwork ConsultingInternet PhonesCloud Solutions Provider and much more. Contact for More Information.

To read this article in its entirety click here.

What you need to know about the WannaCry Ransomware

What has happened?

On May 12, 2017 a new variant of the Ransom.CryptXXX ransomware family (detected as Ransom.Wannacry) began spreading widely, impacting a large number of organizations, particularly in Europe.

What is the WannaCry ransomware?

WannaCry encrypts data files and asks users to pay a US$300 ransom in bitcoins. The ransom note indicates that the payment amount will be doubled after three days. If payment is not made after seven days, the encrypted files will be deleted.

Figure 1. Ransom demand screen displayed by the WannaCry Trojan

It also drops a file named !Please Read Me!.txt which contains the ransom note.

Figure 2. Ransom demand note from WannaCry Trojan

It propagates to other computers by exploiting a known SMB remote code execution vulnerability (MS17-010) in Microsoft Windows computers.

Are you protected against this threat?

South Jersey Techies, LLC recommends and offers Symantec Endpoint Protection to its clients. Symantec Endpoint Protection customers are protected against WannaCry using a combination of technologies: Antivirus, SONAR protection, Network-based protection.

All South Jersey Techies Managed IT Services client computers have the latest Windows security updates installed, in particular MS17-010, to prevent spreading. If your business / organization is not on our Managed IT Services plan please check or contact us to ensure that you have the latest updates installed.

Who is impacted?

A number of organizations globally have been affected, the majority of which are in Europe.

Is this a targeted attack?

No, this is not believed to be a targeted attack at this time. Ransomware campaigns are typically indiscriminate.

Can I recover the encrypted files?

Decryption is not available at this time but companies are investigating. South Jersey Techies, LLC does not recommend paying the ransom. Encrypted files should be restored from back-ups where possible. South Jersey Techies offers a number of backup solutions including Carbonite Online Backup and cloud storage solutions. If you are unsure about your computer / server backups, please check or contact us to discuss the best solution for your business.

What are best practices for protecting against ransomware?

  • New ransomware variants appear on a regular basis. Always keep your security software up to date to protect yourself against them.
  • Keep your operating system and other software updated. Software updates will frequently include patches for newly discovered security vulnerabilities that could be exploited by ransomware attackers.
  • Email is one of the main infection methods. Be wary of unexpected emails especially if they contain links and/or attachments.
  • Be extremely wary of any Microsoft Office email attachment that advises you to enable macros to view its content. Unless you are absolutely sure that this is a genuine email from a trusted source, do not enable macros and instead immediately delete the email.
  • Backing up important data is the single most effective way of combating ransomware infection. Attackers have leverage over their victims by encrypting valuable files and leaving them inaccessible. If the victim has backup copies, they can restore their files once the infection has been cleaned up. However organizations should ensure that back-ups are appropriately protected or stored off-line so that attackers can’t delete them.
  • Using cloud services could help mitigate ransomware infection, since many retain previous versions of files, allowing you to “roll back” to the unencrypted form.

Have additional questions?

Feel free to call us at contact us or (856) 745-9990 with any questions you may have.

Quick Tips: Flush the ARP cache in Windows 7

Here’s how to clear the Address Resolution Protocol cache and how to manage that cache with a few command switches.

The Address Resolution Protocol (ARP) cache is a crucial component of IP networking on any operating system. What ARP does is link Ethernet addressing (IP addressing) to hardware addressing (MAC addressing). Without this system, a machine could not communicate to the outside world as one addressing scheme could not communicate with the other.

The ARP Cache is a collection of ARP entries (mostly dynamic) that are created when a hostname is resolved to an IP address and then an IP address is resolved to a MAC address (so the computer can effectively communicate with the IP address).

When this happens, the PC will store that newly mapped address in the ARP cache, and it will stay there until the ARP cache entry timeout expires. This isn’t usually a problem, but sometimes a bad ARP entry can cause issues with Internet connections and Web page loading. When this occurs, one step that can be taken toward resolution is to clear the ARP cache. Yes, this means the ARP cache has to be rebuilt, which means a little more work for the PC, but that cache will rebuild fairly quickly.

Clearing the ARP cache is done completely through the command line, so stretch out those fingers and get ready to type. After we show you how to clear the ARP cache, we will show you how to manage that cache with a few command switches.

Flush the cache

Step 1: Open the command prompt

Click Start and then type “cmd” (no quotes) in the search dialog box, but don’t hit Enter yet. Right-click the cmd.exe icon and select Run as Administrator (Figure A). After answering the UAC, the terminal window will open offering up the command prompt.

Figure A

If the icon is already pinned in the Start menu, entering cmd is not necessary.

Step 2: Run the commands

The first command to run is

arp -a

This command will display all your ARP entries (Figure B). Naturally the -a option is not the only option available. The arp command also allows for the following switches:

-d Delete an IP address (arp -d 192.168.100.10)
-d -a Delete all entries in the ARP table
-s Add an entry to the ARP table (arp -s ADDRESS MAC_ADDRESS – Where ADDRESS is the address to be added and MAC_ADDRESS is the MAC address of the machine)

Figure B

Here you see the arp cache for two different interfaces on a single machine.

To flush the entire cache, issue the following command:

netsh interface ip delete arpcache

The above command will flush the entire ARP cache on your system. Now as soon as network connections are made, the ARP cache will begin to repopulate.

Verify the flush

Once you have flushed the ARP cache, make sure to issue the command arp -a to see if the cache has, in fact, been flushed. If it does not flush, it could be the system is a victim of a Windows bug caused when Routing and Remote Services is enabled. This is a simple bug to fix:

1.           Click Start | Control Panel.

2.           Click Administrative Tools.

3.           Click Computer Management.

4.           Double-click Services and Applications.

5.           Double-click Services.

6.           Scroll down to Routing and Remote Services.

7.           Double-click Routing and Remote Services.

8.           Set the Startup Type to Disable.

9.           Make sure the service is stopped.

Now try flushing the ARP cache again. It should work this time.

Troubleshooting

It is also possible to troubleshoot network connections using the ARP cache. For example, it is important to look out for invalid ARP entries that go to a MAC address of 00-00-00-00-00-00. If one such entry shows up, make sure to delete it from the cache using the -d switch. Say you have an ARP entry that looks like:

224.0.0.24           00-00-00-00-00-00 static

In order to delete this entry, use the arp command like so:

arp -d 224.0.0.24

And that invalid entry will be gone.

Final thoughts

There are so many ways to troubleshoot networking connections. Flushing the ARP cache is just one of those methods that is rarely thought of, but when all else fails this might be the last-gasp effort that makes you the hero of the day.

Have questions?

Get answers from Microsofts Cloud Solutions Partner!
Call us at: 856-745-9990 or visit: https://southjerseytechies.net/

South Jersey Techies, LL C is a full Managed Web and Technology Services Company providing IT Services, Website Design ServicesServer SupportNetwork ConsultingInternet PhonesCloud Solutions Provider and much more. Contact for More Information.

To read this article in its entirety click here.

Microsoft teases Windows 10’s sleek new look for the future

“Project Neon” will give your Windows 10 PC a fresh coat of paint later in 2017.

Microsoft’s planning a sleek visual refresh for Windows 10, and the company quietly teased its first official glimpse of what’s coming in the future during the Windows Developer Day keynote on Wednesday.

There aren’t many details being shared about “Project Neon” right now—as the refresh was called in earlier leaks—but the new visual look will focus on animations and transitions. The basic concept is “to add fluidity, animation, and blur to apps and the operating system,” as first reported by Windows Central. The new design language also hopes to make it easier for developers to create attractive apps.

The design refresh should extend to all Windows 10 devices including PCs and tablets, HoloLens, Xbox, and the few surviving Windows Phones, according to Windows Central.

Twitter user Tom Hounsell shared a clean version of Microsoft’s first look at Windows 10’s forthcoming design tweaks. The image shown on the livestream had large text overlaid on top of the screenshot.

As you can see, this isn’t a huge change, but the visual refresh gives Windows 10 a sleeker, more modern feel. The taskbar icons look a little more dynamic and bolder. Cortana is using the icon instead of the search box, though it’s not clear if this will be the default look. The clock on the taskbar is also bolder, and the usual notification area icons including the Action Center are notably absent. The open Groove Music window itself looks more polished and Aero-esque as well, with no title bar to be seen—just unobtrusive options in the app’s upper-right corner.

The impact on you at home: Windows Central says that some of the code for Project Neon is already available in recent Insider Preview builds of Windows 10; however, it’s unlikely the visual refresh will be ready in time for the massive Creators Update this spring. Microsoft is expected to share more information about Neon during the Build conference in May. The Creators Update is expected to roll out in late March or early April, followed by a second major update later in 2017.

Have questions?

Get answers from Microsofts Cloud Solutions Partner!
Call us at: 856-745-9990 or visit: https://southjerseytechies.net/

South Jersey Techies, LL C is a full Managed Web and Technology Services Company providing IT Services, Website Design ServicesServer SupportNetwork ConsultingInternet PhonesCloud Solutions Provider and much more. Contact for More Information.

To read this article in its entirety click here.

Microsoft’s latest Windows 10 ad annoys Chrome users with taskbar pop-ups

Ads on the Windows 10 taskbar aren’t just for Microsoft Edge anymore.

Microsoft’s aggressive advertising push inside Windows 10 is going beyond pop-ups for Microsoft Edge.

Myce recently spotted yet another pop-up ad on the taskbar in Windows 10. This time around Microsoft was advertising its extension for Chrome dubbed the Personal Shopping Assistant (Beta). The extension is a Microsoft Garage project that lets you compare prices across shopping sites.

Prior to the Chrome extension pop-up, Microsoft was advertising its rewards program for Microsoft Edge, which we spotted in early November. The earlier ad appeared to be targeted at people who didn’t use Edge that frequently.

A pop-up ad that promotes Windows 10’s Edge browser and Bing Rewards. The pop-up for the Chrome extension looks similar, as you can see on Myce.

The Chrome one, by comparison, is probably targeted at people who use Chrome as their default browser. Microsoft’s likely thinking that if people won’t stop using Chrome on Windows, at least they can use some Microsoft software while they’re doing it.

Microsoft told Thurrott.com that ads like the one for the Chrome extension are part of the company’s tests to provide, “new features and information that can help people enhance their Windows 10 experience.”

Tests or not, it’s unlikely that Microsoft will ever stop these taskbar ads even though users pay $100 or more for Windows. Thus far, Microsoft has advertised its own software and services.

The impact on you at home: If you want to make sure you don’t get pop-up ads on your taskbar you can turn them off. Open the Settings app and go to System > Notifications & Actions. On this screen under “Notifications” turn off Get tips, stricks, and suggestions as you use Windows. That’s not the only way Microsoft can advertise to you.

Have questions?

Get answers from Microsofts Cloud Solutions Partner!
Call us at: 856-745-9990 or visit: https://southjerseytechies.net/

South Jersey Techies, LL C is a full Managed Web and Technology Services Company providing IT Services, Website Design ServicesServer SupportNetwork ConsultingInternet PhonesCloud Solutions Provider and much more. Contact for More Information.

To read this article in its entirety click here.