New Website Design – Furino & Sons Inc.

The Website Design team of South Jersey Techies has been constantly working on developing great looking websites using the latest web technologies. The most recent website developed by our team is for Furino & Sons Inc. located in Branchburg, New Jersey. Furino & Sons Inc. works to provide their clients with a level of service and support that differentiates them from their competitors. A well managed company with solid financial reserves, Furino and Sons possesses the resources to complete extensive projects.


Have questions?


Our Web Design team is here to help. Call us at: 856-745-9990 or visit: https://southjerseytechies.net.


South Jersey Techies, LLC is a full Managed Web and IT Services Company located in Marlton, NJ providing IT Services, Managed IT Services, Website Design Services, Server Support, IT Consulting, VoIP Phones, Cloud Solutions Provider and much more. Contact Us Today.

New Website Design – West Bay Construction, Inc.

The Website Design team of South Jersey Techies has been constantly working on developing great looking websites using the latest web technologies. The most recent website developed by our team is for West Bay Construction, Inc. located in Linwood, New Jersey. West Bay Construction, Inc. is a general contractor headquartered in beautiful Southern New Jersey. They have been providing prompt and professional contracting services to state, federal and local authorities for over 20 years. They are qualified to perform work at the State level for the NJDOT, NJ Turnpike Authority and NJ Transit. Additionally, they also perform work for the local counties, as well as municipal levels including work for local Boards of Education.


Have questions?


Our Web Design team is here to help. Call us at: 856-745-9990 or visit: https://southjerseytechies.net.


South Jersey Techies, LLC is a full Managed Web and IT Services Company located in Marlton, NJ providing IT Services, Managed IT Services, Website Design Services, Server Support, IT Consulting, VoIP Phones, Cloud Solutions Provider and much more. Contact Us Today.

Emerging Threats: VPNFilter malware targets over 500,000 routers

FBI warns against VPNFilter malware that targets over 500,000 routers

If you have a home or office Internet router, the FBI has issued an urgent request for consumers to reboot now to help disrupt a massive foreign-based malware attack.

Foreign cybercriminals have compromised hundreds of thousands of home and office routers and other networked devices worldwide, the FBI said in a May 25 announcement.

How to help defend yourself from VPNFilter malware:

Turn your router off, then back on. This may temporarily disrupt
the malware and potentially help identify already-infected devices.

Secure the device with a strong, unique, new password.

Upgrade firmware to the latest available version.

Consider getting the Norton™Core Secure Wi-Fi Router designed to
help defend against a variety of possible cyber threats,
including the VPNFilter attack, and is also designed to automatically
update its knowledge of known viruses and other threats.

RingCentral Mobile Users Without A Digital Line

Ring Central allows your employees to communicate anywhere, anytime on any device. In the past, Ring Central has not been enforcing licenses for employees that are using the system on mobile devices without a digital line. That is about to change. 


RingCentral Mobile Users FAQ


Why are you now charging for Mobile Users without a digital line?
Mobile Users without a digital line can make and receive calls and have access to many of the same capabilities as users with digital lines. These include RingCentral Glip, RingCentral Meetings, integrations and more. With this advanced functionality, these users have begun using the product the same way they would a digital line.

Consequently, Mobile Users using the system without a digital line will now be considered part of the total licensed users and will be charged based on their account’s current cost per digital line.

Will I be charged for using the Mobile App?
No. Mobile Users with a digital line are not affected, and can continue to use the Mobile App for no additional charge. This change only affects Mobile Only Users without a digital line.

When does this take effect?
Please refer to the email notification for the timing of this change for your account.

What will be the cost?
The cost for each Mobile User without a digital line will be the same as users who have a digital line. If you want to add digital lines for your Mobile Users at no additional cost (excluding taxes and fees), please contact your RingCentral account manager.

What are the benefits to Mobile Users of adding a digital line?
By adding a digital line, the Mobile User will get full access to RingCentral’s softphone (inbound and outbound) and the ability to use a desk phone if needed. If you are interested, please contact your account manager by calling  800-591-7973.

How do I know which Mobile Users without a digital line will be billed at any given time?
System administrators can log into their RingCentral account and see this information under the billing tab. See more details here. If a mobile user without a digital line is inactive or is only used for internal company calls, within a given month, there will be no charge.


How to take control of your privacy in Windows 10

Where do you draw the line on personal privacy? The right options are different for everyone. This guide shows the privacy settings that will help you to create the right balance of privacy and convenience in Windows 10.

windows-10-privacy-blinds

Over the past year, We’ve read countless “privacy guides” for Windows 10. Most are well-intentioned, but they invariably take a simplistic approach to privacy: Just turn off every switch in the Privacy section of the Settings app.

If you do that, you’re not understanding the privacy landscape, which encompasses far more than just those settings. You’re also missing some important additional steps.

Windows 10 is a mix of software and services. With every session, a Windows 10 device exchanges a great deal of information with Microsoft’s servers. That’s neither unusual nor alarming. Microsoft’s chief rivals, Google and Apple, are also blending services into their software, with the goal of making your life easier and making that software more reliable.

So are other tech companies that you don’t think of as software companies: Amazon, with the Echo. Tesla, with its self-updating, software-driven cars. Your thermostat and your home security system.

There’s something profoundly satisfying about a service that anticipates your every move, reminding you when to leave for an appointment to arrive on time, or to pick up flowers for your anniversary tomorrow. Your digital personal assistant, whether it’s Siri or Cortana or Alexa or Google, needs to be able to see your calendar and contacts to make that magic happen.

But when that sort of personal attention goes too far, it “crosses the creepy line,” to use a phrase that Eric Schmidt probably regrets uttering when he was Google’s CEO.

The thing about that line is that it’s drawn in a different place for everyone. There are people who are thrilled at the idea that their PC or mobile device is so familiar with their actions that it can anticipate what they’ll do next. I know others who would like to build a virtual Faraday cage around their computing hardware so that none of their personal details can escape.

Both of those viewpoints, and everything in between, are perfectly valid. That’s why the software and services we use are loaded with switches and dials designed to help you take control of their potential privacy impact.

In this post, We’ll walk you through the big privacy questions for Windows 10, with enough context to help you decide which settings are right for you.

Note that this guide assumes you are using Windows 10 on a personal PC or one in your small business. If you are in an enterprise setting, or if you are in a regulated industry, you should seek professional assistance to ensure that you’re meeting proper standards.

Let’s start with the part of your PC that has the biggest impact on your personal privacy.

THE NETWORK

No one knows more about your online identity than your Internet service provider. Every packet you send or receive from anywhere online goes through their servers. When you travel and connect to Wi-Fi networks that are under the control of others, the owners of those networks can see every connection you make and can intercept their contents.

Regardless of the platform you use, that’s why it’s important you use encrypted connections for any kind of sensitive communications. Using a virtual private network whenever possible is an excellent best practice.

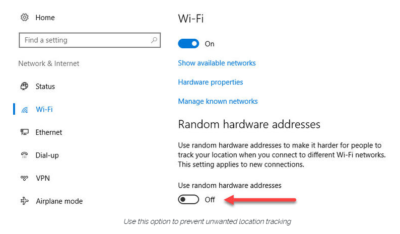
Windows 10 does offer one obscure option that can help protect third parties from tracking your movements based on your connections to Wi-Fi networks. (Note that this feature requires support from your Wi-Fi adapter, so if you don’t see this option, the most likely explanation is that your hardware doesn’t support it.) Under Settings > Network & Internet > Wi-Fi, turn the Use random hardware addresses setting to On.
windowsprivacy02

That step keeps third parties from matching your Wi-Fi adapter’s hardware address with your personal information, making it more difficult to track your location.

THE BROWSER

Countless third-party ad networks and analytics companies use cookies and other tracking technology to record your movements around the web and to correlate your online activities with your offline identity.

The result is a digital fingerprint that can be extraordinarily detailed and, unfortunately, outside of your ability to change.

To limit the amount of information that those ad and analytics companies know about you from your web browsing, consider third-party anti-tracking software such as Abine’s Blur, which is available for every web browser except Microsoft Edge. (That lack of solid support for add-ons is one reason I can’t yet recommend Edge as a full-time browser for most Windows 10 users.)

Another privacy product worth considering is Ghostery, although some are suspicious of this browser extension because of its uncomfortably close ties to the online advertising industry.

Ad-blocking software can also provide some privacy protection as a side-effect of performing its basic function. Here, too, watch out for close ties between some ad-blocking add-ins and the third-party trackers they supposedly protect you from.

Note that none of these steps is unique to Windows 10. Anti-tracking software is typically a browser add-in and works with most popular browsers.

THE OPERATING SYSTEM

With those two big, platform-independent factors out of the way, we can now turn to Windows 10 itself. When you use a Windows 10 device, it is capable of sharing the following types of information with Microsoft’s servers:

Your location

Windows 10 can determine your location to help with actions like automatically setting your current time zone. It can also record a location history on a per-device basis. Go to Settings > Privacy > Location to control the following:

  • Location on/off?Use the master switch at the top of this page to disable all location features for all users of the current device.
  • Location service on/off?If location is on for Windows, you can still turn it off for your user account here.
  • General location?This allows you to set a city, zip code, or region so that apps can deliver relevant content.
  • Default location?Click Set default to open the Maps app and specify the location you want Windows to use when a more precise location is not available.
  • Location history?Click Clear to erase the saved history for a Windows 10 device.

If location is on, a list at the bottom of the Settings > Privacy > Location page allows you to disable access to that data on a per-app basis.

Your input

If you enable Cortana, Windows 10 uploads some info from your devices, such as your calendar, contacts, and location and browsing history, so that Cortana can make personalized recommendations. If you don’t want any accounts on your PC to use Cortana, follow the steps in this article to disable the feature completely: Turn off Cortana completely.

Windows 10 uses some feedback from the way you type, write, and speak to improve performance for you and as a way to improve the overall platform. This isn’t keystroke logging; rather, the operating system uses a very small amount of information. A separate feature uses your speech and writing history to make better suggestions in Windows and Cortana.

You can control this collection with two sets of controls:

Under Settings > Privacy > General, click Info about how I write and turn it off so that your typos aren’t used to improve things like the built-in spell checker.

Under Settings > Privacy > Speech, inking, & typing, under the Getting to know you heading, click Stop getting to know me to turn off personalization.

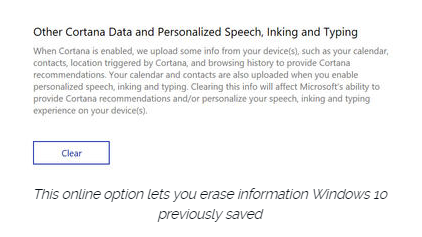
To clear previously saved information associated with your Microsoft account, click the first link under the Manage cloud info heading. That takes you to this Bing Personalization page, which includes this prominent button:
windows-privacy01

Click Clear to remove that saved information from the cloud.

Files and settings

When you sign in with a Microsoft account, you have the option to save files to the cloud using OneDrive. Windows 10 also syncs some settings to OneDrive, allowing you to have the same desktop background, saved passwords, and other personalized settings when you sign in with that account on multiple PCs.

If you use a local account, of course, none of your settings are synced. If you use a Microsoft account, you can turn off syncing completely or remove certain settings from the sync list by going to Settings > Accounts > Sync Your Settings.

OneDrive is an opt-in service. If you don’t sign in, it does nothing. You can’t save files to OneDrive accidentally, and no files are uploaded without your explicit permission, which you can revoke any time. To disable OneDrive for all users on your PC, follow these instructions: Shut down OneDrive completely.

Telemetry

Microsoft, like all modern software companies, uses feedback from its installed base to identify problems and improve performance. In Windows 10, this feedback mechanism produces diagnostics data (aka telemetry) that is uploaded to Microsoft at regular intervals. The data is anonymized and is not used to create a profile of you.

The default telemetry setting for all consumer and small business versions of Windows 10 is Full, which means that the uploaded data also includes details (also anonymized) about app usage. If you are concerned about possible inadvertent leakage of personal information, I recommend that you go to Settings > Privacy > Feedback & diagnostics and change the Diagnostic and usage data setting to Basic.

THE APPS

Although the number of subcategories under the Privacy heading in Settings seems daunting, most of them govern access to your information by Windows Store apps. That set of apps includes those that are preinstalled (Mail, Calendar, Groove Music, Photos, and so on) as well as those you acquire from the Store.

Most of the categories offer a single on-off switch at the top, which you can use to disable all access to that feature by all apps. If you leave the feature enabled, you can use a list of apps at the bottom of the page to enable or disable access on a per-app basis.

This capability works the same with the following categories: Camera, Microphone, Notifications, Account Info, Call History, and Radios. The Other Devices category lets apps automatically share and sync info with wireless devices that aren’t explicitly paired with your PC. Use the Background Apps category to specify which apps are allowed to work in the background.

If Location is enabled, you have the option to disable location access on a per-app basis and to disable Geofencing.

The Contacts, Calendar, Email, and Messaging categories allow you to control which apps can have access to these features. If you want to share content from an app using email or messaging, this option has to be on for that app. Note that Mail and Calendar, People, and Phone always have access to your contacts; Mail and Calendar are always allowed to access and send email and always have access to your calendar.

Finally, one horribly misunderstood setting is available under Settings > Privacy > General. Advertising ID controls whether Microsoft serves personalized ads to ad-supported apps. If you turn this option off, you still get ads, but they’re not personalized. In any case, your information is not shared with advertisers.

Have questions?

Get answers from Microsofts Cloud Solutions Partner!
Call us at: 856-745-9990 or visit: https://southjerseytechies.net/

South Jersey Techies, LL C is a full Managed Web and Technology Services Company providing IT Services, Website Design ServicesServer SupportNetwork ConsultingInternet PhonesCloud Solutions Provider and much more. Contact for More Information.

To read this article in its entirety click here.

Windows Tip of the week: How to Switch from Bing

Switch from Bing:
Microsoft would like you, and your personal assistant Cortana, to use Bing as your default search engine and not Google, etc. You can force Cortana to use a different search engine, but first you have to change your default web browser.

If Firefox is your default browser in Windows 10, Cortana should be using Google Search. If Chrome is your default browser, you have to install the Chrometana extension and change the default; otherwise, Cortana will be stubborn and keep using Bing.

Have questions?

For More Tips & Info from Microsofts Cloud Solutions Partner!
Call us at: 856-745-9990 or visit: https://southjerseytechies.net/

South Jersey Techies, LL C is a full Managed Web and Technology Services Company providing IT Services, Website Design ServicesServer SupportNetwork ConsultingInternet PhonesCloud Solutions Provider and much more. Contact for More Information.

Windows 10’s new features, how they work and how you can make them work for you.

The final version of Windows 10 won’t be available until 2015, but that doesn’t mean you can’t live the Windows 10 experience — the extremely pre-final experience — right now.

The technical preview is available right now and although things will likely change drastically between now and release, now’s a good chance to get acquainted.

And keep checking back. As the months close in on the new OS’s final release, expect all our How To coverage to be posted right here.

Windows 10 Technical Preview: 1

spartan

Build 10049 of the Windows 10 Pro Technical Preview just dropped, and with it comes Microsoft’s sexy, speedy new browser: Project Spartan.

The next-gen browser has several new features to try out, including a distraction-free reading view and a fast, secure rendering engine (which was available as an experimental feature in Build 9926). But the coolest new feature is inking — the ability to draw, write on, and generally mark up Web pages from directly within the browser. You can share your marked-up creations via email or through social networks, or you can save them to OneNote.

Start inking

When you see a Web page you want to “ink,” click the small icon that looks like a pen and paper in the upper right corner of the browser window. There are only about five icons total, so this shouldn’t be too difficult to find.

The Web page will refresh and the inking toolbar will appear over the regular toolbar. On the left side of the inking toolbar, you’ll see five icons: Pen, highlighter, eraser, text, and clip. The pen tool is selected by default, so you can just start scribbling away if you’d like (in medium thickness, light blue ink). If you want to change the color of your pen, click the pen icon to choose from 12 colors and three sizes.

To use a highlighter, which will let you highlight text and images instead of drawing over them, click the highlighter button. Click the highlighter button a second time to select your highlighter color and shape (six colors, three shapes).

Type some comments

Drop a connect pin

If you prefer typing to writing or drawing, you can use the text tool to make comments on the webpage. The text tool is a little different from the pen and highlighter tools: Instead of letting you put text wherever you want on the page, this tool lets you drop a comment pin and type text in a corresponding text box on the right side of the page. You can minimize the text box (the pin will remain visible) for less clutter.

When you select the text tool, your pointer will turn into a cross-hair. Click anywhere on the page to drop a comment pin. The pin will appear where you click, and a thin line will connect it to a corresponding text box on the right side of the page.

Click inside the text box to type your comment. To minimize the box, you can either click the minus sign in the upper right corner of the box, or you can click the corresponding comment pin. To delete both the comment pin and the text box, click the trash can icon in the lower right corner of the text box.

The clipping tool will also turn your cursor into a cross-hair, so you can clip out a section of the page. It works similar to the Snipping Tool — click the clipping tool icon, and the page will fade out until you select a section of it. Once you have a section selected, you’ll see a small copy icon in the lower right corner; click this to copy your clip (you can paste it into another program, such as Microsoft Paint, if you want to save it).

Don’t make any mistakes

As of right now, the eraser tool doesn’t do much. If you click on it, nothing happens. If you click on it again, a “Clear All” box appears, which you can click to clear the Web page of annotations.

I assume the eraser tool will be fixed before Project Spartan goes public, because right now there’s no way to fix an annotation mistake without clearing the entire page and starting over.

Share or save your masterpiece

On the right side of the inking toolbar, you’ll see a save icon and a share icon. To save your newly-annotated webpage, click the save icon.

Right now, Project Spartan will let you save your marked-up page as an HTML file – that is, you can add it to your Favorites or your reading list. In the future, you’ll also be able to save your projects in OneNote.

To share your work, click the share icon to open up Windows 10’s sharing sidebar. Because this is such a new build, Project Spartan’s sharing capabilities don’t appear to be turned on – but when they are, you’ll be able to share your creation with any app that supports Windows’ sharing sidebar.

Have questions?

Our small business team is here to help.
Call us at: 856-745-9990

South Jersey Techies, LLC is a full Managed Web and Technology Services Company providing IT Services, Website Design ServicesServer SupportNetwork ConsultingInternet PhonesCloud Solutions Provider and much more. Contact for More Information.

To read this article in its entirety click here.

Set Up Exchange E-Mail on an Android Mobile Phone

Set Up Exchange E-Mail on an Android Mobile PhoneWindows_Start_Button

You can set up e-mail using an Exchange account on an Android mobile phone. If you have a different phone, see Mobile Phone Setup Reference. If you are having trouble connecting your device after following these steps, see “What else to I need to know?” at the end of this Help topic.

How do I set up Exchange ActiveSync on an Android mobile phone?


  1. From the Applications menu, select Email. This application may be named Mail on some versions of Android.
  2. Type your full e-mail address, for example tony@contoso.com, and your password, and then select Next.
  3. Select Exchange account. This option may be named Exchange ActiveSync on some versions of Android.
  4. Enter the following account information and select Next.
    • Domain\Username   Type your full e-mail address in this box. If Domain and Username are separate text boxes in your version of Android, leave the Domain box empty and type your full e-mail address in the Username box.
      Note:
      On some versions of Android, you need to use the domain\username format. For example, if your e-mail address is tony@contoso.com, type contoso.com\tony@contoso.com. Your username is your full e-mail address.
    • Password   Use the password that you use to access your account.
    • Exchange Server   Use the address of your Exchange server. To find this address, see “Finding the Server Name” later in this topic.
  5. As soon as your phone verifies the server settings, the Account Options screen displays. The options available depend on the version of Android on your device. The options may include the following:
    • Email checking frequency   The default value is Automatic (push). When you select this option, e-mail messages will be sent to your phone as they arrive. We recommend only selecting this option if you have an unlimited data plan.
    • Amount to synchronize   This is the amount of mail you want to keep on your mobile phone. You can choose from several length options, including One day, Three days, and One week.
    • Notify me when email arrives   If you select this option, your mobile phone will notify you when you receive a new e-mail message.
    • Sync contacts from this account   If you select this option, your contacts will be synchronized between your phone and your account.
  6. Select Next and then type a name for this account and the name you want displayed when you send e-mail to others. Select Done to complete the e-mail setup and start using your account.
    Tip:
    You may need to wait ten-to-fifteen minutes after you set up your account before you can send or receive e-mail.

Finding the Server Name


If your email program isn’t able to automatically find your Exchange ActiveSync server name, you may need to look it up.

  1. Sign in to your e-mail account using Outlook Web App.
  2. If you’re connecting to an Exchange mailbox, your Exchange ActiveSync server name is contained in the address bar in your browser when you are signed in to Outlook Web App, but without the leadinghttps:// and without the trailing /owa. For example, if the address you use to access Outlook Web App is https://mail.contoso.com/owa, your Exchange ActiveSync server name is mail.contoso.com.
  3. If you’re unable to connect to your mailbox using the information earlier in this section, you can try using the server name value that you can view in Outlook Web App options. Do the following:
    1. In Outlook Web App, click Options > See All Options > Account > My Account > Settings for POP, IMAP, and SMTP access.
      Note:
      Although you’re not setting up a POP3 account, you will use this value to determine your Exchange ActiveSync server name.
    2. Under POP setting, view the value for Server name.
    3. Try setting up your email using the server name listed on your options page. For example if the value for Server name under POP setting is mail.contoso.com, try using mail.contoso.com as your Exchange server name.

What else do I need to know?

  • If your e-mail account is the type that requires registration, you must register it the first time you sign in to Outlook Web App. Connecting to your e-mail account through a mobile phone will fail if you haven’t registered your account through Outlook Web App. After you sign in to your account, sign out. Then try to connect using your mobile phone. For more information about how to sign in to your account using Outlook Web App, see How to Sign In to Outlook Web App. If you have trouble signing in, see FAQs: Sign-in and Password Issues or contact the person who manages your e-mail account.