Pro tip: Sort table data in a Word document

sort word

Microsoft Word


Sorting data in a Word document isn’t something you routinely do. On the other hand, presenting list and table data is, so the potential exists that one day you’ll want to sort something. The good news is that it’s easy to sort data in a table or a list. In this article, I’ll show you how to do just that. We’ll work through a few simple sorting examples. You can use most any table, or you can download the example .docx or .doc file.

Behind the scenes

Word relies on paragraphs when sorting, which seems a bit odd within the context of a table (or list). The paragraph formatting mark determines where one paragraph ends and the next starts. As you can see in Figure A, there’s no paragraph mark in a table. The end-of-cell markers denote the end of each cell’s content. The similar marker at the end of each row (outside the right border) is an end-of-row marker. These markers also contain cell and row formatting. When sorting a table, Word relies on the end-of-row marker to identify where one row ends and the next begins, the same way the paragraph mark does. (To see a document’s formatting symbols, click Show/Hide in the Paragraph group on the Home tab.)

Figure A

Table end-of-row markers are similar to paragraph markers.

Sort by the first column

We’ll start with the simplest sort possible; we’ll sort a table by the values in the first column. To do so, select, the table by clicking its move handle (the small square in the top-left corner). If you don’t see this handle, check the view. It’s available only in Print Layout and Web Layout. With the entire table selected, do the following:

  1. Click the contextual Layout tab. In the Data group, click Sort — or click Sort in the Paragraph group on the Home tab. In Word 2003, choose Sort from the Table menu.
  2. The resulting dialog does a good job of anticipating the sort. Notice that the Header Row option (at the bottom) is selected. As a result, the Sort By field is set to Species — the label in the first column’s header (Figure B).
    Figure B

  3. This is exactly what we want, so click OK. Figure C shows the sorted table.
    Figure C

Before we move on, let’s discuss the Type and Using options to the right. We didn’t need to change either, but sometimes you will. The Type options are Text, Number, and Date. Word usually defaults to the appropriate data type. You can force a specific type by choosing a different option other than the one Word assumes (but you’ll rarely have reason to do so). The Using options defaults to Paragraph — we talked about that earlier.

Sort by the second column

That first exercise was easy. Let’s complicate things a bit by sorting by the second column. Fortunately, it’s just as easy as the first. Repeat steps 1 and 2 from the first exercise. Then, do the following:

  1. In the resulting dialog, click the Sort By drop-down.
  2. Choose Common Name, the header label for the second column.
  3. Click OK. Figure D shows the results of sorting by the second column.
    Figure D

That wasn’t any more difficult that the first sort. Tell Word which column contains the values you want to sort by and click OK — that’s it!

Sort by multiple columns

With only two sort tasks under your belt, you’re beginning to see how simple the sorting process in Word can be. Let’s complicate things a bit so you can see how flexible this feature truly is. Let’s sort by the Class column and then sort the bird and mammal groups in a secondary sort. Repeat steps 1 and 2 from the first two exercises. Then, do the following:

  1. To sort by the Class, choose Class from the Sort By drop-down.
  2. To further sort each class group, click Common Name from the Then by drop-down (Figure E). You could add a third column to the sort if the results warranted the additional grouping.
    Figure E

  3. Click OK to see the results shown in Figure F.
    Figure F

What about lists?

You might be wondering how to sort the same data in list form. Word handles the list sort the same way — the exact same way. Highlight the list and click Sort in the Paragraph group on the Home tab. In the resulting dialog, check the header option and set appropriately (if necessary). Then, determine the sort order by choosing the fields (columns), appropriately.Figure G shows the result of sorting the same data in list form.

Figure G

Sort a columnar list the same way you sort a table.


10 places to recycle your cell phone

EcoAtm

Here are 10 places to take your phones so they can be refurbished, reused, or recycled and diverted from the landfill.

1. EcoATM

EcoATM is an automated kiosk that collects your unwanted cell phones and tablets and gives you cash for them. It’s made by the same people that make CoinStar, so you’ll find them by the checkout lines at various grocery store chains. It accepts devices from any era or in any condition, and offers anywhere between a few bucks to a few hundred dollars in return. EcoATM partners with R2 certified e-waste reclamation facilities to ensure they are recycled, or gives the phones a second life.

2. Eco-Cell

Eco-Cell is a Louisville, Kentucky-based e-waste recycling company. It partners with nonprofits and organizations such as the Jane Goodall Institute. Bins are located in coffee shops and other businesses around the country, where the collected phones are shipped to Eco-Cell in Louisville. If the phones are reusable, they resell them and pass some of the money back to the owner. If they are not reusable, the phones are recycled and the owner is paid the money for the value of the recycled materials.

3. Best Buy

Best Buy has recycling kiosks in their stores in the US, as well as recycling in-store for no charge to you. They typically limit it to three items per family, per day. From there, they work with recycling companies to make sure the phones and other electronics don’t end up in landfills.

4. Hope Phones

The Hope Phones campaign was started in 2009 by Medic Mobile, which works to advance health care in 16 countries by using mobile technology. Individuals, nonprofits, groups, or businesses can host a Hope Phones campaign to donate old phones. They are recycled and valued so the nonprofit can get new technology for the field. Most old models are valued at $5, but newer smartphones are regularly valued at $80, according to the website.

5. Cell Phones for Soldiers

Cell Phones for Soldiers is a nonprofit that works to provide cost-free communication services to active-duty military and veterans. New or gently used mobile phones are accepted and each device valued at $5 turns into 2.5 hours of free talk time for the soldiers.

6. Gazelle

Gazelle is one of the most popular trade-in options for old cell phones. The company is headquartered in Boston, with locations in Louisville, Kentucky and in Texas. Pick your brand, model, carrier, and plug in what kind of shape it’s in, then get an offer. Ship it for free, and receive a check or gift card to Amazon.com or PayPal after they check it out and make sure it’s worth what you say it is.

7. Call2Recycle

Call2Recyle  is a no-cost recycling program for batteries and cell phones in the US and Canada. It has collection boxes that can be placed anywhere, which have shipping permits so mailing them is easy. They also have bulk shipping if there is a large amount of recyclables.

8. Your carrier

AT&T has a trade-in program for unwanted phones and accessories regardless of manufacturer or carrier. The owner gets a “promotion card” which can then be used to take money off a new phone or other purchase. Make sure you erase all your information before you turn them in, though.

Verizon also offers a trade-in program where the owner can receive an electronic gift card once they send in the phone and have it appraised.

9. Local places

Your city undoubtedly has places to recycle old phones. Most local government websites, like New York’s, have directions of where to go to recycle phones. A lot of cities usually have nonprofits that donate old phones as well. The EPA also has an option to find out what electronics you can recycle with mail-in options.

10. Recycling for Charities

This nonprofit features one charity at a time, for which they donate money from recycling old phones. All makes and models are welcome at Recycling for Charities, and the phone condition is not an issue. They make an attempt to refurbish it first, then find recycling centers to ensure the materials won’t go into landfills if the phones cannot be reused.

These 10 services are well-researched and well-known options, but make sure to research on your own where your phone is going to make sure it is going to a certified e-waste recycler, so it doesn’t end up in a landfill despite your efforts.


Tips for Outlook Calendar

Takeaway:  Tips to change defaults for Outlook Calendar.

outlook-logo-vector2

Work Week View:

Default “Work Week” is Monday through Friday, 8AM to 5PM.

  1. Select File tab.
  2. Click Options button.
  3. On the left side of the window, click Calendar button (3rd down).WorkWeekView
  4. Under Work Time Section, enter your Start and End time.
  5. Check the days of your Work Week.
  6. Select the First Day of week.
  7. Select the First week of year.
  8. Click OK.

WorkWeekView2

Reminder Alerts:

ReminderAlertsAfter creating or accepting an appointment, a “Default Reminder” is automatically set to 15 minutes.  

  1. Select File tab.
  2. Click Options button.
  3. On the left side of the window, click Calendar button (3rd down).
  4.  Under Calendar Options Section, select your reminder times.
  5. Click OK.

Calendar Time Slots:

CalendarTimeSlotsTime slots for Calendar Appointments are defaulted to 30 minutes.

  1. Select Calendar View.
  2. Right-Click on Timeline.
  3. Select the interval you prefer.
  4. Outlook will automatically update.
    • 5 minutes:  Most space for details.
    • 60 minutes:  Least space for details


Microsoft Word Formatting Tips

Takeaway:  Save time formatting documents in Microsoft Word by using quick tools and tips.

Copy & Paste Methods:

When copying to Microsoft Word, the original formatting is automatically inserted with text and pictures.

1. Copy the content to the Clipboard: [CTRL]+[C] or Highlight content, right click on highlighted content, and select “Copy”.
2. Paste the content into a Word document: [CTRL]+[V] or Home Tab, Paste and then select from the three options (see picture below)

–  Keep Source Formatting (K) – Original Formatting
–  Merge Formatting (M) – New content changed to format already in use
–  Keep Text Only (T) – Generic Format and will only Paste text, no pictures
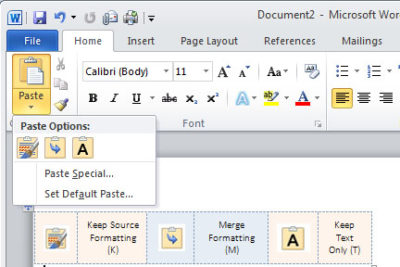
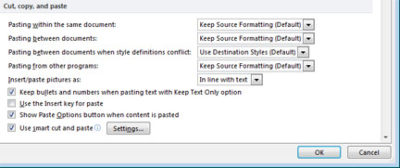
Paste_Blog041013

Changing the default, as follows might be more efficient:

  1. Click the File tab, Help button, Options button and select the Advanced button.
  2. In the Cut, Copy, and Paste section, choose the appropriate option. (Example, you might want to keep formatting when copying from other Word documents but not from any other source)
  3. Click OK.

CCP_Blog041013

In Word 2003, select Tool menu, Options button and Edit Tab, uncheck the “Smart Cut And Paste” option or click the Settings button to customize your settings.

Section Breaks:

Separating a document with Section Breaks allows you to format each “section” differently.  Also, you can copy a previous Section Break

–  Next Page – Insert a section break and start the new section on the next page
–  Continuous – Insert a section break and start the new section on the same page.
–  Even Page – Insert a section break and start the new section on the next even-numbered page.
–  Odd Page – Insert a section break and start the new section on the next odd-numbered page.

SB_Blog041013

 In Word 2003, you can insert a Section Break from the Insert Menu.

Keeping Words Together:

Whether the word is hyphenated or simply two words you do not want to split up , a proper noun or a date, you can keep them together!

–  Hyphenated Words:  When typing the hyphen between use [CTRL]+[SHIFT]+[-]
–  Non-hyphenated Words:  When typing the space between use [CTRL]+[SHIFT]+[SPACEBAR]

Editing Number/Bullet Styles:

When formatting a list (bullets or numbers) you can simply edit the format of one or multiple bullets or numbers.

1. Select the Home tab, click Show/Hide in the Paragraph section.
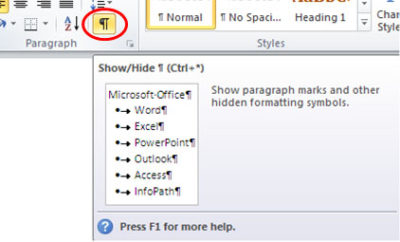
SH_Blog041013

2. Highlight the Paragraph mark(s) at the end of each line you would like to re-format.  For more than one number or bullet, hold [CTRL] while highlighting.
3. Apply format using Style section.

Removing Formats:

You can highlight the entire document or only sections to remove formatting.  If you are trying to remove formatting from a few different sections, hold [CTRL] while selecting the sections.

–  Remove all formatting:  [CTRL]+[SPACEBAR]
–  Remove Paragraph formatting:  [CTRL]+[Q]

Automatically Updating Styles:

When adding a format to text, Word will let you update a style, this can be difficult.

1.  Select the Home tab.
2.  Open the Styles Dialog.
3.  Find the Style from the drop-down list.
4.  Select Modify button.
5.  Uncheck Automatically Update.

Default Line Spacing:
LS_Blog041013

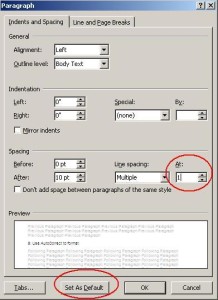
The default line spacing in Word 2007 and 2010 is set for 1.15, commonly used for Web publishing.  You can set your default to 0 or 1 using a few steps.

1.  Select the Home tab.

2.  Right-click Normal in Styles section and select Modify.

3.  Choose Paragraph from the Format list.

4.  In the Spacing section, change the At: setting from 1.15 to 1, Click OK.

5.  You now have the option to set this as your default template for all new documents by selecting “Set As Default” button.

6.  Click OK.


Paragraph Spacing:
PS_Blog041013


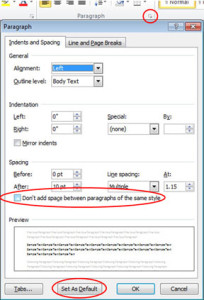
Newest versions of Microsoft Word have increased the spacing between paragraphs.  If you do not want extra space between paragraphs, you can modify it using a few steps.

1.  Select the Home tab.

2.  Open Paragraph Dialog.

3.  Check “Don’t Add Space Between Paragraphs Of the Same Style Option”.

4.  You now have the option to set this as your default template for all new documents by selecting “Set As Default” button

5.  Click OK.


Save Formatted text as AutoCorrect:
AC_Blog041013

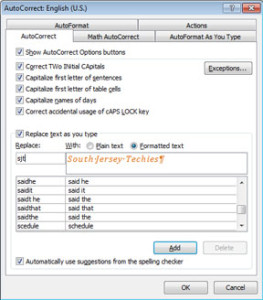
Using AutoCorrect saves time and prevents mistakes.  It can also save the text previously formatted.

1.  Highlight the content you would like to save in AutoCorrect that is pre-formatted.
2.  Open the File tab.
3.  Choose Options and then select Proofing button.
4.  Click AutoCorrect Options button.
5.  Uncheck Automatically Update.
6.  Select the option you would like to use:
–  Plain text (not formatted)
–  Formatted text (keep the format you have already applied)
7.  Enter short key in the Replace control.  (Example:  We use sjt for South Jersey Techies)
8.  Click Add button.
9.  Click OK, twice.


Find and Replace to Edit Format:

Microsoft Word’s Find and Replace tools can be used for more than replacing characters or multiple words, you can also change the format of text.

1.  Copy the text or word you would like to format.
2.  Press [CTRL]+[H] to open tool.
3.  Select More button.
3.  Paste the text or word you previously copied into Find What control.
4.  If the text you paste into Find What is formatted, select the Format button and adjust accordingly.
5.  Paste the same text into Replace With control.
6.  Select the Format button and change to the new format or remove the current Format by leaving the Format Option blank.
7.  You can either, Replace (first instance of the text or word you selected) or you can Replace All (replaces all text or words that are identical).

“Sticky Borders”:

A Sticky Border is when you type three hyphens and press enter directly below text.  This border attaches the the paragraph format or to the bottom of a page.  To easily remove this border follow these steps:

1.  Select the Home tab.
2.  Click inside the paragraph.
3.  In the Paragraph section, choose “No Border” (usually seen with editing tables).


Protection for WiFi

Takeaway:  Five simple ways to protect your information when using WiFi and Hotspots.LOCK2

WiFi is exchanging data through a wireless local area network (WLAN) from electronic devices including smartphones, laptops and tablets.

Also, WiFi is available in public places such as Airports and Restaurants.  Identity Thieves, Hackers and Criminals take advantage of WiFi because it is convenient for users to access personal information.

1.  Avoid accessing your bank accounts & online stores:

When using public WiFi, it is best to avoid using your credit card or banking information.

2.  Double check the WiFi name:

Prior to connecting to a public network double check with an employee for their network name.  Identity thieves can create a false Hot-Spot, have users connect and then steal personal information.

3.  Turn-Off “Auto Connect”:

Stay in control of what networks you connect to, smartphones have a setting that automatically connects you to the closest open network.  Simply, turn this setting off to decide what networks to connect to.

4.  Never use the same Password:

An additional step you can take to keep online accounts safe is to use different passwords for each account.   Using the same password makes stealing your information easier for criminals.

5.  Check the Lock:

The extra layer of security is the locked padlock in the address bar of your browser or “https” which means that your information has been encrypted.

Ten Top Microsoft Office Tips

The ten most popular Microsoft Office tips

Takeaway:  Susan Harkins lists ten most popular Office tips published in the Windows and Office Blog, and the now inactive Office Blog.MS_Office_2007_Logo.svg

When considering tips to share, think about ease-of-use and efficiency. A few naturally rise to the top as your favorites. For your commemoration, here are 10 of 2012’s most popular posts from both the Office Blog, which was deactivated in mid-2012, and the current Windows and Office Blog. Thank you for reading, and thank you for sharing your thoughts and enhancements with one another throughout the year.

1: A quick Word trick for typing text into a scanned document

The response to this limited technique surprised me. It’s something only a few will use, but if you’re one of those few, it can be a big help! I was pleasantly surprised at the positive response it received and the way readers enhanced the technique.

2: Use Word macros to save your place in a document

These two short macros make quick work of bookmarking work areas in a Word document. When the built-in navigation techniques just don’t get the job done for you, consider these macros or one of the alternative methods that readers shared.

3: A quick and dirty way to compare columns of Excel data

This quick Go To comparison solution is great for a one-time task. Comparing Excel data is a common task, and I receive frequent questions for solutions. This solution is a great one to add to your bag of tricks.

4: Demystify Excel’s PivotTable feature with this simple method

Sometimes a great tip doesn’t offer a specific solution, but rather guides you to using a feature more efficiently and effectively. Users tend to ignore Excel’s pivot table feature because they don’t really understand it – hence this blog post offers some quick insight into how to use this feature without mind-bending tricks.

5: Create a dynamic Excel chart and make your own dashboard

This blog post is one of my favorites. I enjoyed sharing the technique, but more than that, I loved the way the readers jumped in to help one another with a step I accidentally omitted in the instructions. TechRepublic readers rock!

6: A quick Excel keyboard trick for selecting large ranges

This technique uses Go To ([F5]) in an unusual way – to anchor two cells, creating a range. The ensuing conversation shared a number of great selection tips!

7: Three tips for rounding Excel time values

Using the right function can help you round up your rounding woes. Excel offers three rounding functions and knowing them all will round out your skills nicely. (Okay, I promise to stop that.)

8: Three things you must do when you inherit an Excel workbook

I review a lot of workbooks, so this blog was one of my favorites to write. In my experience, performing these three quick tasks when inheriting a workbook can speed up your troubleshooting time. Fortunately, it sparked some insightful conversation into what others do.

9: Launch Word with the most recently used document

Reader response sometimes surprises me, as it did for this easy technique. I hadn’t expected so many great alternatives from the readers.

10: Run a list of rolling credits at the end of your PowerPoint presentation

I’m glad a PowerPoint technique made the top list, but it wasn’t because the readers loved my technique. Mostly, the conversation centered on the typo I missed, and then my lack of proper contrition for said typo. It was fun while it lasted.

Five Word tips that could change your life

Takeaway: Searching for ways to increase your Word productivity may get in the way of your productivity. So here are a few tricks you don’t need to go looking for. Efficient, simple to use, easy to remember.

Most of us don’t have time to discover all the ins and outs of the software we use on a daily basis. We learn on the fly, we occasionally pick up a tip or shortcut, and we grudgingly plow through the Help system when we absolutely have to.

But sometimes, just a few little tricks can make a big difference. Turning off an annoying feature, learning a keyboard trick that bypasses three dialog boxes, or taking advantage of an obscure option can save you a few headaches and a lot of time. Will they really change your life? Well that might be a stretch. But they could. Try these tips on for size and let me know.

1: Make vertical text selections

Usually, we select text horizontally — a word, a series of words, a paragraph — from left to right or vice versa. But sometimes the selection has to be vertical. For instance, suppose you wanted to delete the leading characters in Figure A.

Figure A

To make a vertical selection, hold down [Alt] as you drag down through the text you want to highlight. Figure B shows the column of unwanted characters selected using this technique. Hit [Delete] and bam, they’re gone.

Figure B


Although we selected text at the beginning of the lines in this example, you can make vertical selections anywhere on the page.

Note: Some users have reported that the Research pane appears when they try this selection technique. Here’s the secret: Release the [Alt] key before you let up on the mouse button. Word should retain the selection. If you hold down [Alt] but release the mouse button, Word may think “[Alt]-click” and open the Research pane in response.

2: Undo automatic changes you don’t want

By default, Word imposes lots of changes on the text you enter in a document. For example, it might convert a Web address to a hyperlink, replace straight apostrophes and quotation marks with their curly counterparts, or turn a pair of hyphens into an em dash. If that’s a welcome convenience, you’re in good shape. If you want to suppress those types of changes, you can disable them. See 10 annoying Word features (and how to turn them off) for details. But if you want to prevent those changes only from time to time, reach for the Undo command — [Ctrl]Z. Undo isn’t just for reversing something you’ve done; it also undoes some of the actions Word takes. Don’t want that em dash? When Word inserts it, hit [Ctrl]Z and change it back to the hyphens you intended to enter.

3: Get rid of a persistent border

This forehead-smacking solution earned considerable gratitude from stymied TechRepublic readers when Susan Harkins first provided it. Word offers a sometimes-handy option that lets you insert a border automatically. Type three hyphens on a blank line and press [Enter]. If the option is enabled, Word will replace the hyphens with a horizontal line. You can get rid of it if you press [Ctrl]Z after Word inserts it (see above). But if you try to select the border and delete it, you’re out of luck. You’re not dealing with a line object here. Word has applied the Bottom Border format to the paragraph.

To remove that format in Word 2003, click in the paragraph and choose No Border from the Borders drop-down list on the Formatting menu. In Word 2007/2010, click in the paragraph and then click the Border button in the Paragraph group of the Home tab. Just select No Border from the drop-down list (Figure C).

Figure C

If you like the automatic border feature, here’s a bonus tip: In addition to typing three hyphens to apply a bottom border (3/4-point), you can trigger different border styles. Typing:

  • Three tilde characters (~) will create a wavy line.
  • Three underscore characters (_) will create a 1.5-point line.
  • Three asterisks (*) will create a dotted line.
  • Three equal signs (=) will create a double line.
  • Three pound signs (#) will produce a “thin thick thin” line.

4: Move selected text up or down

This tip is probably most useful when you’re working in a table, although you can use it to reorder paragraphs outside a table, too. Let’s say you decide you want the third row of a table to be the top row. Just click within the third row, hold down [Alt][Shift] and press the up arrow key twice. Each time you press the arrow key, Word will move the row up one. You can select multiple contiguous rows to move them as a block, and you can use the down arrow key if you want to move text down instead of up.

Using this shortcut gets a little tricky if you’re moving big pieces of text outside a table. It’s easy to lose track of what’s being relocated where, and you might find it easier to take a standard cut-and-paste approach in those situations. But when the text is small and manageable, the shortcut is great. For example, if you need to move an item up or down within a bulleted or numbered list, you can just click in the item’s paragraph and use the [Alt][Shift] and arrow key combo to move the item to the desired spot.

5: Save changes to all open Word documents at one time

This simple technique comes in handy when you’re working in multiple documents and want to make sure you’ve saved your changes to all of them. I actually use it most often when I’ve made a change to a template and want a quick way to save that change on the fly (before I’ve had a chance to forget I made a change I want to keep).

In Word 2003 and earlier, just press the [Shift] key and pull down the File menu. Word will display the Save All command on the menu, above the Save As command. Choose Save All and Word will prompt you to save each document (or template) that has any unsaved changes. This is more efficient than having to navigate to each document individually and click Save.

If you use Word 2007/2010, this won’t work. But you can add the Save All command to your Quick Access Toolbar:

  1. Click the Office button (File in 2010) and click Word Options (Options in 2010).
  2. Click Customize in the left-hand column (Quick Access Toolbar in 2010).
  3. Select Commands Not In The Ribbon from the Choose Commands From drop-down list.
  4. Scroll down and select Save All.
  5. Click the Add button and then click OK.

Detecting and Preventing Computer Overheating

Many people don’t think about the hidden danger of heat to their computers, or how easy computer overheating is to prevent.

A lot of people don’t think about the effects of heat on their personal computer or laptop. The effects of overheating may be subtle, such as causing the computer to run slower or shortening the expected lifespan of the components; or it can be so devastating as to cause a fire. The most common side effect of overheating is having programs freeze or the computer shutting down sporadically.

How Computers Handle Heat
Computer heat is most efficiently handled by fans. The main fan is usually in the back and blows out. In addition there’s usually a heat sink — cooled by another fan or by a coolant system — over the CPU to prevent the processor from overheating. Some computers have additional fans to encourage airflow and help cool off high-heat components, but this varies from computer to computer.

The power supply can cause overheating if it is not properly installed in the case; if the vents aren’t positioned correctly the hot air can end up in the wrong place. The amount of free space inside the computer also matters; if all the hot components are close together, or if the placements of cords/components is impeding airflow, it can cause more heat problems.

What Can Cause Computer Overheating

There are several things that can cause a computer to overheat.

•Dust inside the computer and around the fans acts as an insulator, causing overheating.
•Running the computer in a hot environment also causes overheating.
•Running a lot of unnecessary programs can aid overheating.
•If the fans are obstructed by walls or drapes it can impede airflow.
•If the computer is being overclocked it can cause the components to overheat.
•Leaving the computer on for extended periods of time can cause overheating.
•Having the computer next to a hot device (a hot vent, other machinery, etc) can heat the computer.

How to Prevent Computer Overheating
By looking at the causes of overheating it’s often easy to diagnose and fix the problem that causes it. It’s important to resist the temptation to leave the computer open while running; the typical computer case is designed to conduct airflow, and leaving the computer open may make the overheating worse.
Simple Ways to Increase the Life of Any Computer’s Parts

The easiest way to prevent the computer from overheating is to clean it out. Most retail stores carry compressed air in their computer aisles, and it’s the easiest way to clean dust out of a dirty computer. A vacuum cleaner can also be used to suck the dust out of fans and ports along the outside of the computer. For more in-depth cleaning instructions, Lifehacker offers a step-by-step guide to computer cleaning: Geek to Live: Evacuate PC Dust Bunnies

Keeping the computer off the floor can help keep excess dust and dirt from mucking up the inside of the computer and fans. Also, putting additional fans in the computer can help improve ventilation. Many cases have specific spots for installing these extra fans; make sure that they blow the hot air out.
Don’t keep the computer too close to the wall, or near anything that keeps the hot air around the case rather than dissipating. It’s also helpful to make sure that the computer is free of debris — keeping stuff on top of the computer can insulate the computer as well.

When Nothing Else Works
When nothing else seems to be fixing the problem it may be hardware related: a broken fan or heat sink can cause major heating issues. If there’s a warranty in effect, contacting the manufacturer about any heat problems may be the easiest solution.

An overheated computer can cause any multitude of trouble. Knowing what can cause the overheating is most of the battle, and even the most novice computer user can get inside to clean the parts and check for broken fans.