Change and customize Windows 7’s Logon screen wallpaper

In this edition of the Windows Vista and Windows 7 Report, we show you how to change Windows 7’s Logon screen wallpaper.
While experimenting with several Microsoft Windows 7 systems recently, we spent a lot of time staring at the Logon screen. During that time, we began to think about changing the Logon screen wallpaper. Now, we have changed the Logon screen wallpaper in just about every version of Windows we’ve used, so we know that there had to be a way to do so.

When we began to investigate the procedure in Windows 7, we discovered that changing the Logon screen wallpaper in the newest version of the Windows operating system is easy, once you know the steps — and you don’t even need any third-party software to do it.

In order to make it easy for OEMs to customize Windows 7, Microsoft built the ability to change the Logon screen wallpaper right in to the operating system. In this edition of the Windows Vista and Windows 7 Report, we’ll show you how to change Windows 7’s Logon screen wallpaper.

A Registry tweak

The process begins with a very minor Registry tweak. Even for those who would not normally feel comfortable editing the Registry, this one’s a piece of cake. To begin, click the Start button and type Regedit in the Search box. Then, select the appropriate result and press [Enter]. When you do, you’ll see the User Account Control, shown in Figure A, and will need to click the Yes button.Note: Editing the Windows Registry file is not without its risks, so be sure you have a verified backup before making any changes.

Figure A
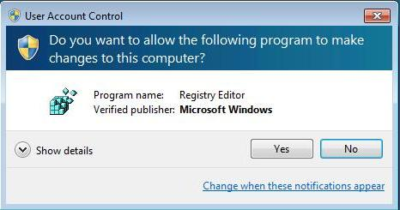
You will encounter a UAC when you launch the Registry Editor.

Once the Registry Editor launches, locate and right-click on HKEY_LOCAL_MACHINE key and select the Find command. When you see the Find dialog box, type OEMBackground in the text box and make sure that only the Values check box is selected, as shown in Figure B.

Figure B
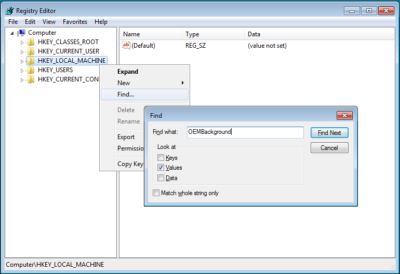
Type OEMBackground in the Find dialog box.

When the HKEY_LOCAL_MACHINE\SOFTWARE\Microsoft\Windows\CurrentVersion\Authentication\LogonUI\Background key opens, locate and double-click the OEMBackground value. When you see the Edit DWORD dialog box, change the value data from 0 to 1, as shown in Figure C. (If the OEMBackground value doesn’t exist in the Background key, you’ll need to pull down the Edit menu from that key and select New | DWORD (32-bit) Value).

Figure C
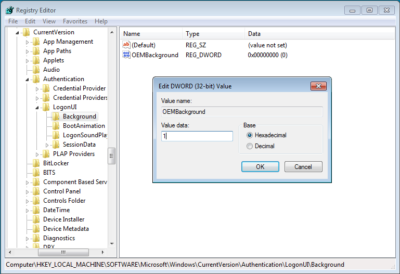
Change the value data from 0 to 1.

To complete this part of the operation, click OK to close the Edit DWORD dialog box and then close the Registry Editor.

Creating folders

In the second part of the operation, you’ll need to create a couple of folders. To begin, launch Windows Explorer. Then navigate to the C:\Windows\System32\Oobe folder. Once you access the Oobe folder, click the New Folder button in the Windows Explorer toolbar. You’ll see a confirmation dialog box, like the one shown in Figure D. When you click Continue, the new folder will be created and you can name it info.

Figure D
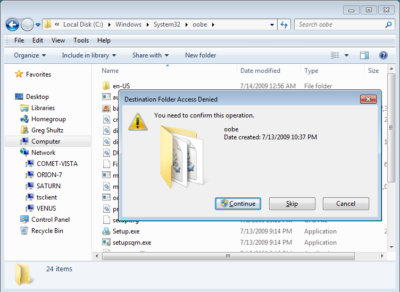
When you click the New Folder button, you’ll encounter a confirmation dialog box.

Then, open the info folder, click the New Folder button again, work through the confirmation dialog box, and then name the second new folder backgrounds.

Configuring the wallpaper

You can use any image that you want for your new Logon screen wallpaper. However, the image has to be in JPG format and you need to name it backgroundDefault.jpg. When you copy your file to the Windows\System32\Oobe\info\backgrounds folder, you’ll encounter and will need to work through a confirmation dialog box similar to the one shown in Figure D.

Two other things to keep in mind: First, the actual file size of backgroundDefault.jpg cannot exceed 256 KB. Second, you’ll want to use an image whose dimensions match the screen resolution that you are using. If you use a file whose dimensions are smaller, the image will be stretched and may appear distorted.

Altering shadows

As you know, the button and the text used to identify your user account on the Logon screen have shadows behind them to give them a 3D-like look, and these shadows work well with the default Logon screen wallpaper. Depending on what image you use for your new Logon screen wallpaper, these shadows might not work so well.

In addition to making it easy to change the Logon screen wallpaper, Microsoft also made it easy to adjust or disable the text and button shadows to accommodate your particular image.

To alter the shadows, launch the Registry Editor again as described above and access the

HKEY_LOCAL_MACHINE\SOFTWARE\Microsoft\Windows\CurrentVersion\Authentication\LogonUI folder

Once you open the LogonUI folder, you’ll create a new DWORD value called ButtonSet, as shown in Figure E. You can then configure the shadow by setting the value data to one of the following numbers:

  • 0 — Light shadow
  • 1 — Dark shadow
  • 2 — No shadow

Figure E

The ButtonSet value allows you to adjust or disable the text and button shadows.

Have questions?

Get answers from Microsofts Cloud Solutions Partner!
Call us at: 856-745-9990 or visit: https://southjerseytechies.net/

South Jersey Techies, LL C is a full Managed Web and Technology Services Company providing IT Services, Website Design ServicesServer SupportNetwork ConsultingInternet PhonesCloud Solutions Provider and much more. Contact for More Information.

To read this article in its entirety click here.

Modifying the Windows 7 boot loader with the Boot Configuration Data Editor tool

In Windows Vista and later versions of Windows, the bootloader was moved from boot.ini to a utility called BCDEdit. Here’s how to modify the boot config data with the new tool.

Sometimes dual-booting a system is a handy way to test new software, a new operating system, or an application that needs to be run in a specific version of Windows. Other reasons to dual-boot might include replication of a client environment.

Read More

Trump administration to move all federal IT into the cloud: Is it realistic?

US president Donald Trump recently signed an executive order on cyber-security that mandated federal systems move to the cloud. But, questions remain on the feasibility of that goal.

On Thursday, US President Donald Trump signed his long-awaited executive order on cyber-security, laying out his plans for addressing security in federal IT and across US infrastructure. The most ambitious mandate was that all federal IT systems move to the cloud.

Read More

Microsoft’s new Surface Laptops unveiled

Microsoft’s most direct shot at the MacBook yet

The one Surface product that fans have been clamoring over for years, a straight up Surface Laptop, is finally here. But, in taking design cues from both the Surface Pro and Surface Book lines, Microsoft has set lofty expectations for its first dedicated laptop device.

Priced at $999 (about £770, AU$1,330), the Surface Laptop clearly aims to chip at the MacBook and MacBook Air models that dominate college campuses practically worldwide. In fact, Microsoft claims that its cheaper (and larger) Surface Laptop can last far longer on a charge than Apple’s 12-inch MacBook: 14.5 hours.

Read More

Old Windows PCs can stop WannaCry ransomware with new Microsoft patch

In a rare step, Microsoft published a patch for Windows XP, Windows Server 2003 and Windows 8

Users of old Windows systems can now download a patch to protect them from this week’s massive ransomware attack.

In a rare step, Microsoft published a patch for Windows XP, Windows Server 2003 and Windows 8 — all of them operating systems for which it no longer provides mainstream support.

Users can download and find more information about the patches in Microsoft’s blog post about Friday’s attack from the WannaCry ransomware.

The ransomware, which has spread globally, has been infecting computers by exploiting a Windows vulnerability involving the Server Message Block protocol, a file-sharing feature.

Computers infected with WannaCry will have their data encrypted, and display a ransom note demanding $300 or $600 in bitcoin to free the files.

Fortunately, Windows 10 customers were not targeted in Friday’s attack. In March, Microsoft patched the vulnerability that the ransomware exploits — but only for newer Windows systems. That’s left older Windows machines, or those users who failed to patch newer machines, vulnerable to Friday’s attack.

Researchers originally believed the ransomware was spread through attachments in email phishing campaigns. That no longer appears to be the case.

Infection attempts from the WannaCry ransomware.

Once a vulnerable PC becomes infected, the computer will attempt to spread to other machines over the local network as well as over the internet. The ransomware will specifically scan for unpatched machines that have the Server Message Block vulnerability exposed.

Businesses can prevent this by disabling the Server Message Block protocol in vulnerable PCs. They can also use a firewall to block unrecognized internet traffic from accessing the networking ports the Server Message Block uses.

Fortunately, Friday’s ransomware attack may have been contained. A security researcher who goes by the name MalwareTech has activated a sort of kill-switch in WannaCry that stops it from spreading.

As a result, over 100,000 new infections were prevented, according to U.K.’s National Cyber Security Centre. But experts also warn that WannaCry’s developers may be working on other versions that won’t be easy to disable.

“It’s very important everyone understands that all they (the hackers) need to do is change some code and start again. Patch your systems now!” MalwareTech tweeted.

Unfortunately, the kill-switch’s activation will provide no relief to existing victims. The ransomware will persist on systems already infected.

Friday’s ransomware attack appears to have spread mainly in Europe and Asia, with Russia among those nations hardest hit, according to security researchers.

Security experts are advising victims to wait before paying the ransom. It’s possible that researchers will develop a free solution that can remove the infection.

Have questions?

Get answers from Microsofts Cloud Solutions Partner!
Call us at: 856-745-9990 or visit: https://southjerseytechies.net/

South Jersey Techies, LL C is a full Managed Web and Technology Services Company providing IT Services, Website Design ServicesServer SupportNetwork ConsultingInternet PhonesCloud Solutions Provider and much more. Contact for More Information.

To read this article in its entirety click here.

Quick Tips: Flush the ARP cache in Windows 7

Here’s how to clear the Address Resolution Protocol cache and how to manage that cache with a few command switches.

The Address Resolution Protocol (ARP) cache is a crucial component of IP networking on any operating system. What ARP does is link Ethernet addressing (IP addressing) to hardware addressing (MAC addressing). Without this system, a machine could not communicate to the outside world as one addressing scheme could not communicate with the other.

The ARP Cache is a collection of ARP entries (mostly dynamic) that are created when a hostname is resolved to an IP address and then an IP address is resolved to a MAC address (so the computer can effectively communicate with the IP address).

When this happens, the PC will store that newly mapped address in the ARP cache, and it will stay there until the ARP cache entry timeout expires. This isn’t usually a problem, but sometimes a bad ARP entry can cause issues with Internet connections and Web page loading. When this occurs, one step that can be taken toward resolution is to clear the ARP cache. Yes, this means the ARP cache has to be rebuilt, which means a little more work for the PC, but that cache will rebuild fairly quickly.

Clearing the ARP cache is done completely through the command line, so stretch out those fingers and get ready to type. After we show you how to clear the ARP cache, we will show you how to manage that cache with a few command switches.

Flush the cache

Step 1: Open the command prompt

Click Start and then type “cmd” (no quotes) in the search dialog box, but don’t hit Enter yet. Right-click the cmd.exe icon and select Run as Administrator (Figure A). After answering the UAC, the terminal window will open offering up the command prompt.

Figure A

If the icon is already pinned in the Start menu, entering cmd is not necessary.

Step 2: Run the commands

The first command to run is

arp -a

This command will display all your ARP entries (Figure B). Naturally the -a option is not the only option available. The arp command also allows for the following switches:

-d Delete an IP address (arp -d 192.168.100.10)
-d -a Delete all entries in the ARP table
-s Add an entry to the ARP table (arp -s ADDRESS MAC_ADDRESS – Where ADDRESS is the address to be added and MAC_ADDRESS is the MAC address of the machine)

Figure B

Here you see the arp cache for two different interfaces on a single machine.

To flush the entire cache, issue the following command:

netsh interface ip delete arpcache

The above command will flush the entire ARP cache on your system. Now as soon as network connections are made, the ARP cache will begin to repopulate.

Verify the flush

Once you have flushed the ARP cache, make sure to issue the command arp -a to see if the cache has, in fact, been flushed. If it does not flush, it could be the system is a victim of a Windows bug caused when Routing and Remote Services is enabled. This is a simple bug to fix:

1.           Click Start | Control Panel.

2.           Click Administrative Tools.

3.           Click Computer Management.

4.           Double-click Services and Applications.

5.           Double-click Services.

6.           Scroll down to Routing and Remote Services.

7.           Double-click Routing and Remote Services.

8.           Set the Startup Type to Disable.

9.           Make sure the service is stopped.

Now try flushing the ARP cache again. It should work this time.

Troubleshooting

It is also possible to troubleshoot network connections using the ARP cache. For example, it is important to look out for invalid ARP entries that go to a MAC address of 00-00-00-00-00-00. If one such entry shows up, make sure to delete it from the cache using the -d switch. Say you have an ARP entry that looks like:

224.0.0.24           00-00-00-00-00-00 static

In order to delete this entry, use the arp command like so:

arp -d 224.0.0.24

And that invalid entry will be gone.

Final thoughts

There are so many ways to troubleshoot networking connections. Flushing the ARP cache is just one of those methods that is rarely thought of, but when all else fails this might be the last-gasp effort that makes you the hero of the day.

Have questions?

Get answers from Microsofts Cloud Solutions Partner!
Call us at: 856-745-9990 or visit: https://southjerseytechies.net/

South Jersey Techies, LL C is a full Managed Web and Technology Services Company providing IT Services, Website Design ServicesServer SupportNetwork ConsultingInternet PhonesCloud Solutions Provider and much more. Contact for More Information.

To read this article in its entirety click here.